Amazon Seller Guide 2025
This amazon seller guide will walk you through everything you need to know to start and grow a successful Amazon business in 2025.
Overview
- Why Sell on Amazon?
- Getting Started
- How to Set Up Your Amazon Seller Account
- What is the difference between FBA vs. FBM?
- Amazon Selling Fees Explained
- How to Select the Right Product to Sell on Amazon
- How to Prepare for Peak Season on Amazon
- How to Optimize Your Amazon Listings
- Understanding Amazon’s Key Performance Metrics
- Mastering Amazon PPC Advertising
- Shipping and Logistics: Avoiding Common Mistakes
Why Sell on Amazon?
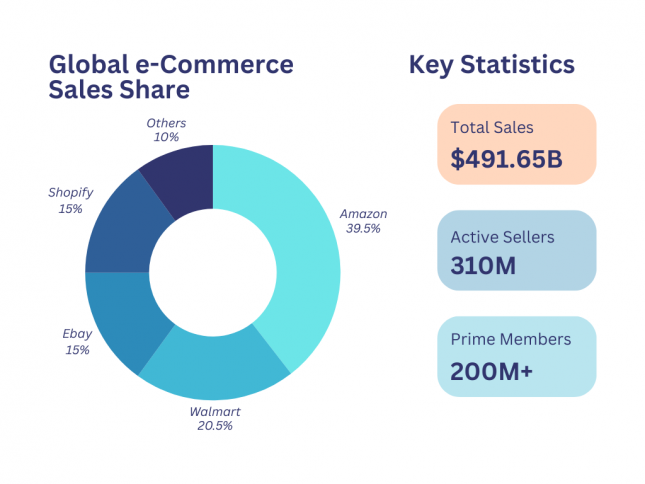
Thinking about diversifying your income, starting a new hobby, or stepping into entrepreneurship? Amazon Marketplace is the perfect launchpad. Dominating 39.5% of global e-commerce sales and generating a staggering $491.65 billion in revenue in 2024 (eMarketer, 2024), Amazon outpaces competitors like Walmart (20.5%) and Shopify (15%). With over 9.7 million active sellers and a massive 200+ million Prime members worldwide (JungleScout Amazon Seller Report, 2025), the opportunities are endless. Whether you’re new to selling or looking for expert tips to level up, this guide has everything you need to succeed.
🎧Listen to this podcast to discover Sheryl’s journey and learn how to automate your business for 7-figure success!
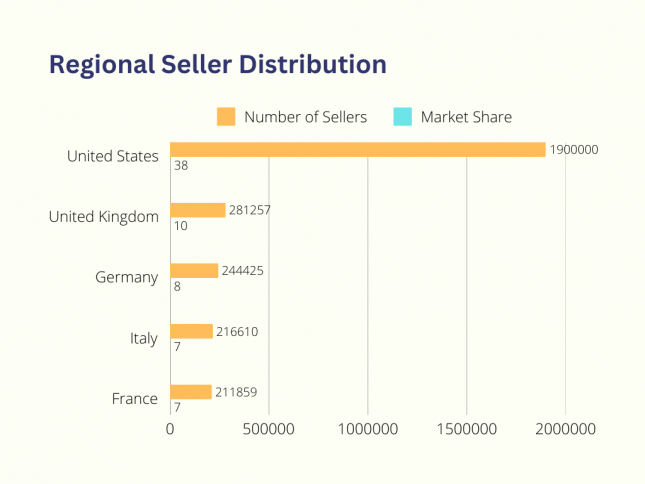
With over 310 million customers worldwide, 80% based in the US, Amazon is a top e-commerce platform that’s easy to access. It has a vast, ready-to-buy audience with over 200 million Prime members who are willing to spend more. The regional seller distribution shows that the United States has 1.9 million sellers, accounting for 37.82% of the market share. The United Kingdom follows with 281,000 sellers, making up 9.54% of the market share. Germany has 244,000 sellers with an 8.30% market share, Italy has 217,000 sellers with a 7.36% market share, and France has 212,000 sellers with a 7.19% market share. (Helium10, 2025)
Regional Seller Distribution of Amazon Sellers across US, UK, Germany, Italy, and France.
What makes Amazon particularly attractive for new sellers is its robust infrastructure and built-in trust. When customers shop on Amazon, they shop with confidence, knowing they’re protected by Amazon’s customer-friendly policies and reliable delivery systems. This trust translates directly into higher conversion rates for sellers compared to standalone e-commerce websites.
📖Read this blog post on “Why Sell on Amazon” for tips on leveraging Amazon’s infrastructure.
As a seller, if you subscribe to fulfillment by Amazon (FBA), Amazon takes the hassle of storage, shipping, and customer service off your hands, leaving you in charge of marketing and selection of your product. This means you can focus on growing your business without getting bogged down by operational logistics. Amazon provides all the tools you need from managing inventory, optimizing listings, and growing your business.
🎧Check out this podcast on Fulfillment by Amazon (FBA)’s Selection Programme and how it can benefit your business.
The platform’s sophisticated algorithm and search features also make it easier for customers to find your products. With tools like Amazon’s A9 search algorithm, your products can gain visibility based on performance metrics rather than just advertising spend. This levels the playing field for new sellers who might not have large marketing budgets.
🎥Watch this tutorial on Finding The Best Amazon Keywords For Your Listings using BQool’s Keyword Research tool.
Also, Amazon’s mobile app presence means your products are accessible to customers 24/7, with over 150 million mobile users accessing the platform monthly. This mobile-first approach, combined with Amazon’s continuous investment in technology and customer experience, ensures that sellers can reach customers wherever they are, whenever they’re ready to buy.
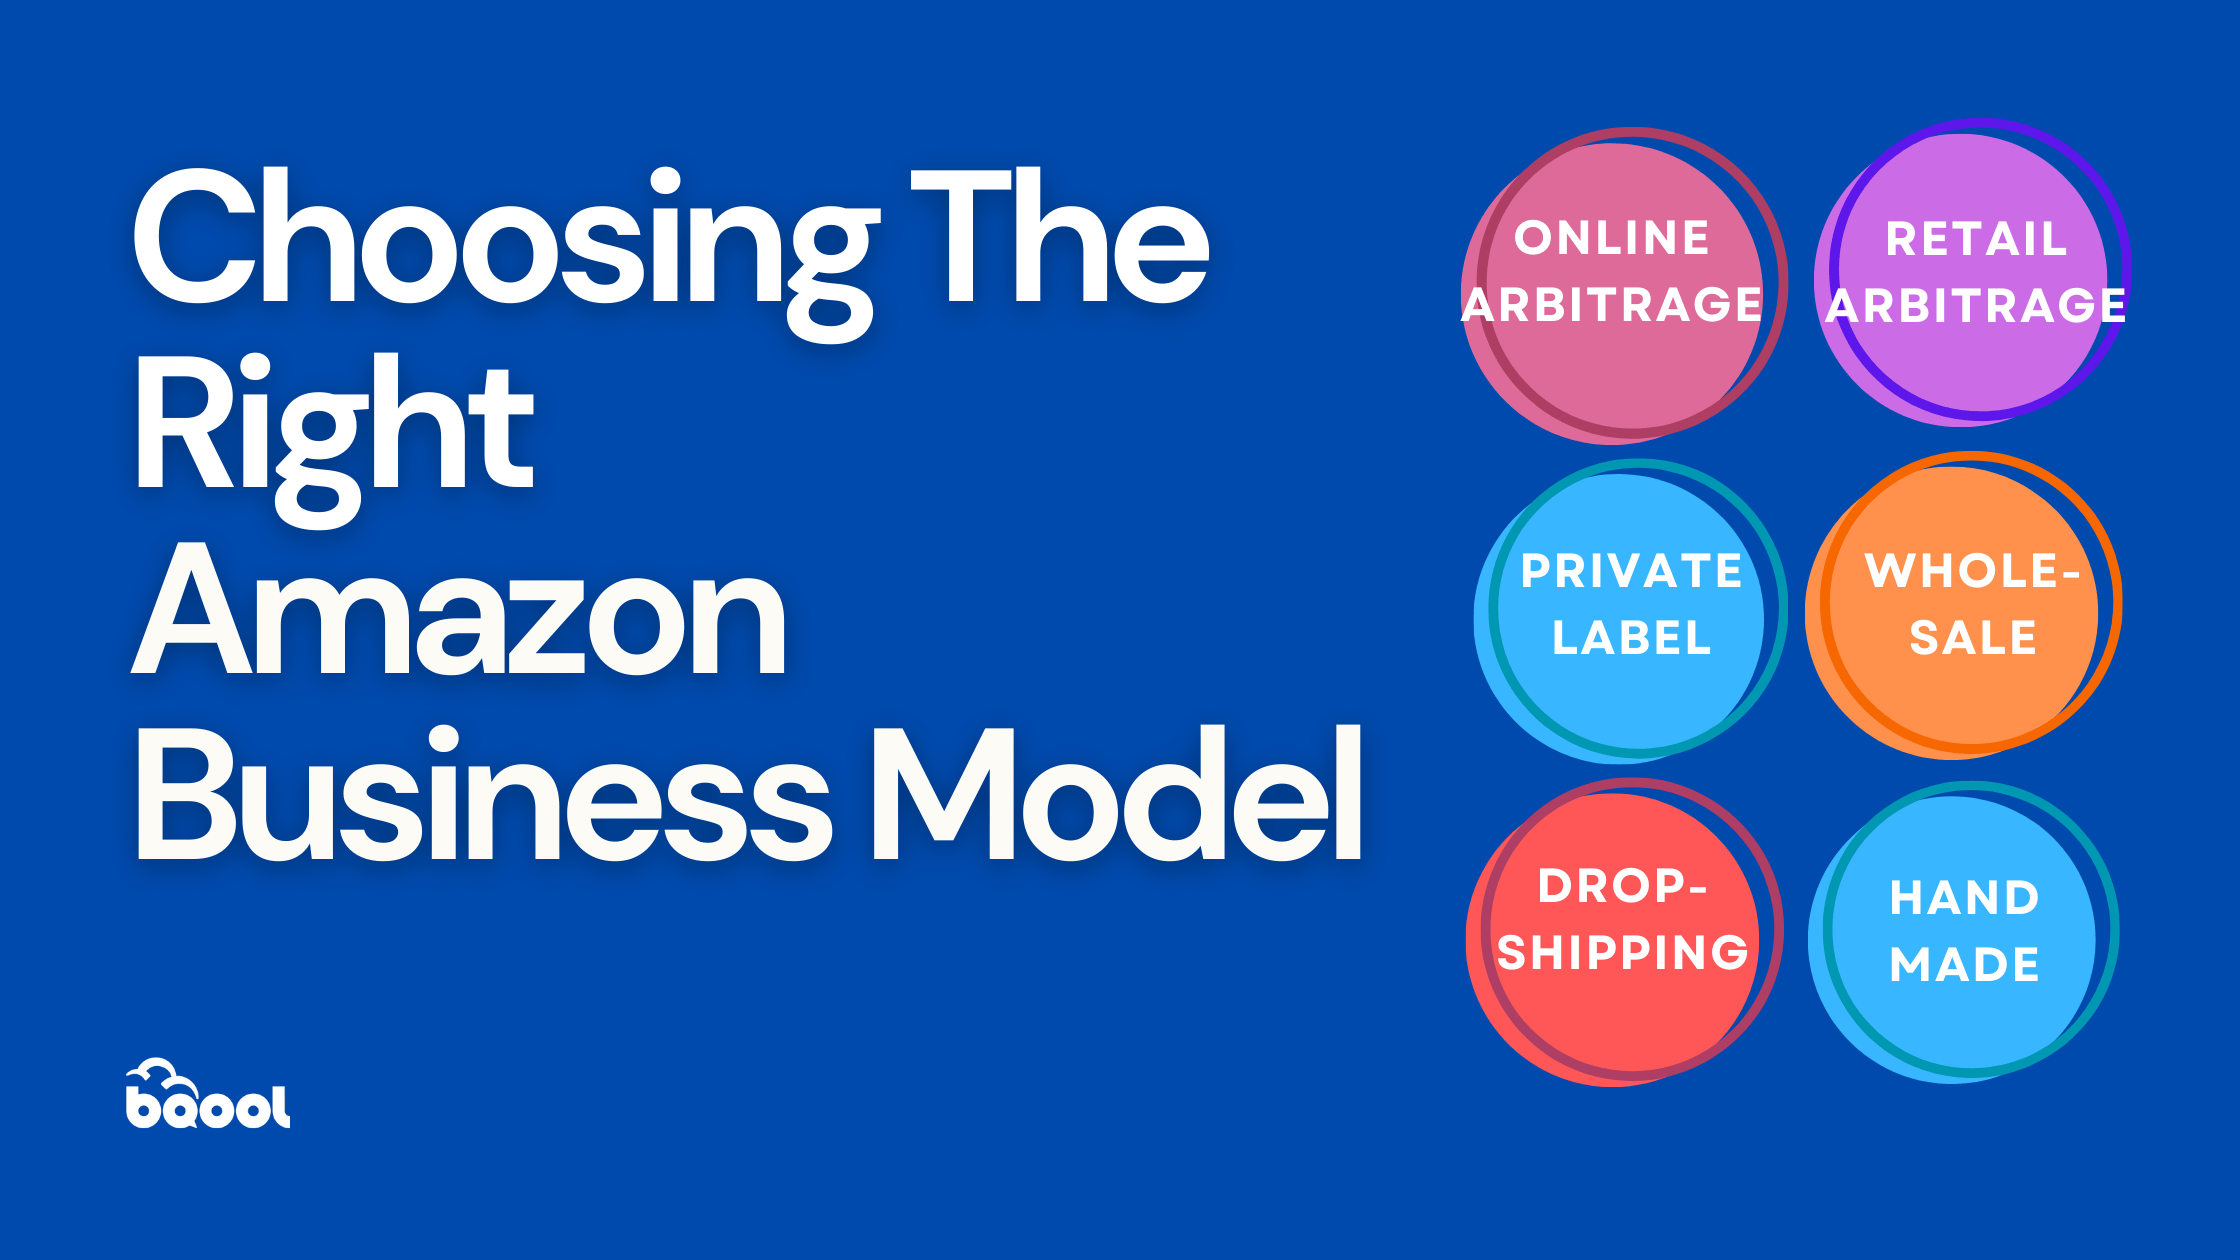
How to Choose the Right Amazon Business Model from Online Arbitrage, Retail Arbitrage, Private Label, Wholesale, Drop-shipping, and Handmade.
Choosing the Right Amazon Business Model
When starting an e-commerce business, you must first pick out a business model that works for you. Below are a few factors to consider when choosing your ideal business model:
- Accessibility: How easy or difficult it is to start using this business model.
- Profitability: How quickly and easily this business model can generate profit.
- Viability: The chances of maintaining long-term success while handling risks.
- Competitiveness: The level of competition you’ll encounter in the market.
Below we introduce the most popular Amazon businesses, namely: Private label, wholesale, retail arbitrage, online arbitrage, drop shipping, and handmade.
The Six Types of Amazon Business Models
Let’s explore each business model in detail, examining not just what they are, but how they work and who they’re best suited for.
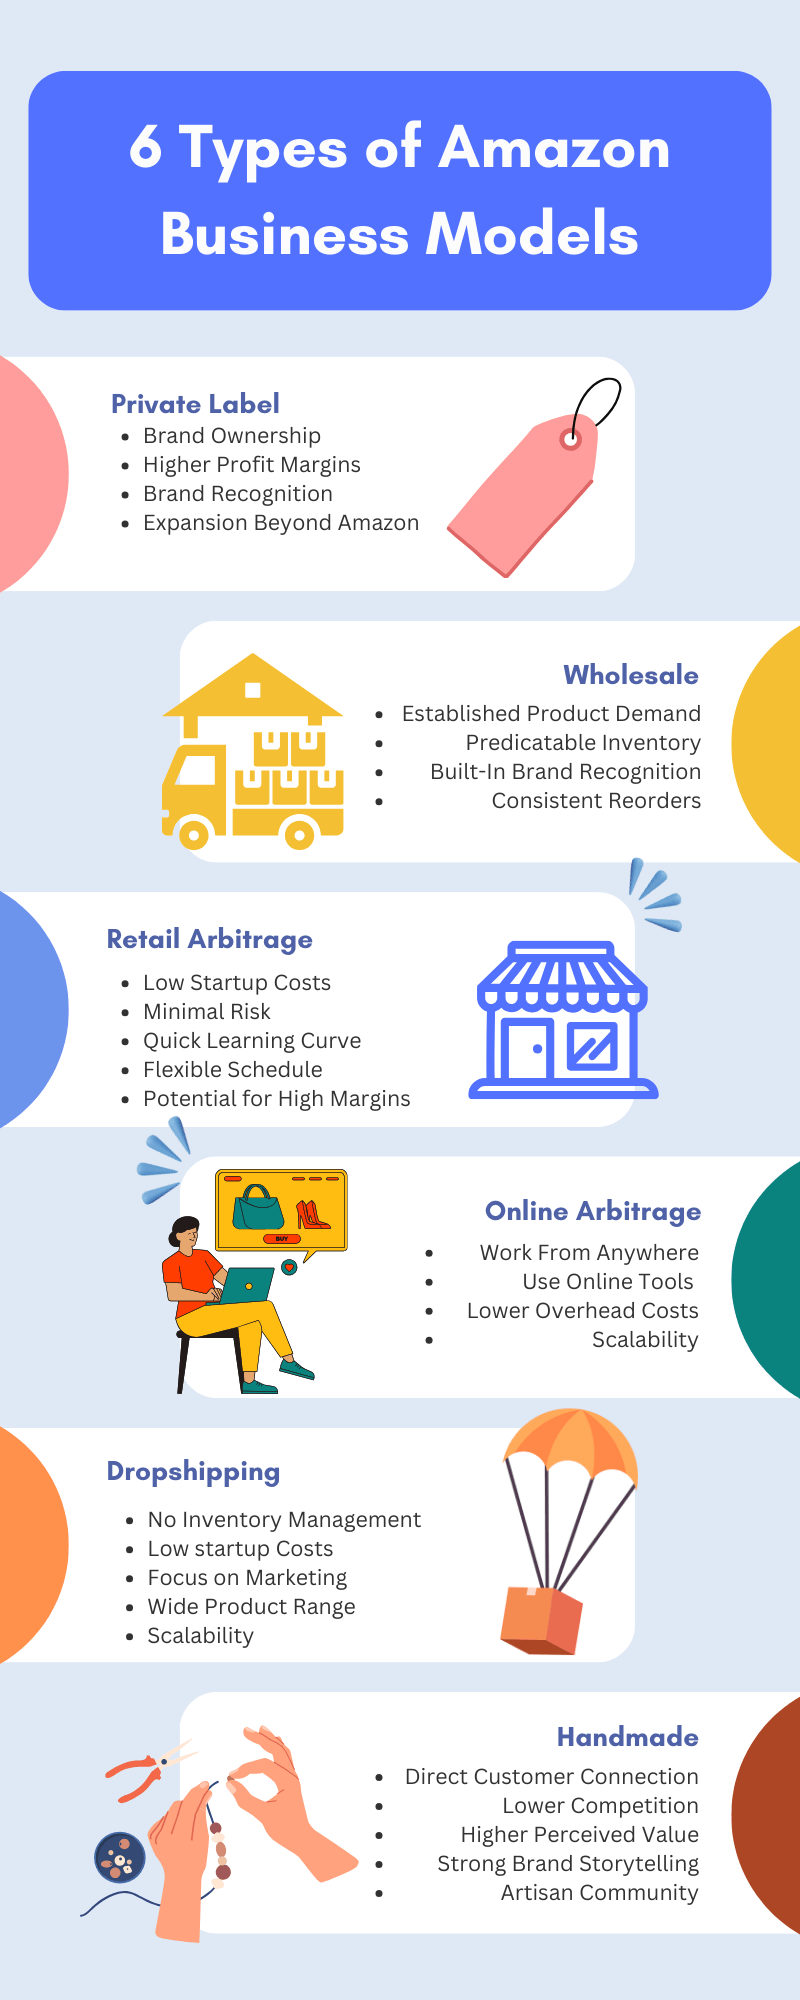
Amazon Private Label
Private label selling involves sourcing unbranded products from manufacturers and rebranding them under your own label. Essentially, you create your own brand identity and apply it to products that are often already being made by manufacturers. Think of it as creating your own restaurant rather than franchising an existing one—you have complete control over your menu (products), pricing, and brand identity.
A few benefits of owning a private label business on Amazon include:
- Brand ownership gives you control over pricing and product development
- Higher profit margins (typically 25-40%)
- Potential for brand recognition and customer loyalty
- Opportunity to expand beyond Amazon
📖 Read this blog on the 9 Causes for Private Label Seller Failure on Amazon
Amazon Wholesale
In wholesale, you purchase products in bulk from distributors or manufacturers at a discounted price, then resell them on Amazon at a markup. Unlike retail or online arbitrage, where you’re hunting for deals on individual products, wholesale selling focuses on buying from established suppliers with large catalogs and offering those products to a massive audience on Amazon. The key is to buy in large quantities, which helps secure better pricing and increases profit margins.
Key aspects of wholesale success:
- Established product demand reduces marketing needs
- Predictable inventory management
- Built-in brand recognition
- Opportunity for consistent reorders
🎥 Watch this video for tips and tricks on Amazon Wholesale & Private Label
Retail Arbitrage
Retail Arbitrage refers to reselling goods that you find at bargain prices from retail stores, then selling them at a higher price point on Amazon to make profits. Amazon sellers prefer this business model due to its ease of access, simplicity, and fast process. You don’t need any investments, and only purchase items that are readily available!
As a retail arbitrage seller you may find yourself going through the steps below:
- Morning: Check clearance sales at local stores
- Afternoon: Scan items using Amazon Seller App to check profitability
- Evening: List new finds and process shipments
🎥 Watch this video and find out How Alex made $380K a year with Retail Arbitrage in less than a year.
Online Arbitrage
Online arbitrage is similar to retail arbitrage but happens entirely online. You scour e-commerce websites like Walmart.com or Target.com for discounted items, purchase them, and resell on Amazon at a markup.
A few common tools that you would use to assist you as an Amazon online arbitrage seller include:
- Price comparison software
- Deal finding extensions
- Virtual assistants for sourcing
- Automated repricing tools
🎥Watch this video to discover John’s journey with Online Arbitrage as he shares the pros and cons and answers our questions about his experience.
Amazon Dropshipping
In this business model, sellers set up their storefronts, decide on pricing, branding, and marketing—all without ever touching the products. As a seller, you act as the middleman between the supplier and the customer. When someone places an order, you collect the payment, pay the supplier, and they handle the fulfillment.
Understanding the drop-ship workflow:
- A customer places order on your Amazon listing
- You forward order to supplier
- Supplier ships directly to customer
- You pocket the difference between your selling price and supplier cost
📖 Read this blog for a Basic Guide to Dropshipping on Amazon
🎥Watch this video on Tips for Retail Arbitrage, Online Arbitrage and Dropshipping on Amazon
Amazon Handmade
Amazon Handmade is a curated community for artisans, similar to Etsy but with Amazon’s massive customer base. This model is perfect for creators who want to scale their craft business.
What sets Handmade apart:
- Direct connection with customers
- Lower competition due to entry barriers
- Higher perceived value for unique items
- Strong brand storytelling opportunities
📖 Interested in Amazon handmade? Read this blog on Exploring the Handmade Amazon Program: Is it Worth Your Time (or your Money)
How do I choose the right Amazon business model?
Choosing the right Amazon business model is a critical decision that depends on your financial readiness, time availability, market conditions, and risk tolerance. The infographic below breaks down the process into three key steps: self-assessment to evaluate your resources and commitment, market analysis to understand competition and trends, and risk assessment to weigh potential challenges.
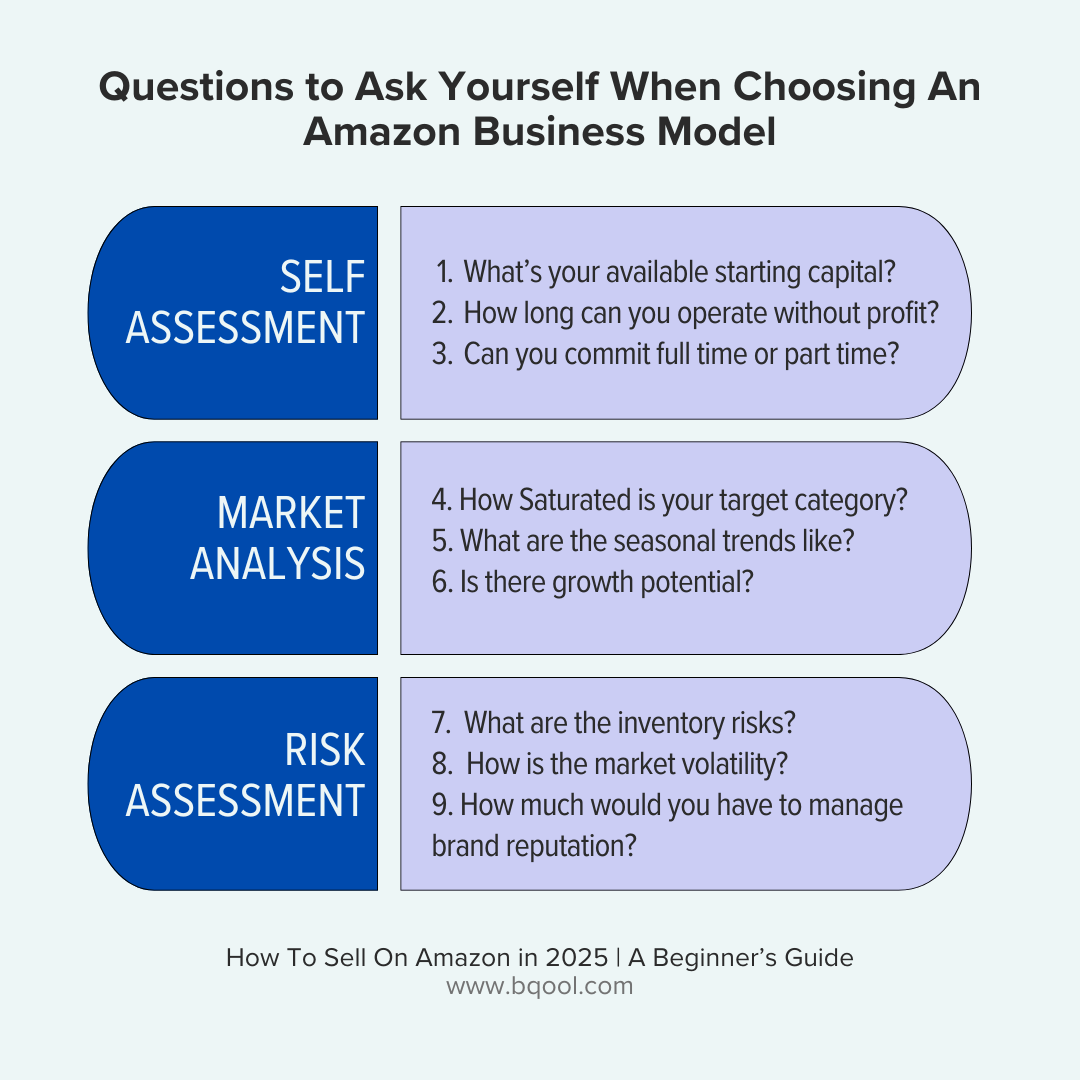
Questions to ask yourself when selecting an Amazon Business Model include: Self Assessment Questions, Market Analysis Questions, and Risk Assessment Questions.
Now that you understand the basics of Amazon’s business models and its policies, it’s time to explore the practical steps to get started. In this section, you’ll find step-by-step guides for each business model- Private Label, Wholesale, Retail Arbitrage, Online Arbitrage, Dropshipping, and Handmade. From finding suppliers to listing products that stand out, these practical tips will help you hit the ground running and set your Amazon journey up for success.
How to Sell Private Label on Amazon
Creating a private label business on Amazon involves sourcing unbranded products and rebranding them under your label. This model allows you to control your product design, branding, and pricing strategy, offering significant opportunities for growth. Below we define the steps on how to get started selling Private Label on Amazon.
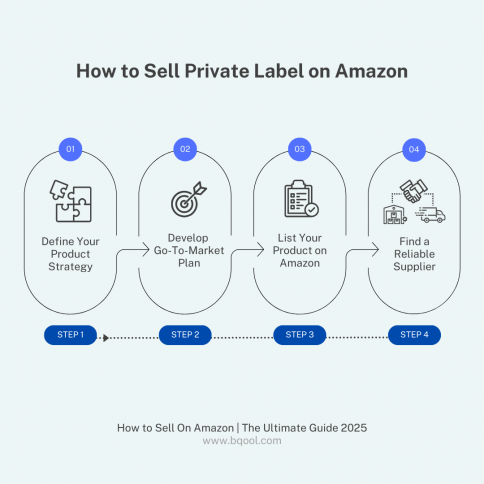
4 Steps to Selling Private Label on Amazon include, defining your product strategy, developing go-to-market plans, listing products on amazon and finding a reliable supplier.
STEP 1: Define Your Product Strategy
Start by identifying a niche where you can offer something unique. Consider customer pain points, market trends, and gaps in existing offerings. Your product should address a specific need or provide added value to stand out.
STEP 2: Develop Your Go-to-Market Plan
Once you have your product, define your target audience, pricing, and marketing strategy. Remember that private label buyers often expect lower prices than national brands. Ensure your pricing aligns with consumer expectations while maintaining healthy margins.
STEP 3: Find a Reliable Supplier
Look for manufacturers on platforms like Alibaba or ThomasNet. Focus on suppliers who offer competitive pricing, consistent quality, and ethical production practices. Test samples to confirm the product meets your specifications.
STEP 4: List Your Product on Amazon
Create a professional, optimized Amazon listing with high-quality images, keyword-rich titles, and engaging descriptions. This ensures your product stands out in search results and appeals to potential buyers.
How to Sell Wholesale on Amazon
Wholesale involves purchasing products in bulk from distributors or manufacturers and reselling them at a markup. It’s a straightforward model that leverages established brands and products.
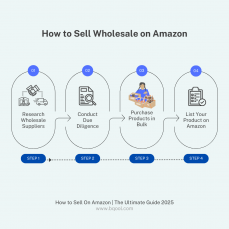
The four steps to selling Wholesale on Amazon include researching wholesale suppliers, conducting due diligence, purchasing products in bulk, and listing products on Amazon.
STEP 1: Research Wholesale Suppliers
Start by identifying reputable wholesalers. Use directories or contact brands directly to find authorized distributors. Focus on suppliers offering popular products with stable demand but avoid overly saturated categories.
STEP 2: Conduct Due Diligence
Vet potential suppliers thoroughly. Check for authorization to sell the products, review their pricing structures, and ensure they meet your shipping and quality standards.
STEP 3: Purchase Products in Bulk
Once you’ve selected a supplier, buy products in bulk to secure better pricing. Be mindful of minimum order requirements and focus on maintaining a balanced inventory to avoid overstocking.
STEP 4: List Products on Amazon
Use existing ASINs for products already listed on Amazon or create new listings for unique items. For optimal results, leverage FBA to manage storage, packing, and shipping, ensuring faster delivery and higher customer satisfaction.
How to Sell Retail Arbitrage on Amazon
Retail arbitrage is one of the simplest ways to start selling on Amazon. You buy discounted products from local stores and resell them at higher prices. Below are detailed steps on how to begin selling retail arbitrage.
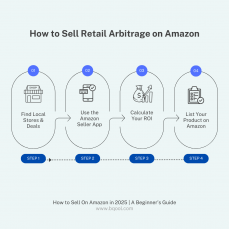
The four steps to selling retail arbitrage on amazon include finding local stores and deals, using the Amazon Seller App, calculating your ROI, and listing your product on Amazon.
STEP 1: Find Local Stores and Deals
Visit department stores, supermarkets, or clearance outlets to scout for discounted items. Focus on well-known brands that customers already trust.
STEP 2: Use the Amazon Seller App
Scan product barcodes using the Amazon Seller App to check the current selling price and potential profit margins. Look for items with a Best Seller Rank (BSR) below 50,000 to ensure steady demand.
👉 Read our blog post on “5 Repricing Strategies”
STEP 3: Calculate Your ROI
Before buying, calculate your return on investment (ROI) using the app. Ensure the product’s profit margin justifies your time and effort.
STEP 4: List and Sell on Amazon
Add the items to your Amazon account under existing ASINs or create new listings. For faster sales, consider using a repricer to stay competitive.
How to Sell Online Arbitrage on Amazon
Online arbitrage mirrors retail arbitrage but involves sourcing discounted products from e-commerce websites instead of physical stores.
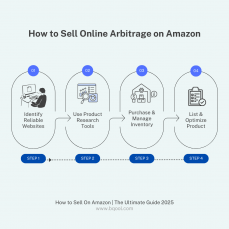
The four steps on selling online arbitrage on Amazon include identifying reliable websites, using product research tools, purchase and manage inventory, listing and optimize products.
STEP 1: Identify Reliable e-Commerce Websites
Search for deals on sites like Walmart, Target, or Overstock. Look for clearance sections or seasonal sales.
STEP 2: Use Product Research Tools
Leverage tools like SellerAmp or Keepa to track product pricing trends and ensure consistent profitability. Analyze sales data and competition before making purchases.
STEP 3: Purchase and Manage Inventory
Order the products and have them shipped to your home or directly to Amazon’s fulfillment centers if using FBA. Check shipping fees and delivery times to manage costs effectively.
STEP 4: List and Optimize Your Products
Create attractive listings on Amazon. Use compelling images and descriptions to drive conversions and regularly monitor performance to adjust pricing if needed.
How to Dropship on Amazon
Dropshipping allows you to sell products without holding inventory. You act as the middleman between customers and suppliers. The steps involved in dropshipping are listed below.
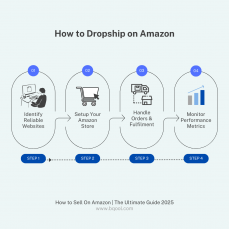
The 4 steps to dropshipping on Amazon include: identifying reliable websites, setting up your amazon store, handling orders and fulfillment and monitoring performance metrics.
STEP 1: Find Reliable Suppliers
Research suppliers on platforms like Oberlo or Spocket. Ensure they can deliver high-quality products promptly and offer competitive prices.
STEP 2: Set Up Your Amazon Store
Set up your store and list products from your chosen supplier. Use engaging product descriptions and high-quality images to attract buyers.
STEP 3: Handle Orders and Fulfillment
When a customer places an order, your supplier ships the product directly to them. Focus on managing customer expectations and addressing issues quickly.
STEP 4: Monitor Performance Metrics
Keep an eye on fulfillment times and customer reviews. Promptly address any issues to maintain strong seller metrics.
How To Sell Handmade on Amazon
Amazon Handmade is ideal for artisans and crafters looking to sell unique, handcrafted items.
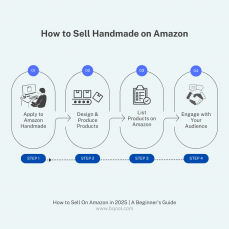
The four steps to selling handmade on Amazon include: applying to Amazon handmade, designing and producing products, listing products on Amazon, and engaging with your audience.
STEP 1: Apply to Amazon Handmade
Register for the Handmade program and provide information about your craft. Approval may take time, so prepare your portfolio in advance.
STEP 2: Design and Produce Your Products
Focus on creating high-quality, unique items that cater to a specific niche. Highlight your craftsmanship and any custom options available.
STEP 3: List Your Products on Amazon
Showcase your items with professional photos and detailed descriptions. Include information about the materials, production process, and customization options.
STEP 4: Engage with Your Audience
Build a loyal customer base by offering exceptional service and engaging with buyers through feedback and reviews.
📖 Read this blog to find out whether Amazon Handmade program is worth your time!
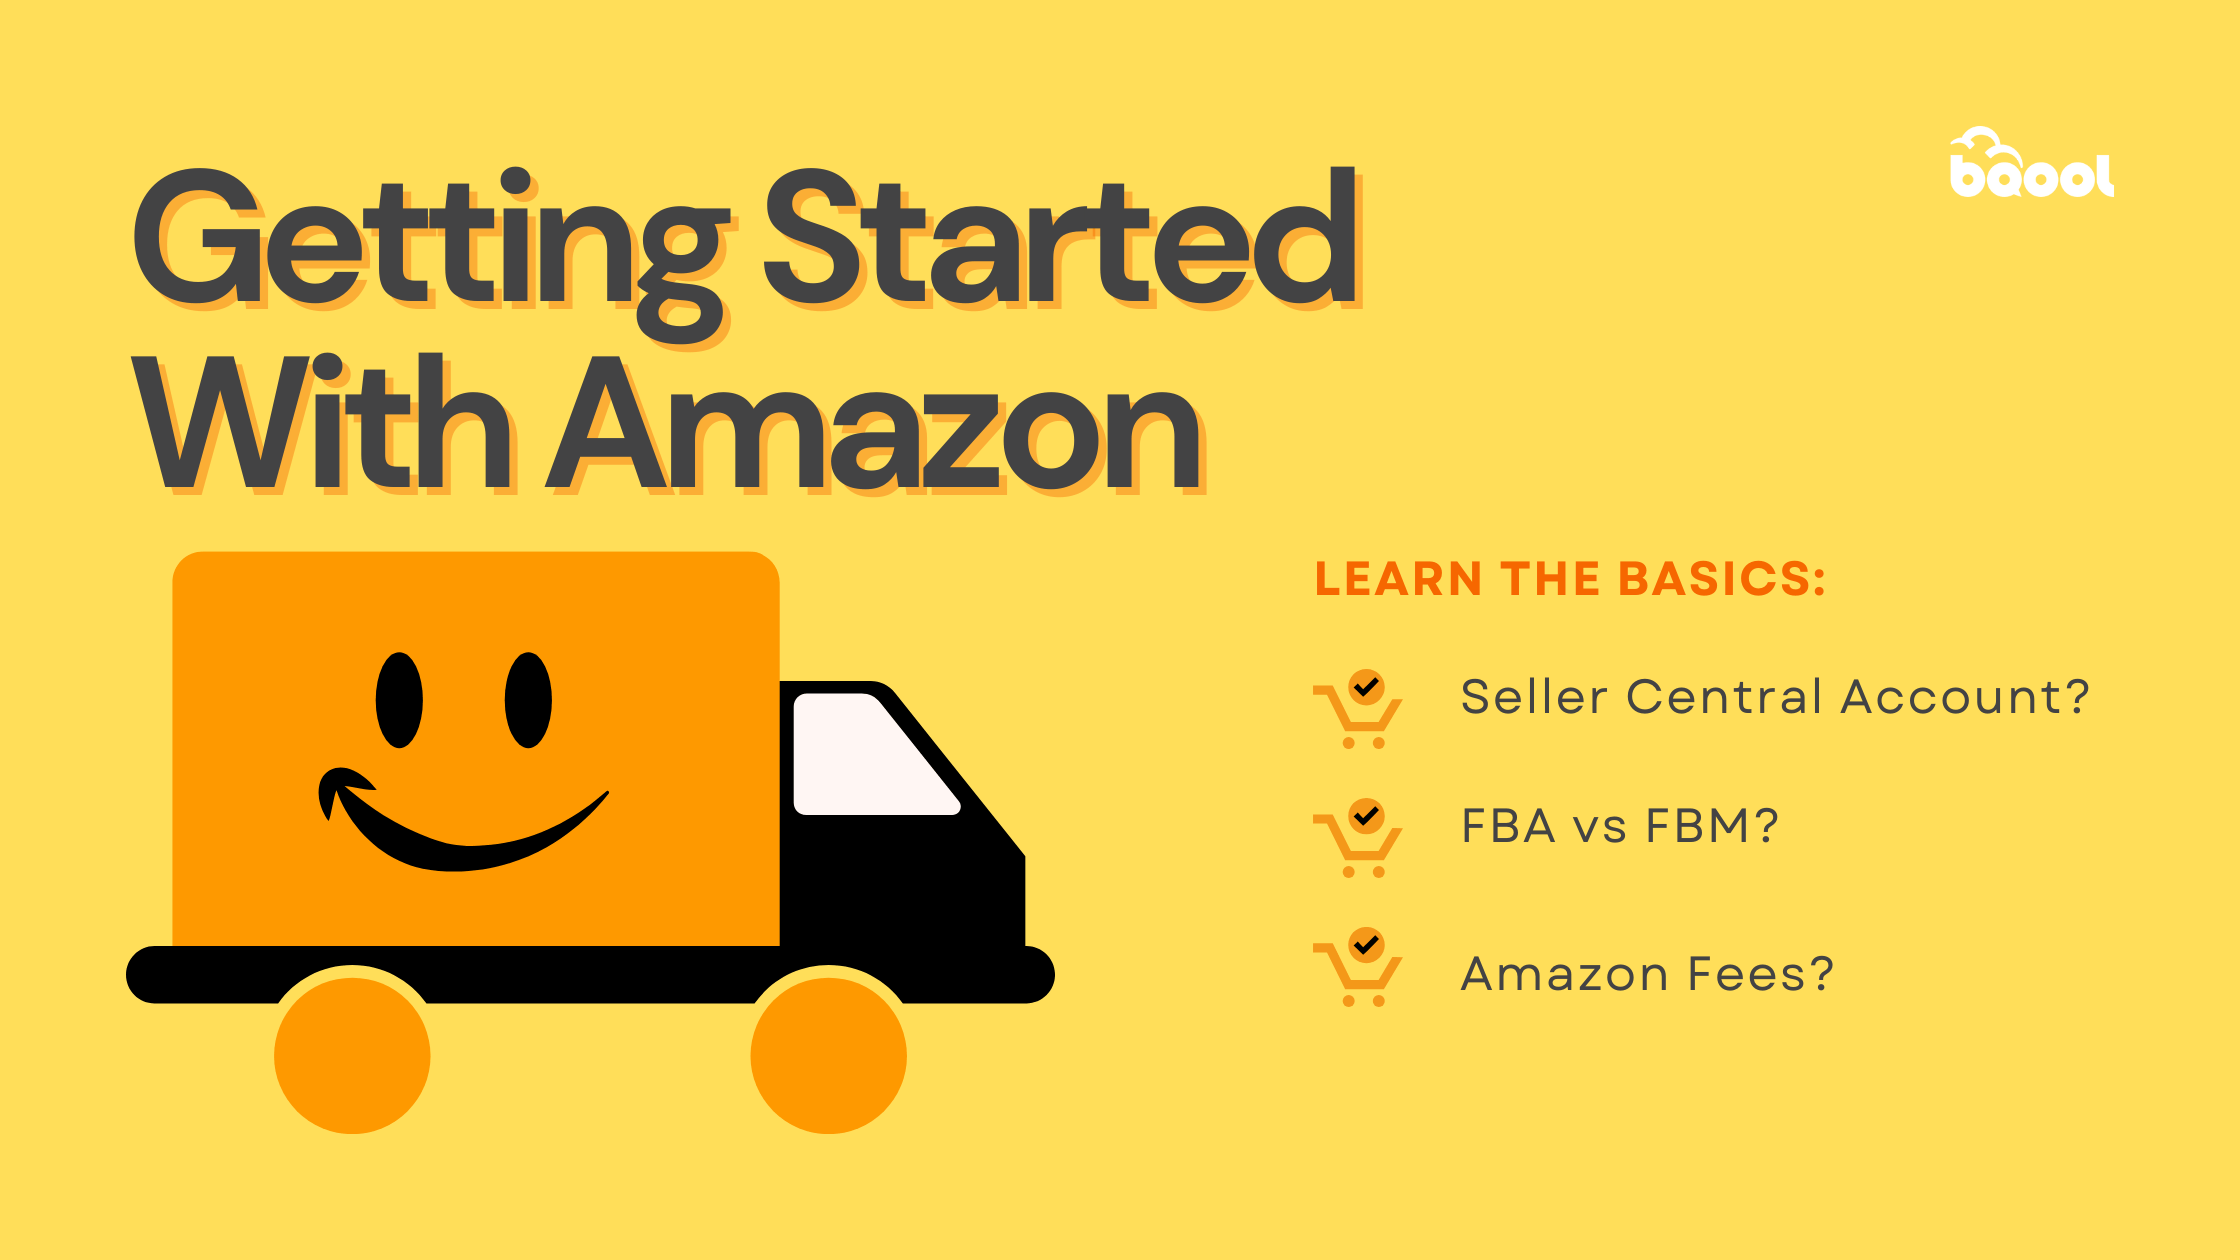
The things you must know when getting started on Amazon include: How to set up your seller central account. knowing the difference between FBA and FBM, and understanding Amazon’s fee structures.
Getting Started
Which Amazon Seller Account Should I Sign Up For?
When signing up as an Amazon seller, you’ll need to make a crucial decision between two account types: the Professional seller account at $39.99 per month or the Individual seller account with a $0.99 per-item fee. Understanding the differences and benefits of each option is essential for making the right choice for your business.
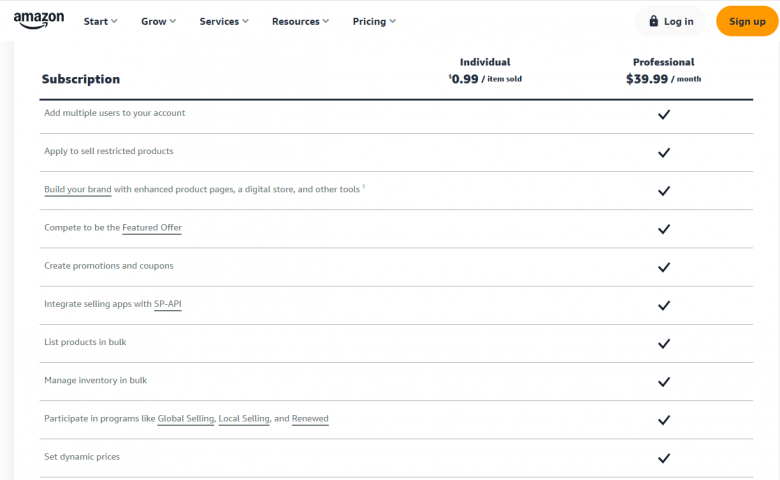
Screenshot of comparison between Amazon Individual vs Professional Pricing Plans
What is a Professional Seller Account on Amazon?
The Professional Amazon seller account comes with several advantages that make it attractive for serious sellers. While it has a monthly subscription fee, Amazon has implemented a business-friendly feature: if you don’t have any active listings in a given month, you won’t be charged the $39.99 fee. The charge only applies when you make sales, making it a low-risk option for seasonal sellers or those testing new product lines.
What is an Individual Seller Account on Amazon?
For those starting small, the Individual seller account might be the better choice. This option is ideal if you sell less than 40 items per month, as you’ll only pay $0.99 per item sold instead of a monthly subscription. The break-even point is 40 items – if you sell more than this, the Professional account becomes more cost-effective.
Features
Individual
Professional
Monthly Fee
None
$39.99 Per Month
Per-Item Fee
$0.99 Per Item Sold
None
Number of Listings
Up to 40 Items Per Month
Unlimited
Access to Buy Box
Limited
Full Access
Advertising Options
None
Full Access to Amazon PPC
Advanced Selling Tools
Not Available
Includes Inventory Tools, Bulk Listings, and Reports
Custom Shipping Options
Not Available
Available Buyers
Reports and Analytics
Basic
Detailed Sales & Performance Reports
Remember that while the Individual account has lower upfront costs, it comes with some limitations. Professional sellers get access to additional features like bulk listing tools, inventory management systems, and advanced reporting capabilities that can be crucial for scaling your business.
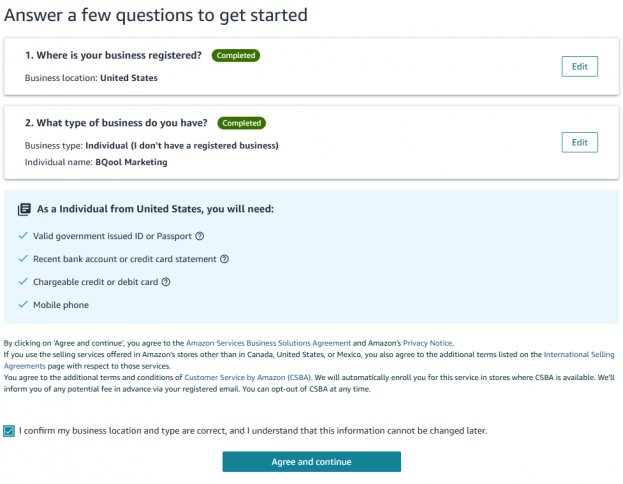
Assuming you are an individual seller without a registered business yet, below are some documents needed to start the registration process:
- Government-issued ID or passport
- Tax information
- Recent bank account Bank account or credit card statement
- Chargeable credit card or debit card
- Mobile phone
One of the most flexible aspects of Amazon’s seller account system is that you can switch between account types at any time. This means you can start with an Individual account and upgrade to Professional as your business grows, or downgrade during slower periods to optimize your costs.
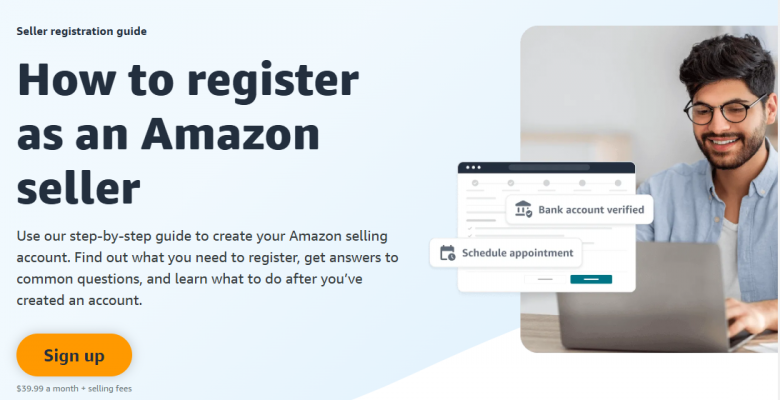
How to Set Up Your Amazon Seller Account
Setting up your Amazon Seller Account is the first major step in your journey.
Step 1: Create an Account. Visit Amazon Seller Central and click on “Sign Up.” Choose between an Individual or Professional account based on your business goals.
Amazon Seller Central Sign Up Page Screenshot
Step 2: Verify Your Identity. Prepare essential documents like your government ID, bank account details, and tax information. Follow the on-screen prompts to submit your documents securely.
Seller Information Needed When Getting Started on Amazon
Step 4: Set Up Payment Methods. Link your bank account to ensure you can receive payouts. Double-check to ensure accuracy in bank details.
Step 5: Familiarize Yourself with the Dashboard. Once registered, begin exploring explore Seller Central. To further your understanding of Seller Central and the basics of selling on Amazon, take advantage of Amazon’s Seller University resources.
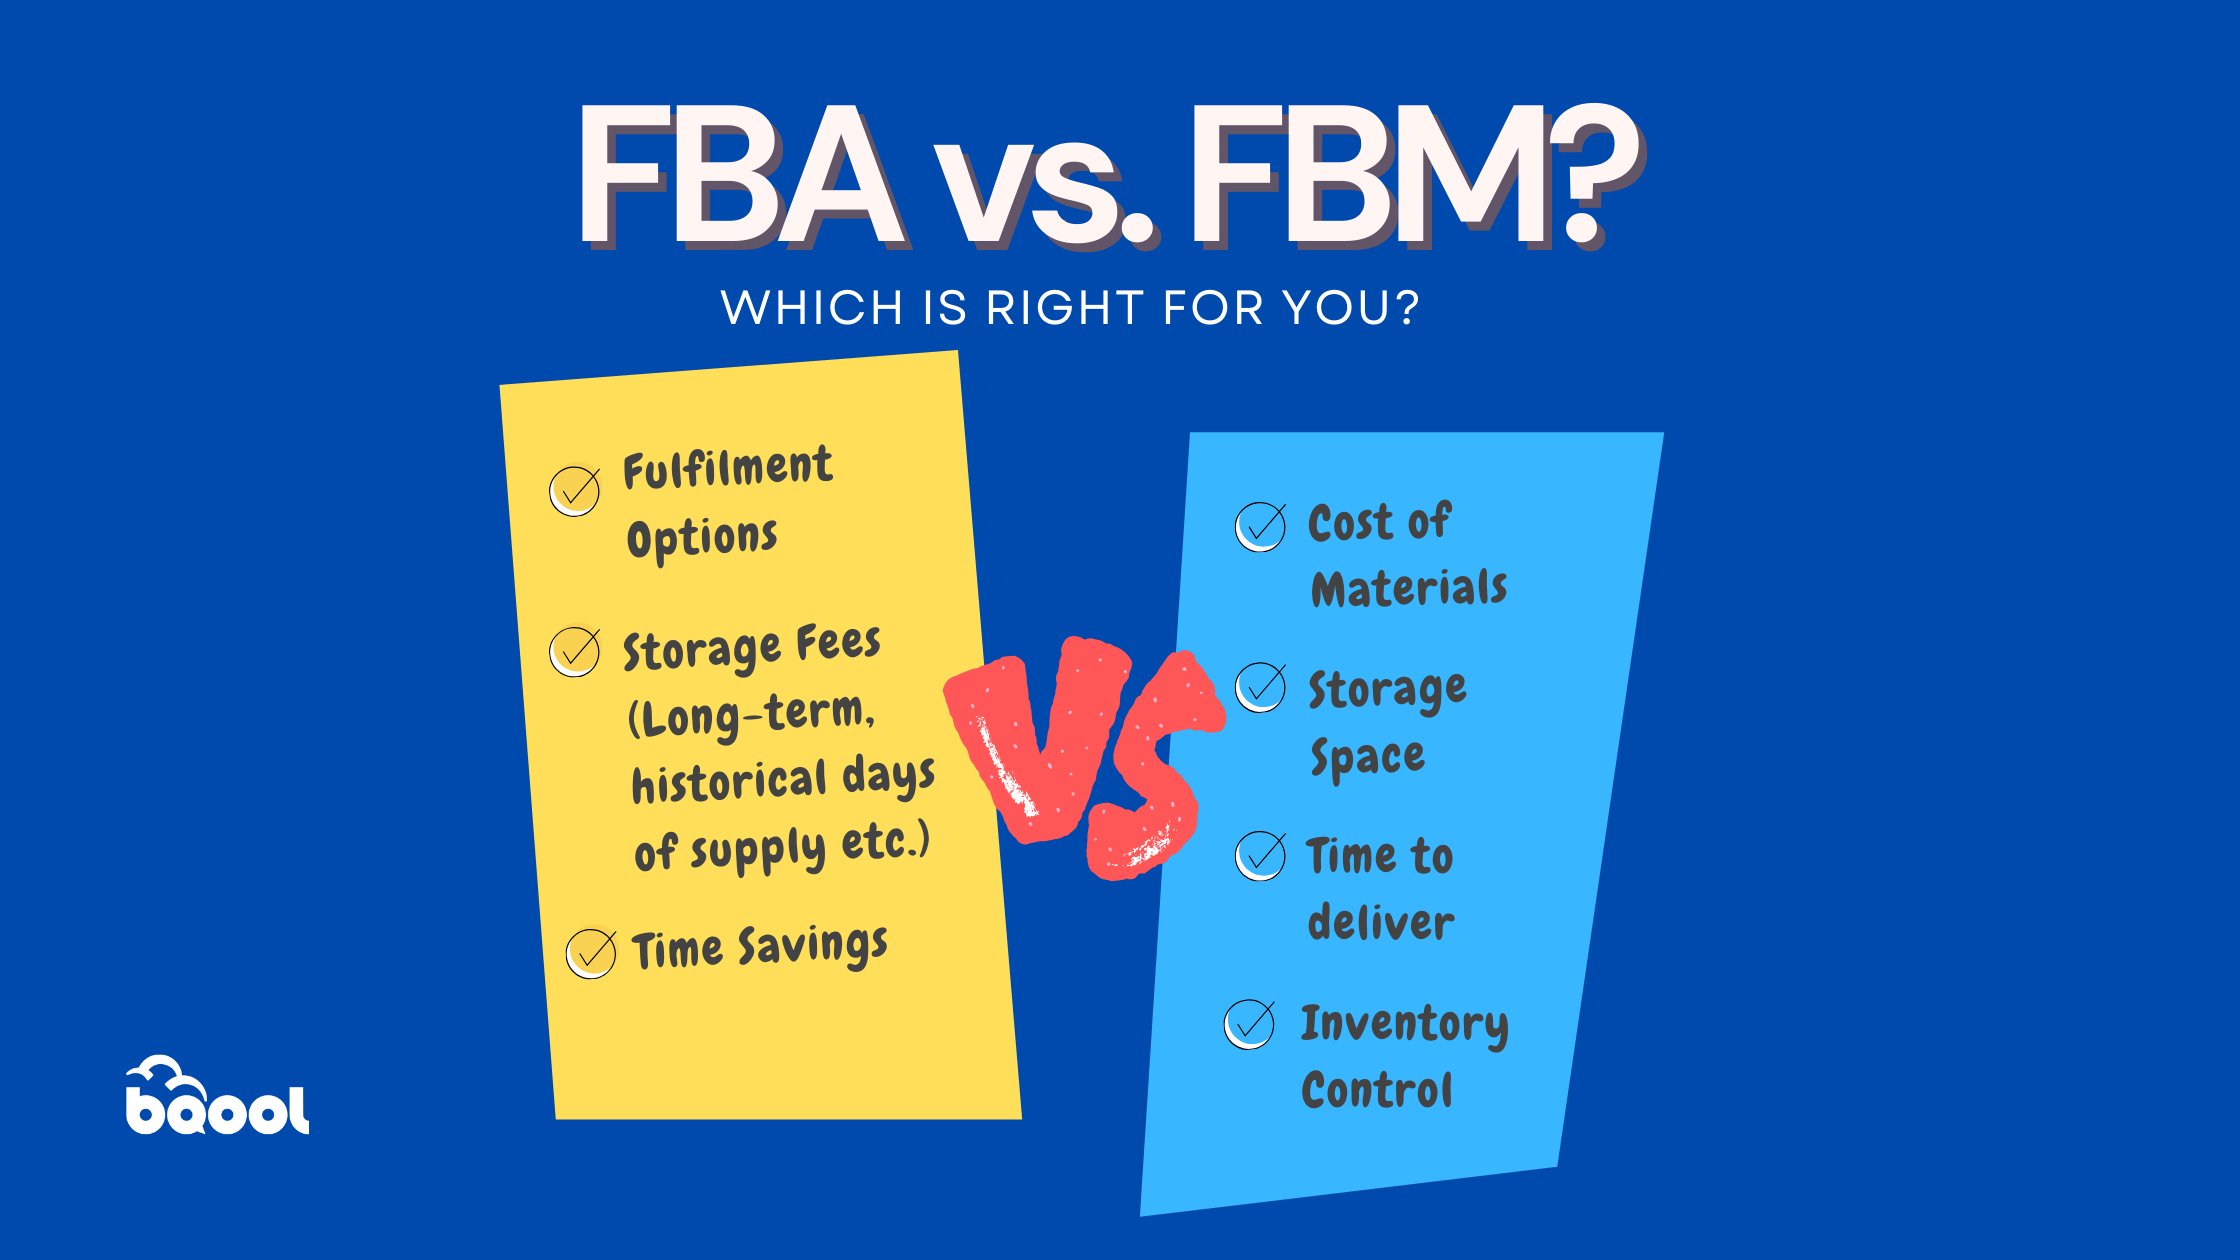
Comparing FBA vs FBM for Amazon, which is right for you?
What is the difference between FBA vs. FBM?
Understanding the differences between Amazon’s two main fulfillment methods is crucial for your business success. Each option has distinct advantages and considerations that can significantly impact your operations and profitability.
🎥Watch our video to find out when to use Amazon FBA or FBM
What is FBA (Fulfillment by Amazon)?
Fulfillment by Amazon (FBA) offers a hands-off approach to order processing. When you choose FBA, you ship your inventory to Amazon’s warehouses, and they handle everything else. Amazon takes care of storage, packaging, shipping, and even customer service, including returns. Your products become eligible for Prime shipping, which can significantly boost your sales since Prime members often filter their searches to show only Prime-eligible items.
The main advantages of FBA include:
- Access to Amazon’s world-class logistics network
- Prime badge on your listings
- Higher chance of winning the Buy Box
- More time to focus on product sourcing and marketing
- Ability to scale quickly during peak seasons
- Build customer trust as you depend on Amazon’s reliable shipping and return policies
However, FBA also comes with considerations like storage fees, prep requirements, and the need to manage inventory levels carefully across multiple fulfillment centers.
Challenges of FBA include:
- Fees such as storage, fulfillment, and additional surcharges (e.g., aged inventory fees) can add up, especially for low-margin or slow-moving products.
- Lack of inventory control as you rely on Amazon’s processes, which may limit your ability to inspect and manage inventory directly.
What is Fulfillment by Merchant (FBM)?
Fulfillment by Merchant (FBM), on the other hand, puts you in control of the entire fulfillment process. You store your own inventory, pack orders as they come in, and handle shipping directly to customers. This method gives you complete control over your inventory and shipping processes but requires more hands-on management.
FBM might be the better choice if you:
- Sell large or heavy items where FBA fees would be prohibitive
- Have low sales volume or seasonal products
- Already have an efficient warehousing and shipping system
- Sell products that require special handling or customization
- Want to maintain closer control over your inventory
Some challenges of FBM include:
- Being more time-Intensive as you handle every aspect of fulfillment, which can be resource-heavy as your business grows.
- Higher shipping costs without Amazon’s discounted rates, your shipping expenses may be higher.
- Increased Buy Box Competition since FBM sellers are less likely to win the Buy Box compared to FBA sellers.
👉 Check out our podcast and gather valuable insights on whether you should choose FBA or FBM on Amazon.
How to Decide Between FBA and FBM
Evaluate Your Product Type
FBA is better for small, lightweight, high-demand products with healthy margins, as Amazon’s storage and fulfillment costs are lower.
FBM is ideal for oversized or heavy items that would incur significant FBA fees, or for custom or handmade products requiring personal attention.
Assess Your Budget
If you have the capital to invest in FBA fees and benefit from Prime visibility, FBA may be the way to go.
If you’re working with a tight budget and can handle logistics efficiently, FBM might be more cost-effective.
Analyze Your Order Volume
High-volume sellers benefit from FBA’s streamlined logistics, which can save time and improve customer satisfaction.
Low-volume sellers may find FBM more manageable, avoiding unnecessary FBA fees.
Pay attention to customer needs
For time-sensitive items, FBA’s fast and reliable shipping through Amazon Prime is a significant advantage.
For niche or handmade products, FBM allows for personalized touches that can enhance the customer experience.
Factor in Storage Needs
If your products require long-term storage or are slow movers, FBM may help you avoid Amazon’s aged inventory surcharges.
If you have limited space to store inventory, FBA’s fulfillment centers can take this burden off your hands.
The key to choosing between FBA and FBM is understanding your products, sales volume, and operational capabilities. Consider factors like product size and weight, sales velocity, and your ability to handle fulfillment efficiently when making your decision.
Some sellers opt for a hybrid approach, using both FBA and FBM depending on the product or season. For example, they might use FBA for their best-selling items and handle slower-moving products themselves, or switch to FBM during peak seasons when storage fees are higher.
📖 Learn how to succeed with the Amazon FBA and FBM as Chris shares expert tips on product sourcing, inventory management, and using repricing tools to scale your sales by up to 2,400%
The below table compares a few aspects of FBA vs FBM to help you decide between the two options.
Aspect
Fulfillment by Amazon (FBA)
Fulfillment by Merchant (FBM)
Inventory Control
Limited control; Amazon manages inventory and processes
Full control over inventory and fulfillment
Storage
Amazon provides warehousing
Seller stores inventory
Packaging & Shipping
Amazon handles all packaging and shipping logistics
Seller is responsible for packaging and delivery
Customer Service
Amazon manages customer service and returns
Seller handles customer support and return processes
Prime Eligibility
Products are eligible for Amazon Prime
Products are not Prime-eligible
Fees
Includes storage, fulfillment, and possible surcharge fees
No FBA fees, but bears shipping and handling costs
Scalability
Easily scales with high order volumes and seasonal demand
Growth may require significant operational investment
Time Investment
Frees up seller time for growth-focused tasks
Requires hands-on daily management
Buy Box Advantage
Higher chance of winning the Buy Box
Lower Buy Box visibility
Customer Trust
Amazon’s brand builds buyer confidence
Offers personalized service that can foster loyalty
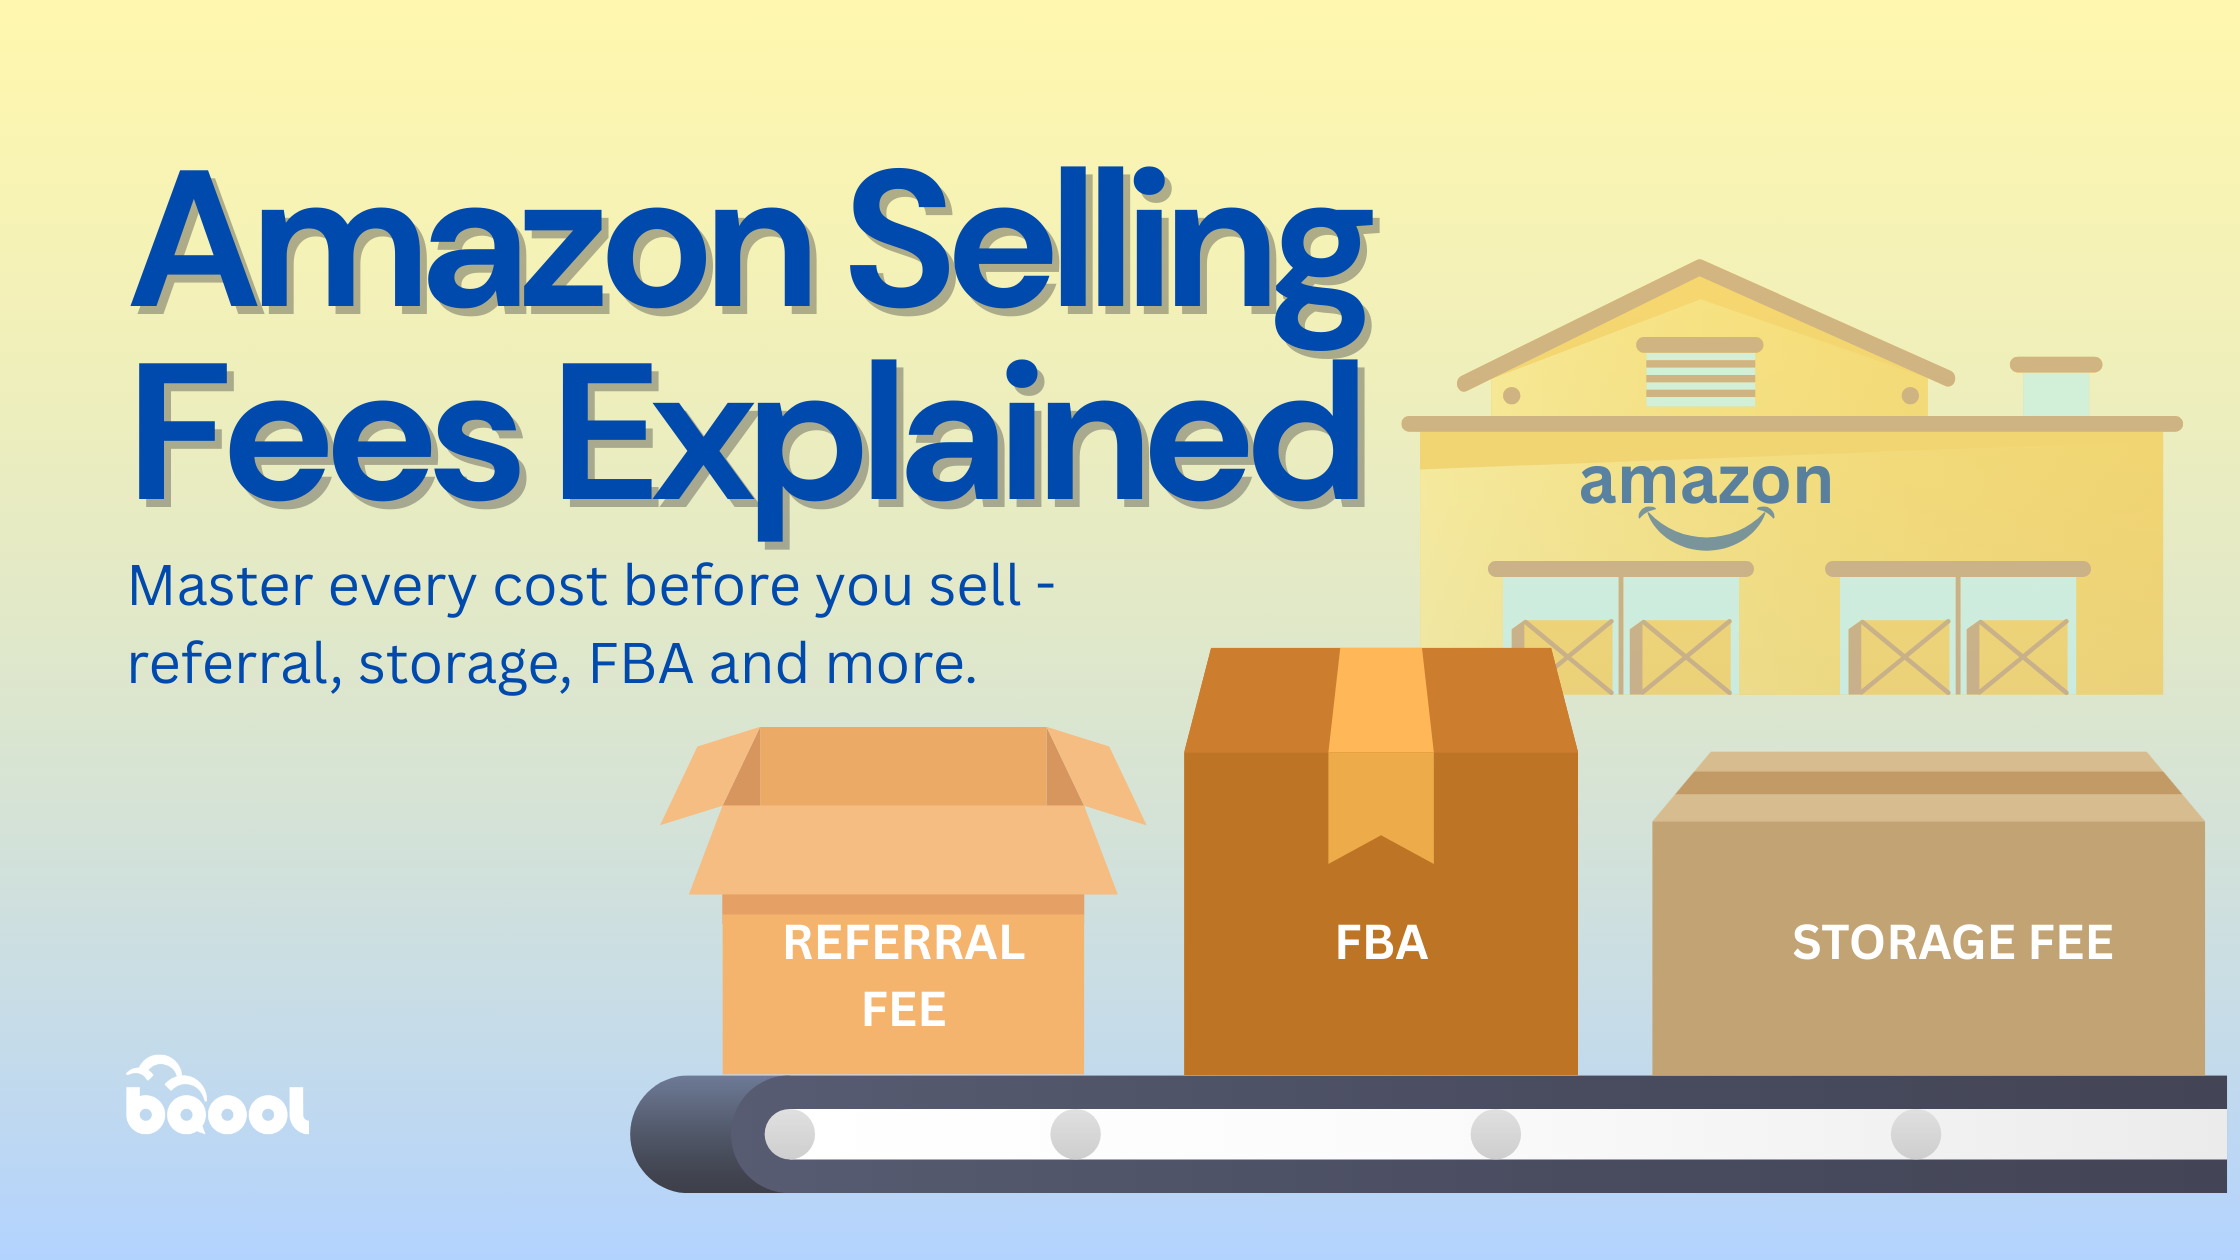
Amazon Selling Fees Explained
Starting your journey as an Amazon seller requires understanding a complex ecosystem of fees, percentages, and calculations. This comprehensive guide will walk you through everything you need to know about Amazon’s fee structure, helping you make informed decisions and maximize your profits on the world’s largest e-commerce platform.
Amazon’s Core Fee Structure
Referral Fees
Amazon tends to update its Seller Fees every year. However, in the year 2025, Amazon is not introducing any new fee types or increasing their Referral fees. Referral fees are what Amazon charges customers, a percentage of your total sales price for each item that is sold on their platform. These fees typically range from 8% to 15% of your selling price, though some categories have special structures. To find out specific referral fees for certain categories of Amazon in the US, you can refer to Amazon’s specific fees.
For example, imagine you’re selling baby products:
- For a $8 baby bottle, you’ll pay 8% ($0.64)
- For a $25 baby carrier, you’ll pay 15% ($3.75)
In 2024, Amazon introduced more seller-friendly rates for apparel items:
- Items under $15: Reduced from 17% to 5%
- Items $15-$20: Reduced from 17% to 10%
- Special 3% referral fee for watches priced over $1,500
This below table shows the most popular and profitable categories for Amazon sellers in 2025, helping you make informed decisions about what to sell.
Product Category
Referral Fee Percentage
Minimum Referral Fee
Clothing and Accessories
17%
$0.30
Electronics Accessories
15% ≤ $100.00, 8% > $100.00
$0.30
Home and Kitchen
15%
$0.30
Beauty, Health and Personal Care
8% ≤ $10.00, 15% > $10.00
$0.30
Grocery and Gourmet
8% ≤ $15.00, 15% > $15.00
—
Pet Products
15%, 22% for vet diets
$0.30
Sports and Outdoors
15%
$0.30
Computers
8%
$0.30
Consumer Electronics
8%
$0.30
Toys and Games
15%
$0.30
Understanding Storage Fees: FBA vs. FBM
If you’re selling on Amazon, understanding storage fees is crucial to managing your costs. The following section will assist you in understanding the storage fees for both FBA and FBM sellers.
FBA (Fulfillment by Amazon) Storage Fee Structure
When you choose FBA, you’re essentially hiring Amazon as your warehouse manager, shipping department, and customer service team. This service can significantly reduce your operational burden. The FBA Storage Fee Structure consists of monthly inventory storage fees and long-term storage fees. These fees cover the cost of storing your inventory at Amazon’s fulfillment centers and depend on factors such as product size, volume, and how long you store your products at the warehouse.
Monthly Inventory Storage Fees
The monthly inventory storage fees are calculated by the amount of space that your products occupy in Amazon’s fulfillment centers. This is calculated by the average daily volume of your inventory in cubic feet. The factors that influence this fee include:
- Product type
- Product size-tier (small standard, large standard, oversized)
- Standard sized items storage fees range from $3.43 to $7.17 for apparel items with additional charges based on weight.
- Oversized items, are defined as products measuring over 130 inches in combined length and girth, incur higher storage fees and may lead to inventory surcharge fees.
- Time of year or seasonality
- For example, during off peak seasons like January to September, storage fees are reduced by $0.09 per cubic foot. Whereas, during October to December, which is peak season, the rates can be up to 2-3 times higher. (However, storage fees for oversized items remain unchanged regardless of which season it is).
- Storage Utilization Surcharge
To better manage your storage fees, you should bear in mind the possible costs and charges that may accumulate over time as your inventory changes.
How to calculate Amazon FBA Fee Per Product
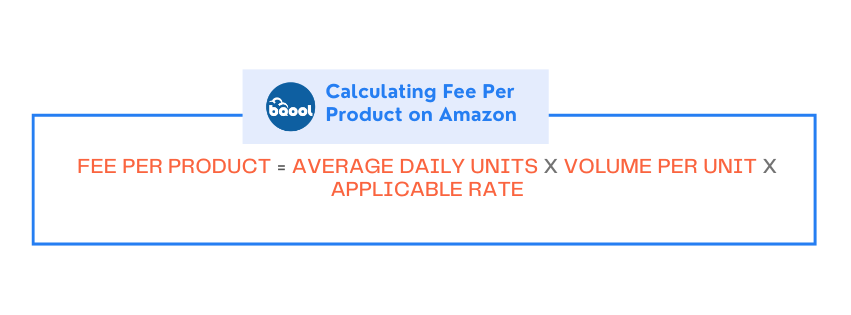
For example, if you have subscribed to Amazon’s FBA Storage services, and you are selling 100 items on Amazon, and each item is 10 inches in length, 6 inches wide, and 4 inches in height, use the following breakdown:
1. Calculating the size of one item by multiplying the item’s dimensions:
-
- 10 × 6 × 4 = 240 cubic inches.
- Convert to cubic feet (since Amazon charges in cubic feet):
-
- 240 ÷ 1,728 = 0.1389 cubic feet per item.
2. Account for all items stored daily. Since you’re storing 100 items, the total space used per day is:
-
- 0.1389 cubic feet × 100 = 13.89 cubic feet.
3. Apply the storage rate by multiplying the total space by the rate:
-
- 13.89 cubic feet × $0.75 = $10.42 per day.
4. Get the monthly cost by multiplying the daily cost by 30 days:
-
- $10.42 × 30 = $312.50 per month.
FBA Fulfillment Fees
FBA Fulfilment Fees are the costs charged by Amazon for packing and shipping customer orders. This fee per unit is calculated according to the weight and dimensions of the product.
As of January 15, 2025, there are reduced rates for standard-sized and large bulky-sized products, with an average decrease of $0.58 per unit for minimal split shipments. Standard-sized items (one pound) cost approximately $3.22, which includes picking, packing, shipping, and customer service.
🎥 Watch our video for a detailed breakdown of FBA Fulfillment Fees
📖 Or if you prefer reading, check out the blog to learn more about FBA Fulfillment Fees in detail.
Refund Administration Fees
Amazon charges refund administration fees when they process returns for customers. This can either be 20% of the refunded charge or $5, whichever amount is lower will be charged to the seller.
Tools for Fee Management
You can utilize tools provided by Amazon, such as Amazon’s Fee Calculator, to help you estimate sales margins and compare different fulfillment methods.
Other useful tools from Amazon include the Amazon Fee Preview Report, which allows sellers to view their fees before the incoming billing cycle, and the Revenue Calculator Tool to calculate potential profits and modify your pricing strategies.
💡TIP: View your Fee Preview Report through your Seller Central account and navigate to the Reports section.
Being thorough in your calculations can help you estimate your costs better and manage your budget efficiently.
What is Storage Utilization Surcharge on Amazon?
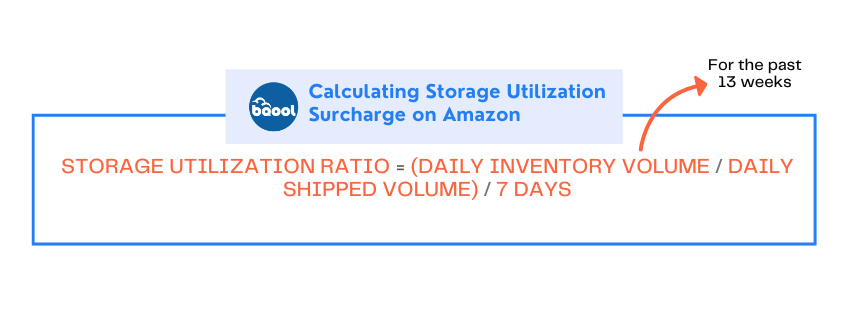
If your inventory exceeds a certain utilization ratio, there may be a storage utilization surcharge. The storage utilization ratio is calculated as the average daily inventory stored divided by the average daily shipped over the past 13 weeks. This is monitored through the FBA dashboard and calculated independently for each size tier.
Factors for Calculating Storage Utilization Surcharge
- Product Size Tier
- Month
- Product Dimensions and Volume
- Average Monthly Units Stored
- Storage Utilization Ratio (The average amount of inventory stored daily compared to the average daily shipped amount over the past 13 weeks)
- Dangerous Goods Classification.
This surcharge applies to sellers who:
- Have a Professional account
- Have their first shipment 365 days ago
- Average daily inventory volume > 25 cubic feet
- Storage utilization ratio above 22 weeks (as of April 1, 2024)
Aged Inventory Surcharge (Previously known as Long-term Storage Fees)
Amazon’s aged inventory surcharge, also known as Long-term storage fees (LTSF), are incurred when your items are stored in Amazon’s storage centers for more than 180 days. The aged inventory surcharge is evaluated on the 15th of each month, with charges applied between the 18th and 22nd. If not properly accounted for, these fees can add up quickly. So it’s important to conduct regular inventory health checks to see how long your products occupy Amazon’s fulfillment centers.
Amazon charges LTSF twice a year, on February 15th and August 15th. It’s important to note that Amazon charges these fees separately to the standard storage fees.
Aged Inventory Surcharge Fee Structure:
- 181-270 days: Standard rate
- 271-365 days: Increased rate (as of February 15, 2024)
- 365+ days: Premium rate
Amazon provides Aged Inventory and Utilization reports to help sellers track inventory age distribution, items approaching fee thresholds, and products requiring action.
Sellers have access to the Inventory Performance Dashboard that provides key insights into your inventory health. Through monitoring metrics such as the Inventory Performance Index (IPI), excess inventory levels, sell-through rates, and storage utilization metrics to assist you in assessing your inventory health.
To avoid long-term storage fees on Amazon and move products faster, sellers could offer promotions and discounts or lower prices. Use pricing tools to adjust prices based on competitor pricing and sales velocity, and watch out for overstocking and incurring unnecessary fees from Amazon.
🎥 Watch this video to understand “Amazon’s Long-Term Storage Fee and How to Avoid It”
👉 Check out our blog on BQool’s new Inventory Conditions update
Fulfillment by Merchant (FBM)
If the fees from Amazon for FBA seem like a lot, you can opt to fulfill your products by yourself. This option is called Fulfillment by Merchant (FBM) on Amazon and gives you more control but requires more hands-on management. Here’s what you need to consider:
Shipping and Packaging
A typical one-pound package might cost:
- Shipping: $6
- Packaging materials: $1
- Total: $7 per unit
📖 Read our blog post on “Amazon FBM Sellers & Prep Centers”
Time Investment
Consider the value of your time: order processing might take 10 minutes at $40 per hour, equating to $6.67 per order. You also need to take care of customer service, returns handling, and inventory management.
Profit Calculation
Let’s walk through an example to understand how you would calculate profits on Amazon.
Consider the following costs of a home organization product:
- Product Cost: $8.00
- Referral Fee (15%): $4.50
- FBA Fulfillment: $3.22
- Storage (per month): $0.15
- Advertising (10% ACoS): $3.00
- Net Profit: $11.12 (37% margin)
Now, let’s sum up all the costs: Total Costs: $8.00 + $4.50 + $3.22 + $0.15 + $3.00 = $18.87
To determine the selling price that results in a net profit of $11.12 (37% margin), we add the net profit to the total costs:
Selling Price: $18.87 (Total Costs) + $11.12 (Net Profit) = $29.99
Therefore, the selling price is $29.99.
🎥 Check out our video on How To Use Our Profit Calculator Tool
🔥 Sign up for a free 14-day Trial here: Start Trial
Success on Amazon requires thorough understanding of fees, strategic planning, and continuous optimization. By mastering these elements and staying informed about fee updates, you’re well-positioned to build a profitable and sustainable Amazon business.
Remember: The most successful Amazon sellers treat their fees not as obstacles but as investments in a powerful distribution channel. Regular monitoring, strategic planning, and proactive management are key to maintaining and growing your profitability.
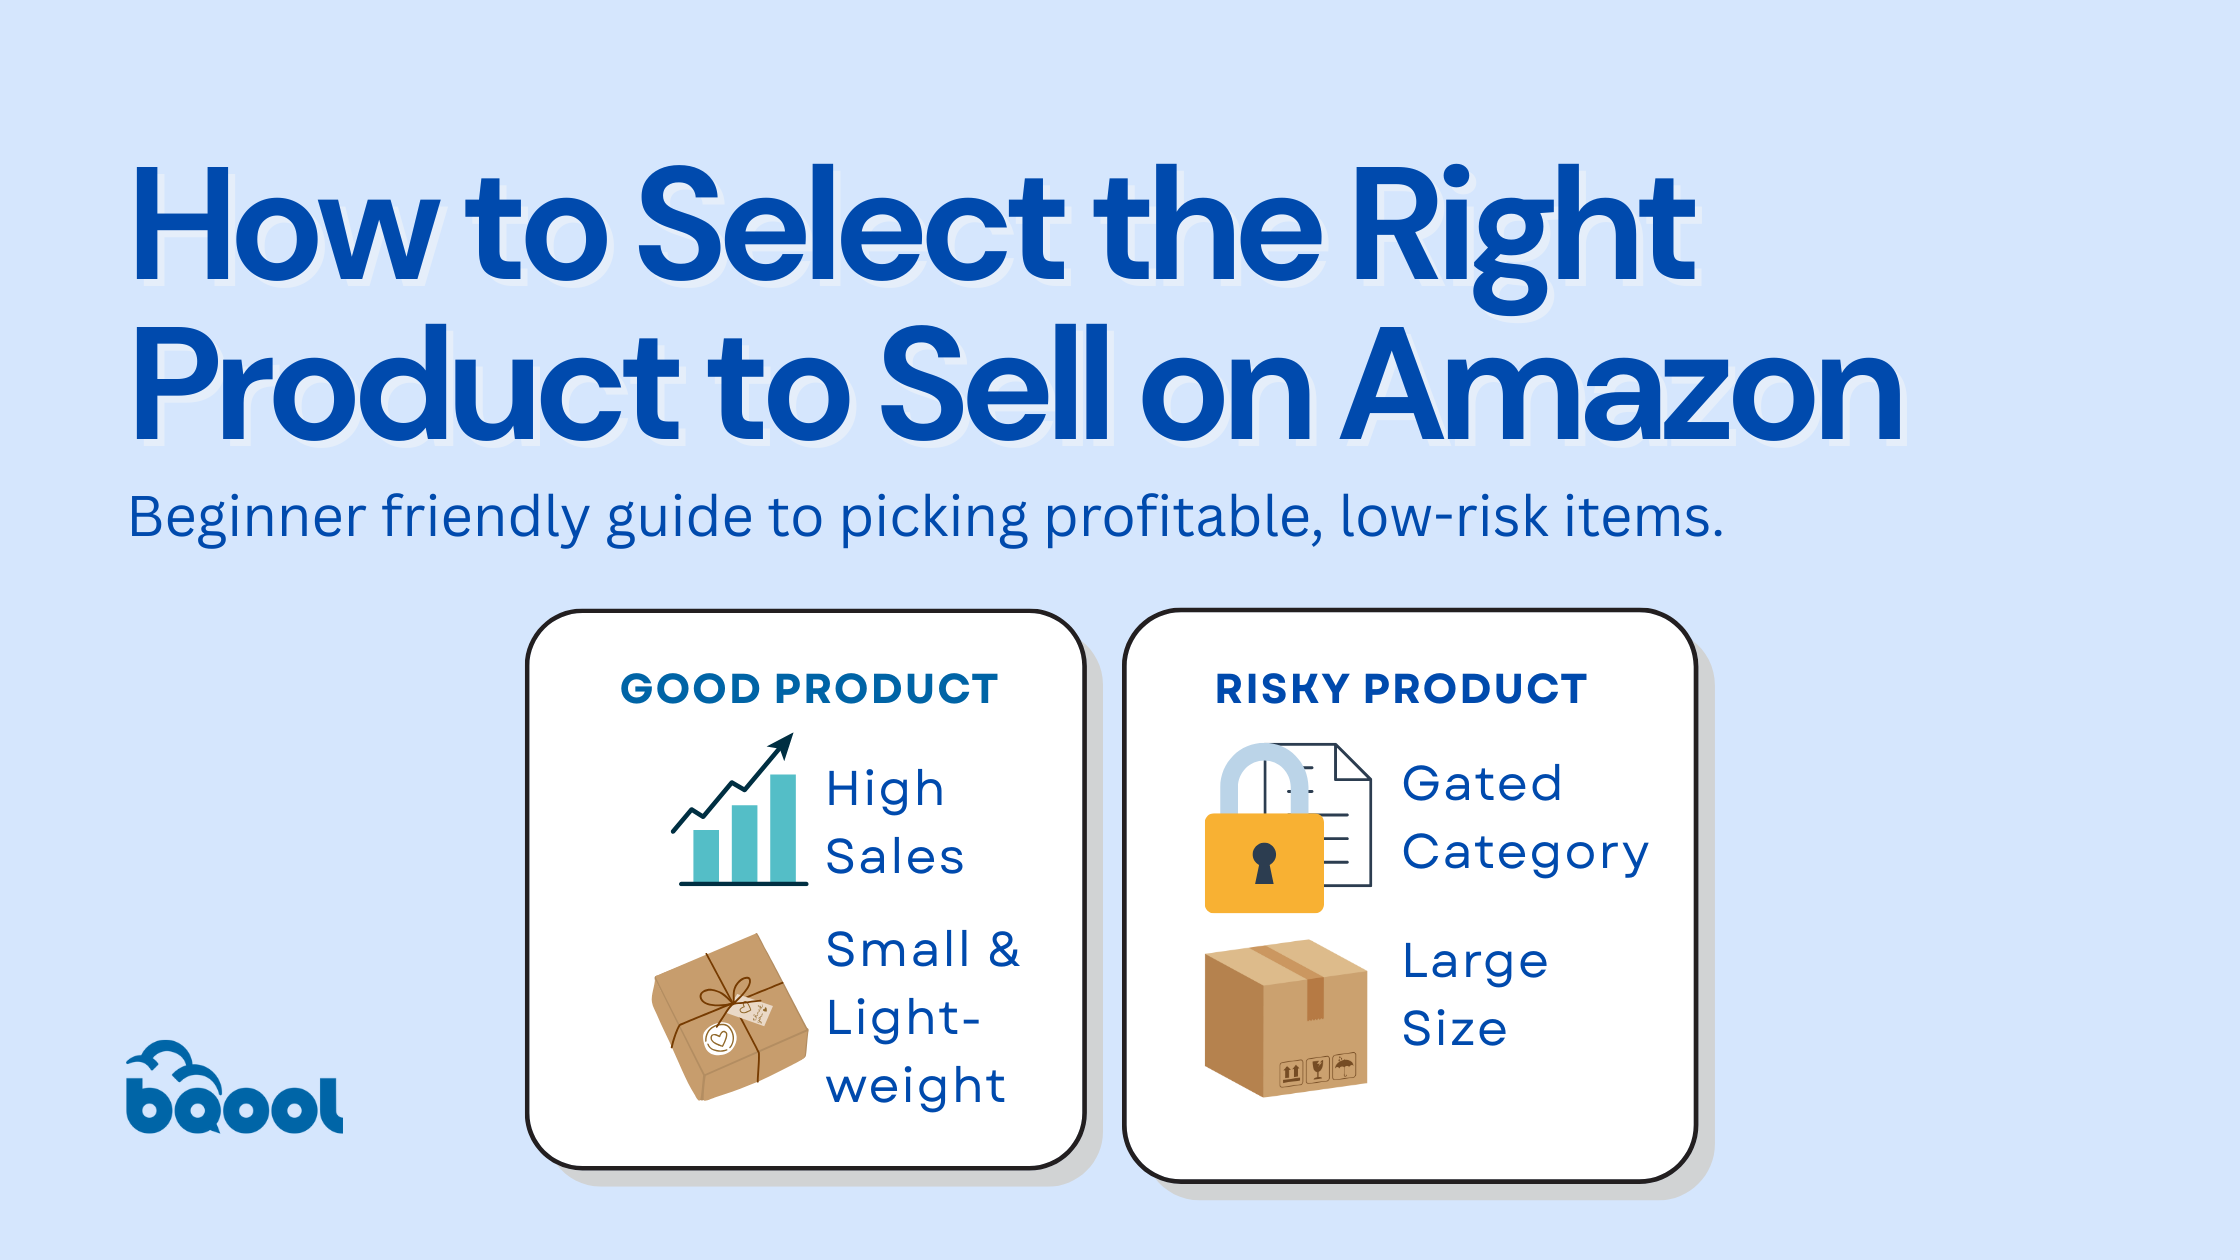
How to Select the Right Product to Sell on Amazon
Choosing the right products to sell on Amazon can be daunting, especially with the wide variety of products available, it can be difficult to decide what you would like to focus on. By leveraging product research tools, understanding key metrics like Best Seller Rank (BSR), and navigating Amazon’s requirements, you can set yourself up for long-term success.
🎥Watch now to find out How to find profitable products to sell in under 5 mins
Product Research Tips for Beginners
Product research is the foundation of finding profitable products. Tools like Keepa and SellerAmp simplify this process by tracking pricing trends, sales history, and competition.
👉 Read our blog on How to Identify Profitable Amazon Products on Amazon
Understand Best Seller Rank (BSR)
BSR is a key metric that indicates how well a product is selling within its category. A lower BSR signifies higher sales velocity. For example:
- A product with a BSR of 1,000 in the Home & Kitchen category is selling significantly better than one with a BSR of 50,000.
- Target products with a BSR under 50,000 to ensure consistent demand, while a BSR under 10,000 may indicate a highly competitive market.
Use BSR alongside other factors like pricing trends and competition to identify products with both demand and profitability potential.
Prioritize Small, Lightweight Items
Smaller, lightweight products are cost-effective to ship and store, making them ideal for FBA sellers. For example, compact phone accessories are easier to manage than bulky furniture, keeping fees low and profits high.
Set a Sustainable Price Point
Aim for a profit margin of 15%–20% as a beginner and work toward 30% as you grow. Following the “⅓ rule” can help ensure profitability: if you sell an item for $30, aim to source it for $10.
Start Small and Test Demand
Order small quantities of products initially to gauge customer interest and market performance. For instance, test 10–20 units of a niche product to minimize risk before committing to bulk purchases.
💡Pro Tip: Use tools like Keepa to analyze historical sales data and spot products with stable demand and manageable competition.
Understanding PPC ROI (Pay-Per-Click Return on Investment)
Selecting the right products to sell isn’t just about identifying demand and profit margins; it’s also about ensuring they are cost-effective to advertise. Products with high PPC ROI potential – those that are easier and cheaper to promote – can give you an edge in Amazon’s competitive marketplace. By evaluating metrics like Advertising Cost of Sales (ACoS) and understanding category-specific benchmarks, you can make smarter product decisions that maximize both visibility and profitability.
🎥 Watch this video and find out how Craig tripled his sales and halved his ACoS in just 6 months
What Is PPC ROI?
Amazon’s PPC advertising helps boost product visibility by targeting relevant keywords. Tracking metrics like Advertising Cost of Sales (ACoS) helps ensure campaigns are cost-efficient.
How to Use ACoS in Product Selection
When choosing products, consider their potential PPC performance:
- Products with a lower category average ACoS are generally more cost-effective to advertise.
- Higher-margin products are better suited to absorb advertising costs, ensuring profitability even with moderate ACoS.
For example, a product in the Tools & Home Improvement category with an average ACoS of 24.8% and a CPC of $0.60 may offer better returns than a product in Beauty & Personal Care, which has an average ACoS of 44.1% and a CPC of $0.92.
🎥 Learn how to use BQool’s chrome extension to find profitable products and keywords
Leverage Category Benchmarks
Use Amazon’s Category Benchmark Reports to compare average ACoS and Cost-Per-Click (CPC) across categories. For example:
- Beauty & Personal Care: 44.1% average ACoS, $0.92 CPC
- Tools & Home Improvement: 24.8% average ACoS, $0.60 CPC
By understanding these benchmarks, you can select products that align with your advertising goals and budget.
Understanding Gated Products and Restrictions
Certain categories, such as Beauty, Jewelry, and Automotive, are gated, requiring sellers to gain approval. Although this involves extra steps, it often leads to reduced competition and better profit margins.
What Are Gated Products?
Gated products require documentation like invoices from authorized distributors or brand authorization letters to ensure marketplace integrity.
How to Identify Restricted Products
Tools like SellerAmp highlight gated items during product research, saving you time and effort. Work with reliable suppliers to secure necessary documentation and streamline the approval process.
😎 Get exclusive offers from BQool & Selleramp Integration
Benefits of Selling Gated Products
Gated categories often feature less competition and higher margins. For instance, while selling in the Jewelry category may require an upfront investment in compliance, the reduced competition can result in significant profitability.
Common Gated Categories
- Jewelry
- Automotive & Powersports
- Fine Art
- Major Appliances
- Collectible Coins
💡 Read now for more detailed information on restricted products on Amazon
🎥 Watch this short to find out which products you should avoid selling on Amazon
How to Prepare for Peak Season on Amazon
Success on Amazon is about more than great products and optimized listings, it’s about mastering timing and preparation. These moments, including Prime Day, Black Friday/Cyber Monday, and also the Holiday Season, hold immense potential for growth. We’ll guide you through detailed timelines and strategies to adequately prepare you for Prime Day and Black Friday/Cyber Monday.
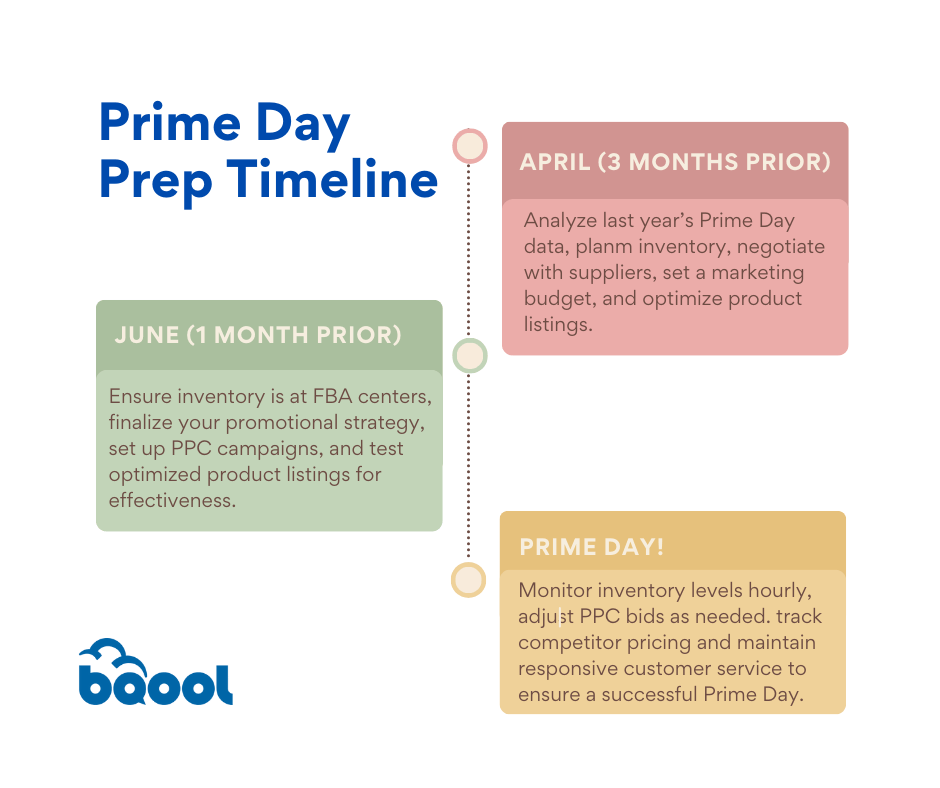
Prime Day Preparation Timeline for Amazon Sellers
Prime Day
Prime Day, Amazon’s annual two-day shopping extravaganza exclusively for Prime members, offers sellers an incredible opportunity to boost sales. Here’s how to prepare effectively:
Three Months Before (April)
Begin by analyzing data from the previous year’s Prime Day to uncover valuable insights and trends. Use this information to guide your inventory planning and initiate negotiations with suppliers to ensure stock availability. At this stage, it’s also crucial to allocate a marketing budget and start optimizing your product listings to attract more buyers.
One Month Before (June)
Ensure that your inventory has arrived at FBA centers, ready to meet the anticipated demand. Finalize your promotional strategy and prepare pay-per-click (PPC) campaigns to drive traffic. Additionally, test the optimized product listings to confirm they’re effective and appealing to potential buyers.
During Prime Day
Stay vigilant by monitoring your inventory levels hourly to avoid running out of stock. Be ready to adjust your PPC bids as needed to maintain visibility. Keep an eye on competitor pricing to stay competitive and prioritize customer service responsiveness to enhance buyer satisfaction during this critical period.
Black Friday and Cyber Monday
Black Friday, occurring on the fourth Friday of November, and Cyber Monday, the following Monday, represent the pinnacle of retail sales. To capitalize on this high-demand period, strategic planning and meticulous execution are essential. Here’s a streamlined guide to help you optimize your profits:
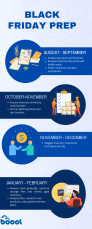
Black Friday Prep Timeline for Amazon Sellers
Pre-Season Planning (August-September)
During August-September, analyze your previous year’s performance to identify successful strategies and areas for improvement. Order inventory, considering Chinese holidays that may affect production, and develop a promotional calendar. Create engaging marketing assets, including advertisements and social media content, to ensure a cohesive campaign.
Implementation (October-November)
In October-November, ensure your inventory arrives by early October to avoid delays. Set up Amazon Lightning Deals if eligible, and prepare social media campaigns for peak engagement. Conduct thorough testing of your systems and processes, including your website and customer service protocols, to ensure smooth operations during high-traffic periods.
Holiday Season (September-December)
Throughout September-December, stagger inventory shipments to maintain a steady supply chain and reduce storage costs. Monitor daily sales velocity to adjust inventory levels and promotional strategies in real-time. Stay flexible with pricing strategies to remain competitive and maximize sales. Maintain high customer service levels to enhance satisfaction and encourage repeat business.
Post-Holiday Period (January-February)
In January-February, focus on inventory management by gradually reducing stock levels through clearance sales or promotions. Consider post-holiday promotions to clear remaining inventory and avoid storage fees. Plan for storage fee optimization and review aged inventory for liquidation, donation, or further promotions. Analyze the previous year’s data to identify trends and areas for improvement. Research new product opportunities, update your business plan, and optimize product listings to enhance visibility and conversion rates.
By following this strategic approach, you can effectively navigate the busy holiday season and maximize your profits during Black Friday and Cyber Monday.
🎥 Watch this video to find out how to reprice on Amazon during low seasons on Amazon.
How to Optimize Your Amazon Listings
Creating an effective Amazon listing might seem overwhelming at first, but breaking it down into manageable components makes the process much simpler. Let’s walk through each element step by step to help you create listings that both Amazon’s algorithm and your customers will love.
How to Write Product Titles and Descriptions on Amazon
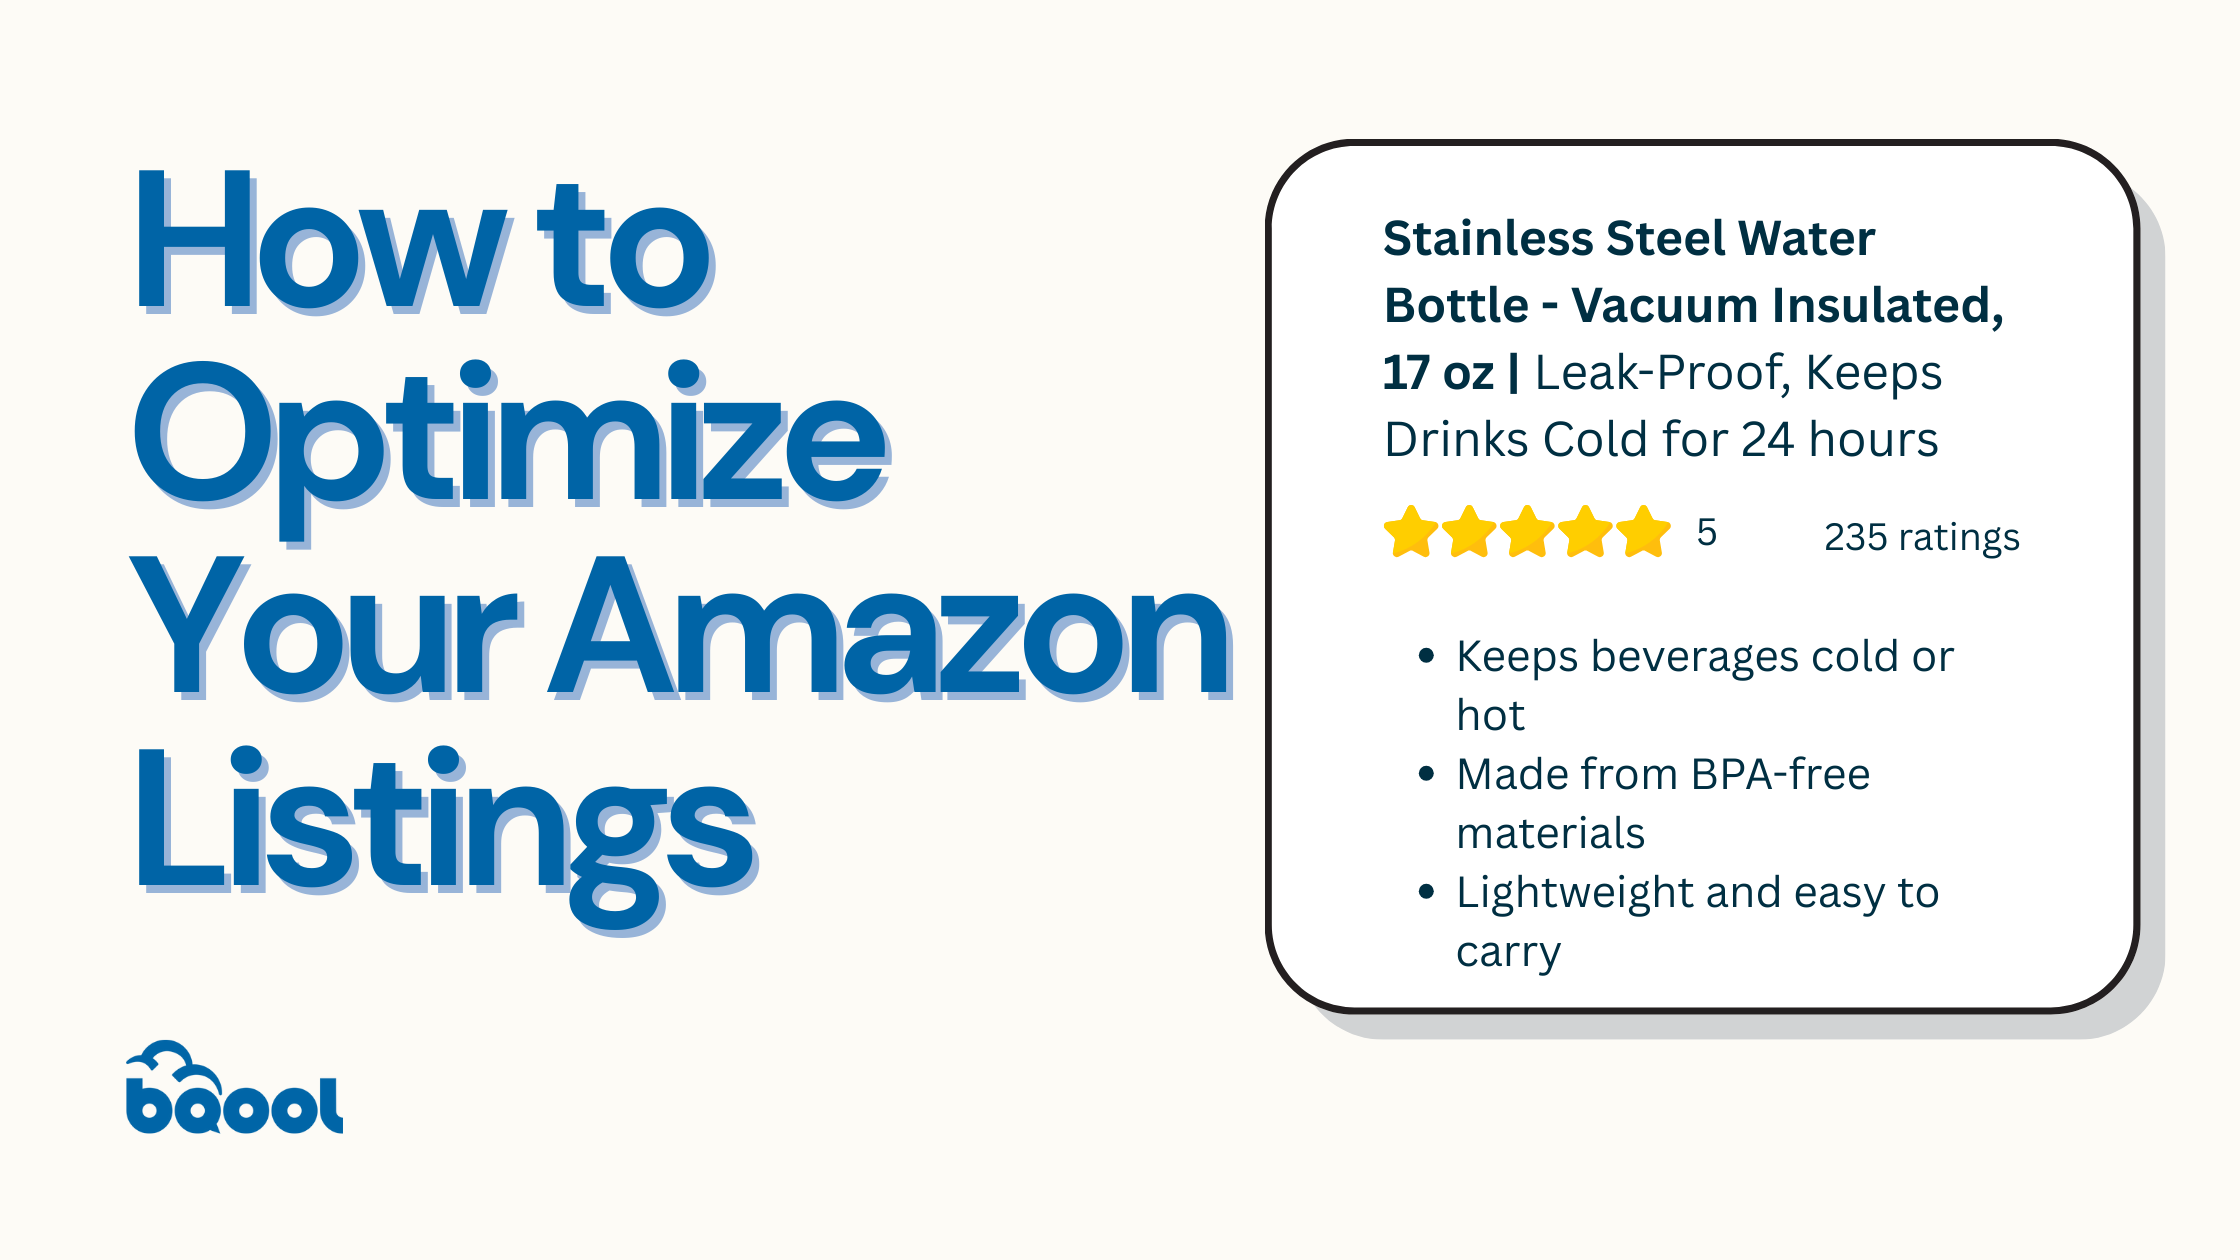
Think of your product title as your first impression on potential customers. You have 200 characters to work with, so make them count! Include these elements in a logical order:
- Start with your brand name and basic product type (e.g., “BrandName Stainless Steel Water Bottle”)
- Add key features that set your product apart (e.g., “Vacuum Insulated, Leak-Proof”)
- Include practical details like size and quantity (e.g., “32 oz, Pack of 2”)
- Mention the primary use or target user (e.g., “for Sports & Outdoor Activities”)
For your product description, imagine you’re explaining your product to someone who can’t see or touch it. Use simple, clear language and break up text into short paragraphs. Focus on answering the questions: “What problems does this solve?” and “Why should someone choose this product?”
🎥Watch this video to learn How to Write an Amazon Product Description that Sells
Optimizing Images and Bullet Points
Your product images are like your virtual showroom. Here’s how to make them work harder for you:
- Your main image needs a pure white background with the product taking up 85% of the frame
- Make sure images are at least 1000px × 500px to enable zoom features
- Include photos showing your product from different angles
- Add lifestyle images demonstrating the product in use
- Consider comparison shots to help customers understand size
For bullet points, think of them as your elevator pitch. Start each point with the most compelling information:
- First bullet: Highlight your product’s main feature or benefit
- Second bullet: Address a common problem it solves
- Third bullet: Mention quality indicators or certifications
- Fourth bullet: Include practical information like dimensions or compatibility
- Fifth bullet: Add any special features, warranty, or support information
Using Keywords Effectively
Keywords are like signposts that help customers find your product. Here’s a beginner-friendly approach:
- Start by brainstorming terms your customers might use to search for your product
- Use Amazon’s search bar suggestions for inspiration – type in related terms and see what Amazon suggests
- Include these keywords naturally in your title, bullets, and description
- Save additional relevant terms for your backend keywords
- Remember: Write for humans first, then optimize for search
🎥 Watch our video for a step-by-step tutorial on how to conduct Amazon Keyword Research
🔎Want to find the most profitable keywords? Try our Product Research Tool free for 14 days
Managing Customer Reviews
Customer reviews are crucial for building a strong Amazon reputation. They increase visibility since Amazon’s algorithm favors products with positive feedback, and they enhance credibility by demonstrating that real users trust your product. Reviews also act as social proof, as satisfied customers can influence potential buyers and drive sales.
For new sellers, gathering positive reviews in a competitive marketplace can be challenging. Without good reviews, or if negative ones aren’t managed properly, your rankings may drop, leading to missed sales and a harmed reputation. Sellers could also sometimes receive fake or malicious reviews that can mislead customers and hurt your business.
To address this, sellers should encourage reviews through:
- Offering great products: Make sure you’re selling items that meet customer needs and are of sound quality to avoid complaints.
- Set clear expectations: Describe your products accurately so customers get exactly what they expect—no surprises!
- Highlight reviews: Regularly share positive reviews on your listings to attract more buyers and build confidence.
- Listen and learn from negative feedback: Although bad reviews may be discouraging for new sellers, they offer valuable perspective and feedback which you can immediately address for future sale- it shows you’re willing to make things right.
- Watch for fake reviews: If you spot fake reviews, you can report them to Amazon to protect your reputation.
🎥 Learn how to track and remove fake or negative reviews through BQool’s BigCentral tool.
🎥Watch this video to learn how to leverage BQool’s Integration with InventoryLab for easy inventory management.
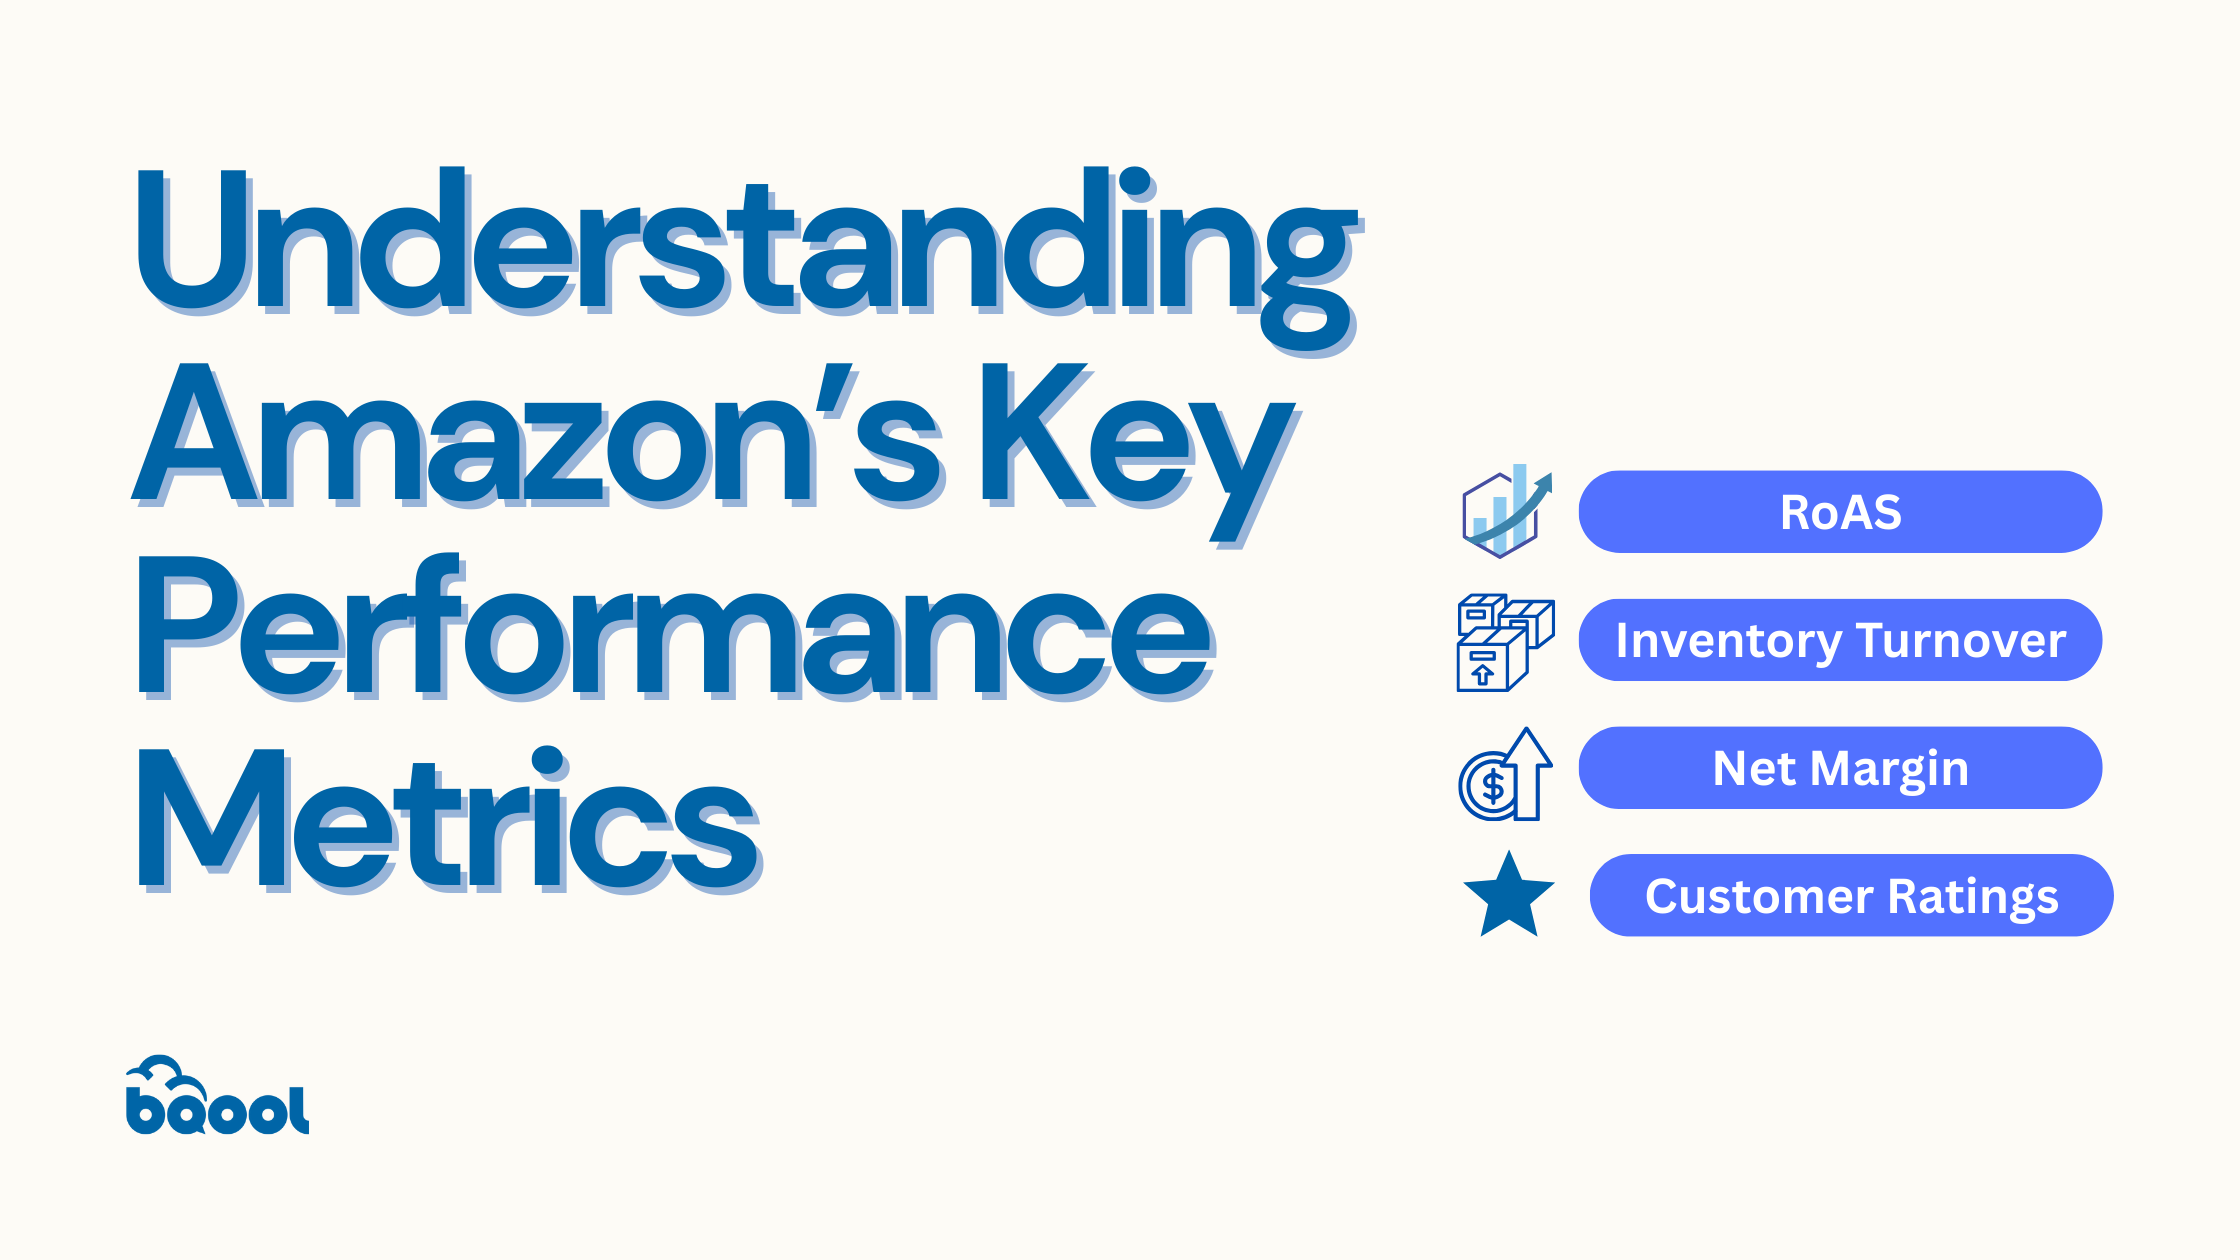
Understanding Amazon’s Key Performance Metrics
Success on Amazon goes beyond listing products – it’s about tracking and optimizing critical performance metrics. The table below outlines essential metrics, why they matter, and how to use them to improve your sales, visibility, and profitability. Use this table below to stay competitive and grow your business strategically.
Essential Metrics to Monitor for Amazon Sellers
Metric Category
Metric
Why It Matters
Actions to Take
Traffic and Engagement
Sessions
Shows the number of unique visitors to your product page, revealing listing visibility and customer interest.
- Launch Amazon ads to drive targeted traffic.
- Optimize keywords for higher rankings.
- Use external platforms for reach.
Click-Through Rate (CTR)
Measures the effectiveness of listings or ads in capturing attention.
- Test images, titles, and ad copy; use A/B testing to improve engagement.
Conversion Rate (Unit Session %)
Indicates how well your listing converts visitors into buyers. Aim for 5-10%.
- Improve images and descriptions.
- Use competitive pricing.
- Implement A+ Content.
Buy Box Percentage
Tracks how often your offer appears as the default purchase option, crucial for sales.
- Manage inventory effectively.
- Resolve account health issues promptly.
Advertising Effectiveness
Return on Ad Spend (RoAS)
Measures profitability of ad spend, showing revenue earned per dollar spent.
- Scale high-performing campaigns.
- Improve underperforming ads.
Total Advertising Cost of Sales (TACoS)
Combines organic and ad-attributed sales for a holistic view of revenue.
- Focus on reducing TACoS by boosting organic sales through effective ads.
Cost-per-Click (CPC)
Tracks the cost of each ad click, reflecting ad competitiveness.
- Use lower-CPC keywords.
- Adjust ad spend for profitability.
Profitability and Margins
Gross Margin
Reveals profitability at the product level by excluding direct costs.
- Promote high-margin products.
- Optimize low-margin pricing.
Net Profit Margin
Measures overall profitability after all expenses.
- Lower operational costs.
- Optimize ads for better returns.
Cost of Goods Sold (CoGS)
Tracks direct costs of producing goods.
- Negotiate with suppliers.
- Reassess pricing.
Inventory Management
Inventory Turnover Rate
Tracks how often inventory is sold and replaced, revealing sales velocity.
- Boost sales for slow-moving items.
- Adjust reorder points.
Excess Inventory %
Reflects overstocked items that tie up capital and increase costs.
- Liquidate excess inventory. Improve forecasting.
Stockout Rate
Measures the percentage of time products are out of stock, impacting sales.
- Streamline restocking processes.
- Improve lead times.
Customer Experience
Customer Ratings
Builds trust and impacts conversions through customer satisfaction.
- Address negative reviews.
- Use positive reviews in marketing.
Refund Rate
Indicates product or expectation issues.
- Improve product quality. Provide accurate descriptions.
Market Intelligence
Best Sellers Rank (BSR)
Shows product performance within its category based on sales velocity.
- Optimize listings for low-ranked products.
- Refine keyword strategies for visibility.
Best Practice for Metric Analysis
1. Regular Monitoring
To establish an effective monitoring routine, dedicate consistent times each week to review your performance comprehensively. Rather than reacting to daily fluctuations, focus your attention on identifying meaningful trends that indicate true business patterns. Keep your analysis organized by maintaining detailed spreadsheets that track performance over time, allowing you to spot long-term patterns and seasonal changes.
2. Action-Oriented Analysis
When analyzing your data, transform these insights into concrete actions. Start by using your inventory data to optimize stock levels and prevent costly stockouts. Your performance metrics will highlight specific areas where listings need improvement, while campaign data should guide adjustments to your advertising strategy. Use your historical performance patterns to design promotional activities that align with your customers’ buying behavior.
3. Holistic Performance Review
Take a comprehensive approach to reviewing your overall performance by examining how different metrics interact and influence each other. By documenting your progress over time, you can identify meaningful long-term trends that shape your business trajectory. Compare performance across your entire product catalog to identify successful strategies that can be replicated. Set realistic performance goals by using category standards as benchmarks, allowing you to measure your success against industry averages while identifying areas for improvement.
💡Remember: Regular analysis and strategic adjustments based on these metrics will help ensure sustainable growth for your Amazon business.

Mastering Amazon PPC Advertising
What is Amazon PPC?
Amazon PPC is an advertising service designed to help sellers and brands boost their product sales. Sellers can run ad campaigns for their products, and a small fee is charged by Amazon each time a customer clicks on an ad.
The Three Types of Amazon PPC Campaigns
When it comes to advertising on Amazon, understanding the different campaign types is key to reaching the right shoppers at the right time. Amazon offers three main types of PPC (Pay-Per-Click) campaigns, each with a unique role in your marketing strategy.
1. Sponsored Products
These ads blend seamlessly into search results and product pages, putting your products in front of shoppers who are actively searching. Sponsored Products are your go-to for visibility, quick sales, and testing new items.
2. Sponsored Brands
These ads showcase your brand, logo, and a curated set of products in top-tier positions. If you’re looking to build recognition and guide customers to explore your full catalog or brand store, this is your tool.
3. Sponsored Display
Sponsored Display ads help you reconnect with shoppers who viewed your products or similar items. They also appear outside of Amazon, keeping your brand top-of-mind across the web.
Each campaign type works best when used with a specific goal in mind, whether that’s boosting sales, building brand awareness, or re-targeting curious shoppers.
What is the difference between Sponsored Product, Sponsored Brand, and Sponsored Display?
When running PPC (Pay-Per-Click) ads on Amazon, you’ll come across three main types of ad campaigns: Sponsored Products, Sponsored Brands, and Sponsored Display. Here’s a simple breakdown of each and where your ads will show up:
🛒 Sponsored Products
- What it is: Ads that promote individual product listings.
- Where it appears: In search results (top, middle, or bottom of the page). On competitor product pages (under “Sponsored Products related to this item”).
- Great for: Boosting visibility of specific products.
- UI location: In Seller Central, go to Advertising > Campaign Manager, click Create Campaign, and select Sponsored Products.
🏷️ Sponsored Brands
- What it is: Ads that showcase your brand logo, a custom headline, and up to three of your products.
- Where it appears:
- At the very top of search results, above Sponsored Products.
- Sometimes within search results or at the bottom of the page.
- Great for: Increasing brand awareness and driving traffic to your Storefront or a custom landing page.
- UI location: In Campaign Manager, click Create Campaign and select Sponsored Brands.
📣 Sponsored Display
- What it is: Ads that target shoppers based on their interests, shopping behavior, or even if they’ve viewed your products before.
- Where it appears:
- On Amazon (product detail pages, search results, or homepage).
- Off Amazon (third-party websites and apps).
- Great for: Retargeting and reaching new audiences.
- UI location: In Campaign Manager, choose Create Campaign and select Sponsored Display.
Understanding Essential PPC Metrics
Just as a doctor monitors vital signs to assess health, these key metrics help you evaluate and optimize your campaign’s performance.
What is Advertising Cost of Sales (ACoS)?
Think of ACoS as your campaign’s temperature reading:
Definition: The percentage of attributed sales spent on advertising
- Formula: (Ad Spend ÷ Sales) × 100
- Real-world example: If you spend $10 on ads and generate $100 in sales, your ACoS is 10%
- Target: Lower ACoS generally indicates better efficiency, but optimal rates vary by product and profit margins
Pro Tip: Consider your profit margins when setting ACoS targets. A 25% ACoS might be excellent for high-margin products but unsustainable for low-margin items.
What is Return on Ad Spend (RoAS)?
Consider RoAS as your campaign’s pulse rate:
Definition: Revenue generated per advertising dollar
- Formula: Sales ÷ Ad Spend
- Real-world example: $500 in sales from $100 in ad spend equals a 5x RoAS
- Target: Higher RoAS indicates stronger campaign performance
💡Pro Tip: Track RoAS trends over time rather than focusing on daily fluctuations.
The Two Amazon PPC Campaign Types
Understanding the difference between automatic and manual targeting is crucial for your advertising strategy. Think of it as choosing between an automatic and manual car- each has its advantages depending on your skill level and goals.
Automatic Targeting
Perfect for beginners and market research, automatic targeting is like having an experienced co-pilot:
- Amazon’s algorithm does the heavy lifting
- Minimal setup required—ideal for those just starting
- Excellent for market research and keyword discovery
- Four intelligent match types:
-
- Close match: Your most relevant searches
-
- Loose match: Broader but related terms
-
- Substitutes: Similar product alternatives
-
- Complements: Products often bought together
Best for:
- New sellers getting started
- Product research
- Keyword discovery
- Testing new markets
Manual Targeting
Once you’re comfortable with PPC basics, manual targeting gives you full control:
- You choose specific keywords to target
- Three precise match types:
- Exact match: Perfect for high-performing keywords
- Phrase match: Captures relevant variations
- Broad match: Casts a wider net
- Better control over spending
- Higher potential ROI once optimized
How to Set Up Your First Amazon PPC Campaign
Starting your first PPC campaign can feel overwhelming but breaking it down into manageable steps makes the process much clearer. Think of it as building a house—you need a solid foundation before adding the finishing touches.
1. Initial Setup: Getting Started Right
Just as you’d carefully choose a location for a physical store, your campaign setup requires thoughtful consideration:
- Navigate to Seller Central > Advertising > Campaign Manager
- Select Sponsored Products as your starting point
- Begin with automatic targeting—it’s like having a skilled mentor guiding your first steps
- Remember: A well-planned start sets you up for long-term success
2. Configuring Campaign Settings
These settings are like the blueprint for your advertising strategy:
- Campaign Name: Choose descriptive titles that help you track purpose and performance
- Budget: Think of your daily budget as your store’s daily operating costs
- Start with at least $50/day to gather meaningful data
- Remember: Underfunding can limit your learning opportunities
- Duration: Leave the end date open to maintain continuous presence
- Bidding: “Dynamic bids – up and down” gives Amazon permission to adjust your bids for optimal performance
3. Creating an Ad Group
Think of ad groups as departments in your store:
- Keep it simple: One product per ad group for clear performance tracking
- Use consistent naming conventions for easy management
- Ensure Buy Box eligibility—without it, your ads won’t run
- Pro tip: Create separate ad groups for variations of the same product
4. Setting up your Bidding Strategy
Your bidding strategy is like setting prices in your store:
- Start with default bids between $1.50-$2.00 to ensure visibility
- Monitor performance daily in the first week
- Adjust based on data, not hunches
- Remember: Higher initial bids can help gather data faster
Pro Tips for PPC Success
These insights come from years of seller experience and can help you avoid common pitfalls:
1. Have Patience
- Give campaigns at least two weeks before major changes
- Don’t panic over short-term fluctuations
- Focus on trends rather than daily numbers
2. Strategic Product Selection
- Products in the $21-$30 range often perform best
- Higher margins allow more bidding flexibility
- Consider seasonal trends in your strategy
3. Smart Keyword Management
- Use automatic campaigns as research tools
- Graduate proven keywords to manual campaigns
- Regularly update negative keywords
- Monitor competitor pricing for bid adjustments
Your success in Amazon PPC comes from understanding these fundamentals and applying them consistently. Start small, learn from your data, and scale what works. With patience and attention to detail, PPC can transform from a marketing expense into a powerful revenue generator for your Amazon business.
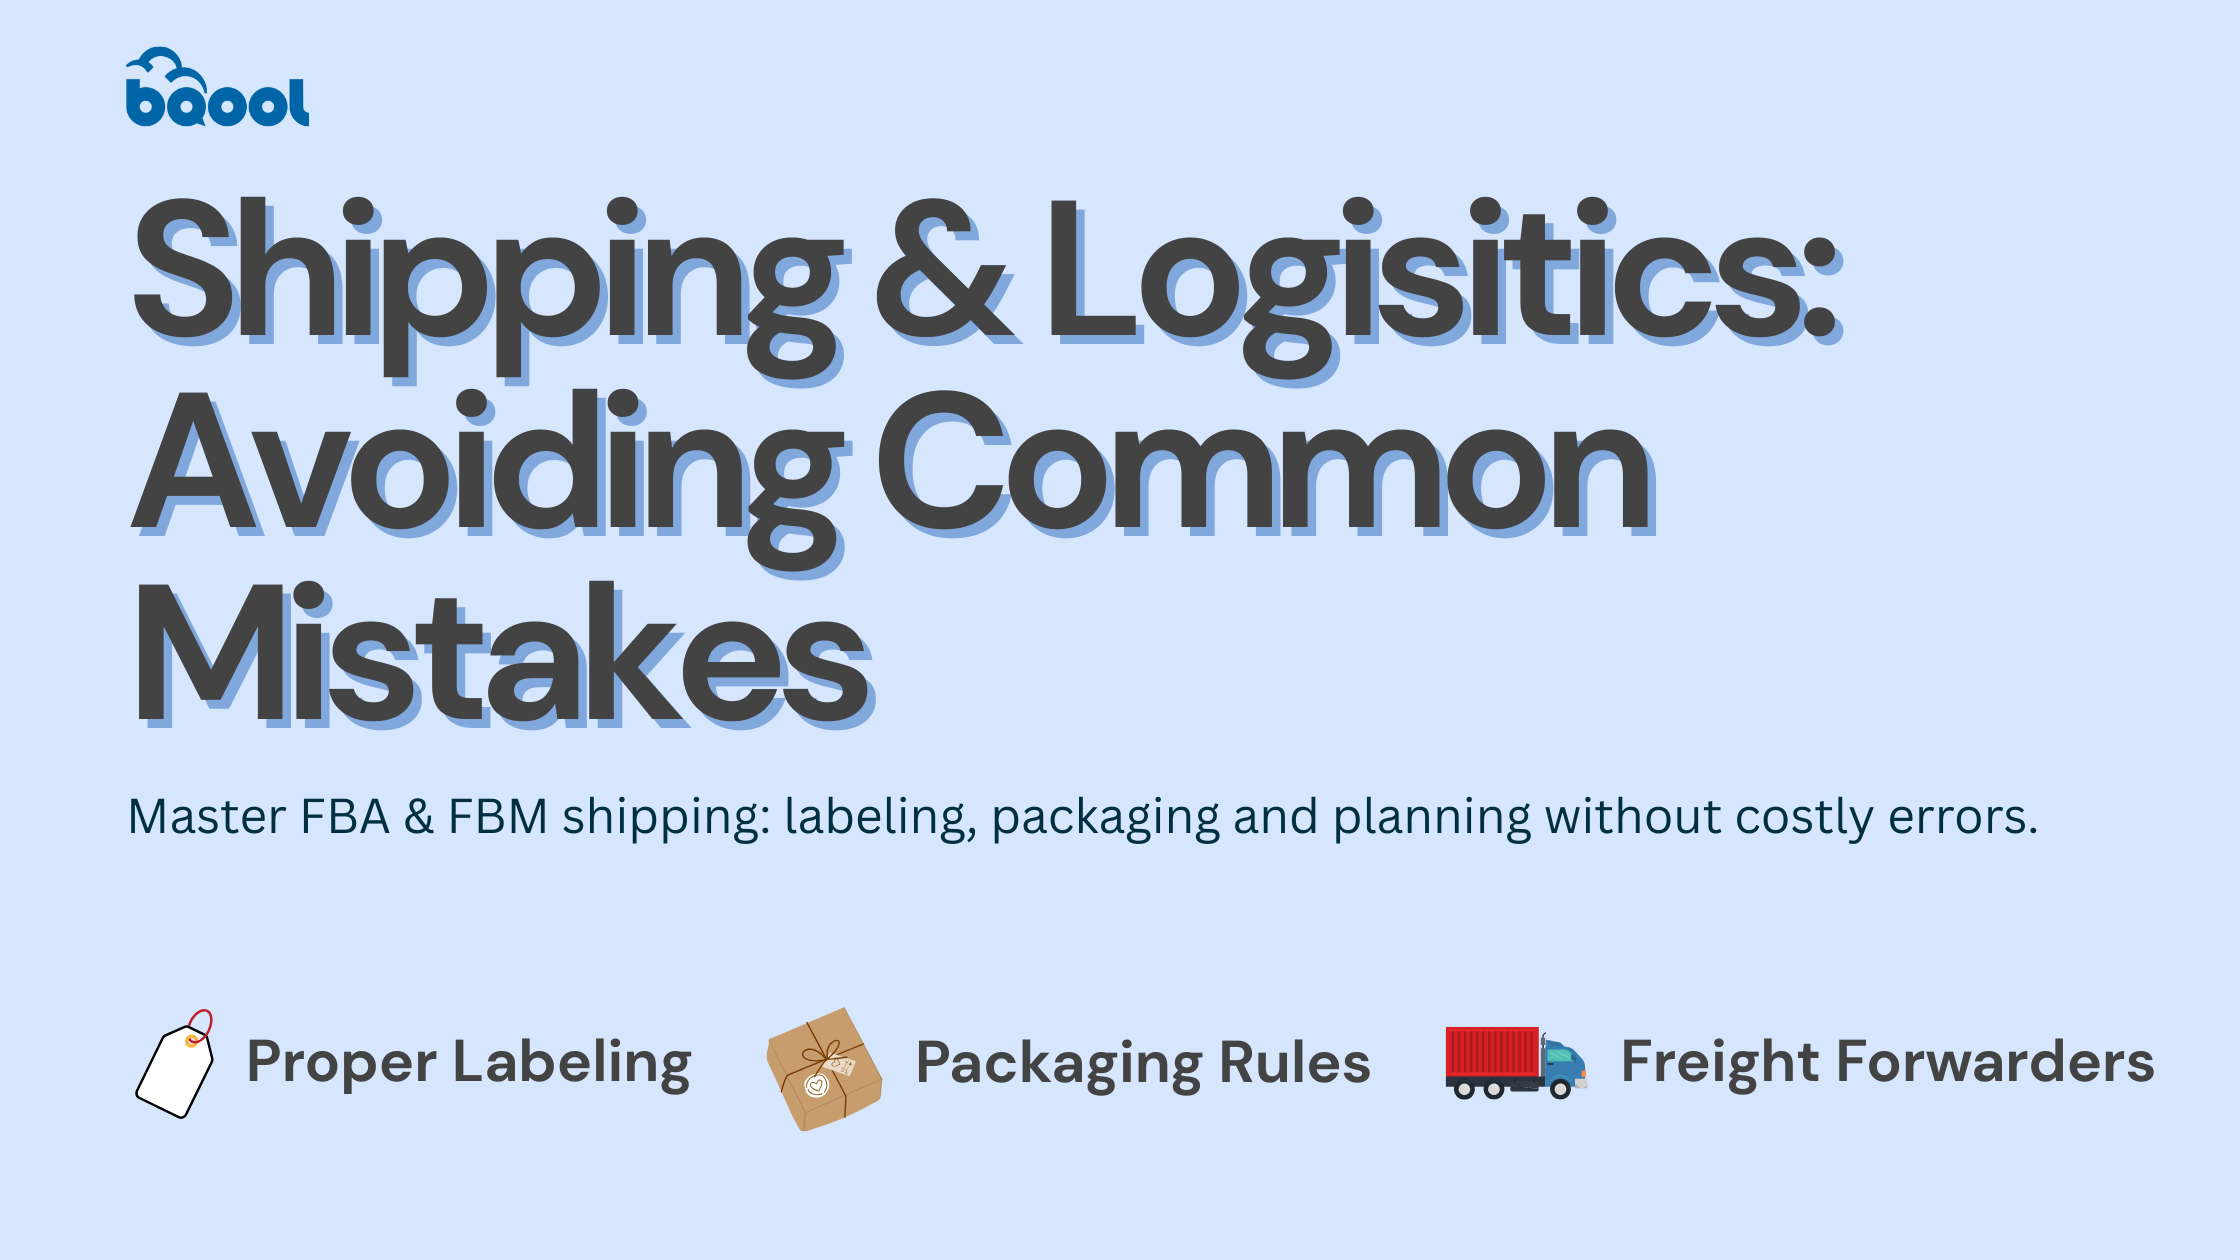
Shipping and Logistics: Avoiding Common Mistakes
Efficient shipping and logistics are essential for running a successful Amazon business. Whether you rely on Fulfillment by Amazon (FBA) or handle orders independently with Fulfillment by Merchant (FBM), understanding Amazon’s guidelines and avoiding common mistakes can save you time, money, and stress.
Amazon’s Shipping Requirements
FBA Shipping Requirements
Amazon has specific rules for packaging, box dimensions, weight, and labeling to ensure inventory is delivered safely:
Box Size and Weight
Standard boxes must not exceed 25 inches on any side or weigh more than 50 lbs. Oversized items can exceed these limits but may incur additional fees.
Packaging Materials
Use strong, six-sided boxes with protective materials like bubble wrap, kraft paper, or air pillows. Avoid restricted materials such as Styrofoam or packing peanuts.
Labeling
Each box must have an FBA Box ID label, ship-to and ship-from addresses, and special handling labels (e.g., “Team Lift” for boxes over 50 lbs). Place labels on a flat surface, not over seams, to ensure scannability.
FBM Shipping Guidelines
FBM sellers must prioritize:
- Timely Deliveries. Choose reliable carriers to meet promised delivery times.
- Insurance. For high-value shipments, use carriers that provide insurance to protect against loss or damage.
- Labeling and Prepping Inventory. Proper labeling is critical for seamless FBA operations.
FNSKU Labels
Ensure each product has a scannable FNSKU (Fulfillment Network Stock Keeping Unit) label, a barcode that Amazon uses to identify and track products in their warehouses. And ensure that this label that matches your shipping plan. For example, a misaligned barcode can delay processing.
Packaging for Protection
Use poly bags, bubble wrap, or custom boxes to secure fragile items. For instance, individually wrapping glassware prevents breakage during transit.
Avoid Labeling Errors
Duplicate or photocopied labels can confuse fulfillment centers. Always use unique, freshly printed labels for each shipment.
💡 Pro Tip: Use visuals to guide team members or suppliers on proper labeling practices to prevent mistakes.
Creating a Shipping Plan
An FBA shipping plan ensures your inventory is sent to the correct fulfillment centers. Key elements of a shipping plan include:
- Product Details. List all products and quantities being shipped.
- Fulfillment Centers. Amazon assigns centers to optimize storage and delivery.
- Labeling Responsibilities. Specify whether Amazon or you will handle labeling.
- Finalize your shipping plan early. preferably before manufacturing—to avoid delays. Missing Amazon’s recommended “Ship By” date can result in cancellation fees and delayed processing.
Handling Lost or Damaged Inventory
FBA Sellers
If inventory is lost or damaged at an FBA center, Amazon typically reimburses sellers. Monitor shipment statuses in Seller Central and file claims promptly for reimbursement.
FBM Sellers
Use carriers with tracking services and insurance to mitigate risks. For high-value items, ensure extra packaging to protect against shipping damage.
Example: If an FBA item is marked as “unsellable” due to damage, you can request reimbursement or create a removal order to inspect the item yourself.
Common Shipping Mistakes to Avoid
Ignoring Amazon’s Packaging Rules
Using prohibited materials like Styrofoam can lead to rejected shipments.
Overlooking Label Placement
Placing labels over seams or edges can make them unreadable during scanning.
Choosing Unreliable Freight Forwarders
Work with experienced companies familiar with FBA procedures to avoid delays and damaged shipments.
Underestimating Lead Times
Always build a buffer into your shipping schedule to account for unexpected delays.
Timing Your Shipments
Shipping during peak seasons, such as the holidays, can cause delays and increased costs. Plan ahead for major shopping events like Black Friday, Prime Day, and Cyber Monday. Avoid shipping too close to these dates to ensure your inventory arrives on time.
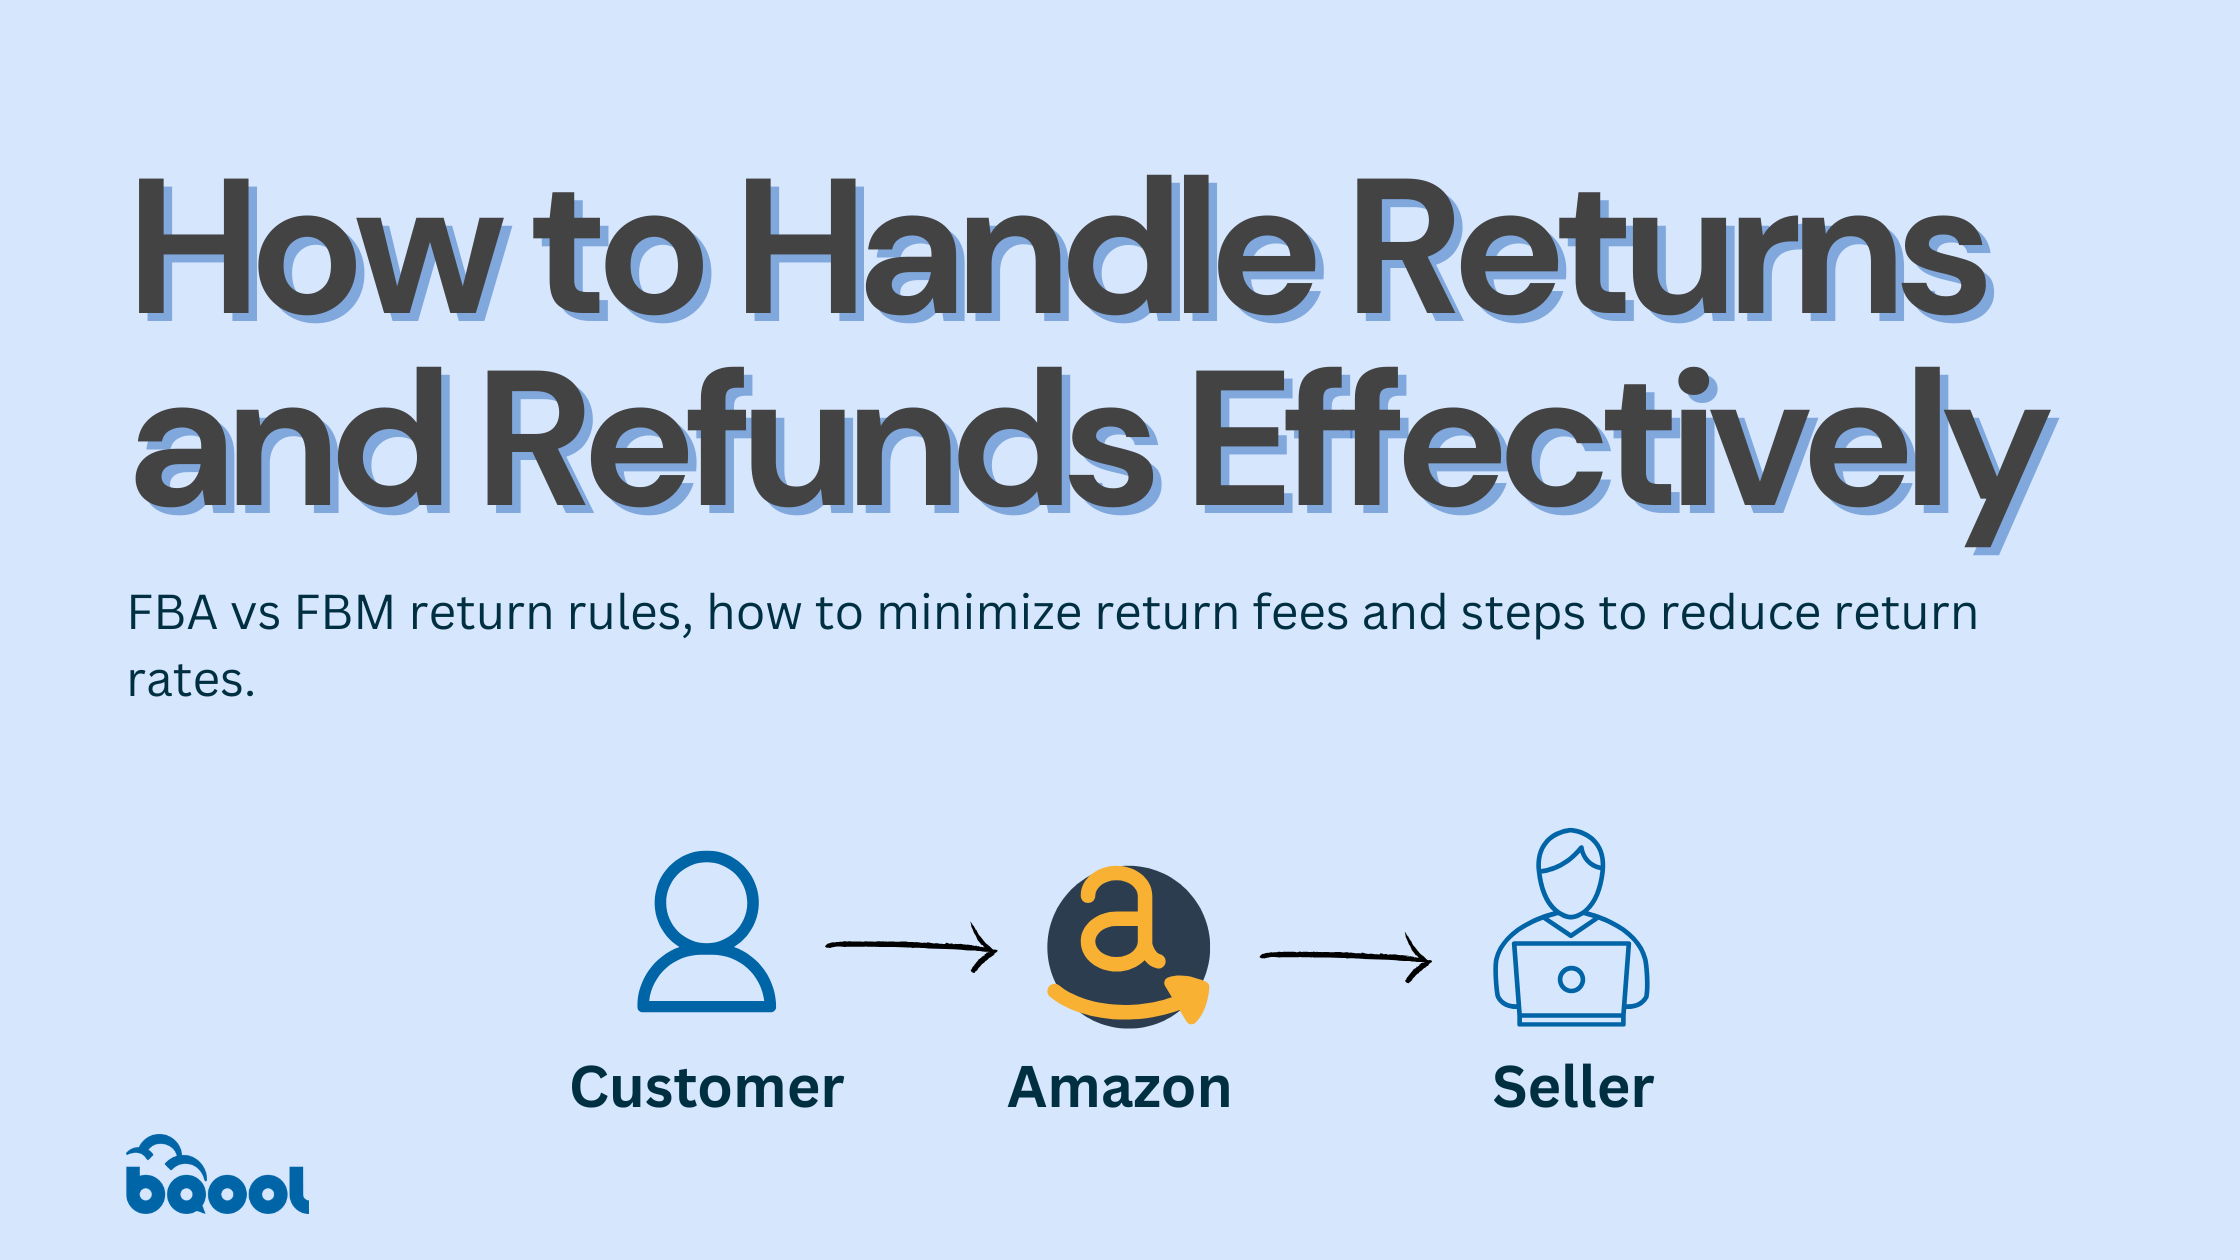
Returns and refunds are inevitable when selling on Amazon, with return rates averaging 5% to 15% across categories (MyFBAPrep, 2024). Managing them well can turn challenges into opportunities to build trust and loyalty with your customers. By understanding Amazon’s return policies and proactively addressing issues, you can maintain strong seller metrics and create a seamless customer experience.
What Are Amazon’s Return Policies for FBA and FBM Sellers?
FBA Return Policies
With Fulfillment by Amazon (FBA), Amazon manages the return process, following its own policies to determine eligibility. Sellers have limited control, even when the buyer is at fault for misuse or damage.
Standard Window
Customers can return items within 30 days, though exceptions apply, such as extended holiday return periods or 90-day windows for unopened Baby category items.
Return Evaluations
Returned items are assessed for resale. Items in new condition are added back to your inventory, while damaged ones are marked “unsellable.” Damaged or unsellable items are categorized as “Defective” or “Customer Damaged.”
Reimbursement
If Amazon damages an item, you’re reimbursed. For customer-caused damage, reimbursement is unavailable unless covered by Amazon’s Safe-T Claim program.
Inventory Evaluation Settings (2024 Update)
Sellers can choose to inspect returns themselves, ensuring quality control for items like electronics or products with moving parts. This is particularly useful for sellers of electronics or items with moving parts, as it gives them the opportunity to personally assess whether a product is truly unsellable. You can manage these settings in Seller Central under FBA Inventory Evaluation Settings.
FBM Return Policies
For FBM sellers, managing returns is entirely your responsibility.
Timely Action
Provide return labels and process refunds within two business days to maintain good metrics.
Inspection
Assess returns for resale potential, such as reclassifying a slightly damaged item as “Used – Like New.”
Custom Policies
Sellers can set conditions, but they must comply with Amazon’s guidelines.
What Happens if the Customer Doesn’t Return the Product?
If a customer doesn’t return an item within 45 days, Amazon recharges them and reimburses the seller automatically. In rare cases, sellers may need to file a support ticket for reimbursement.
How Can I Reduce Return Rates on Amazon?
Optimize Listings
Use accurate descriptions, high-quality images, and clear sizing details to align customer expectations.
Enhance Quality Control
Inspect inventory regularly and address recurring issues with suppliers. Packaging improvements can also reduce shipping-related damage.
Customer Communication
Answer buyer questions promptly, and include usage or care instructions to prevent unnecessary returns.
FBA Returns Fees
Amazon has introduced additional fees for returns exceeding category thresholds.
Threshold-Based Fees
Higher return rates than category norms incur extra charges. For example, exceeding a 10% category return rate triggers additional fees. For example, if your category’s standard return rate is 10% but your product reaches 15%, you may incur extra fees.
Exemptions for Low-Volume Products
Products shipping fewer than 25 units monthly are exempt.
Apparel and Shoes
Return fees are charged for every returned item, regardless of return volume.
Fee Calculations
Return fees depend on size tier, shipping weight, category, and return rate. For instance, a large standard item in the electronics category exceeding its return threshold will incur combined fees. For more details on how Amazon calculates return fees, check out this website. Additionally, see the table below for return rate thresholds per category.
Amazon Return Rate Threshold Per Category
Category
Return Rate Threshold (Since June 2024)
Backpacks, Handbags, and Luggage 👜
12.8%
Compact Appliances 🏠
12.6%
Eyewear 👓
12.1%
Full-Size Appliances 🏠
11.9%
Watches ⌚
12.0%
Amazon Device Accessories 📱
11.3%
Computers 💻
11.4%
Consumer Electronics 🎧
11.2%
Jewelry 💍
10.8%
Video Game Consoles 🎮
10.7%
Pet Products 🐾
10.2%
Lawn Mowers and Snow Throwers 🌱
9.5%
Mattresses 🛏
9.3%
Baby Products 👶
9.3%
Automotive and Powersports 🚗
9.1%
Musical Instruments and AV Production 🎸
9.2%
Furniture 🛋
9.6%
Lawn and Garden 🌿
7.7%
Base Equipment Power Tools 🛠
7.1%
Electronics Accessories 📡
8.8%
Sports and Outdoors ⚽
8.7%
Tires 🚗
8.7%
Tools and Home Improvement 🛠
8.7%
Home and Kitchen 🍽
8.1%
Media – Books, DVD, Music, Software, Video 📚
5.1%
Fine Art 🎨
5.6%
Beauty, Health and Personal Care 💅
5.5%
Business, Industrial, and Scientific Supplies 🏗
6.0%
Video Games and Gaming Accessories 🎮
6.5%
Everything Else 🌐
4.8%
Gift Cards 🎁
4.8%
Amazon Explore 🌍
4.8%
Toys and Games 🧸
4.7%
Office Products 🖊
4.4%
Grocery and Gourmet 🥘
2.9%
This amazon seller guide will walk you through everything you need to know to start and grow a successful Amazon business in 2025.
Overview
- Why Sell on Amazon?
- Getting Started
- How to Set Up Your Amazon Seller Account
- What is the difference between FBA vs. FBM?
- Amazon Selling Fees Explained
- How to Select the Right Product to Sell on Amazon
- How to Prepare for Peak Season on Amazon
- How to Optimize Your Amazon Listings
- Understanding Amazon’s Key Performance Metrics
- Mastering Amazon PPC Advertising
- Shipping and Logistics: Avoiding Common Mistakes
Why Sell on Amazon?
Thinking about diversifying your income, starting a new hobby, or stepping into entrepreneurship? Amazon Marketplace is the perfect launchpad. Dominating 39.5% of global e-commerce sales and generating a staggering $491.65 billion in revenue in 2024 (eMarketer, 2024), Amazon outpaces competitors like Walmart (20.5%) and Shopify (15%). With over 9.7 million active sellers and a massive 200+ million Prime members worldwide (JungleScout Amazon Seller Report, 2025), the opportunities are endless. Whether you’re new to selling or looking for expert tips to level up, this guide has everything you need to succeed.
🎧Listen to this podcast to discover Sheryl’s journey and learn how to automate your business for 7-figure success!
With over 310 million customers worldwide, 80% based in the US, Amazon is a top e-commerce platform that’s easy to access. It has a vast, ready-to-buy audience with over 200 million Prime members who are willing to spend more. The regional seller distribution shows that the United States has 1.9 million sellers, accounting for 37.82% of the market share. The United Kingdom follows with 281,000 sellers, making up 9.54% of the market share. Germany has 244,000 sellers with an 8.30% market share, Italy has 217,000 sellers with a 7.36% market share, and France has 212,000 sellers with a 7.19% market share. (Helium10, 2025)
Regional Seller Distribution of Amazon Sellers across US, UK, Germany, Italy, and France.
What makes Amazon particularly attractive for new sellers is its robust infrastructure and built-in trust. When customers shop on Amazon, they shop with confidence, knowing they’re protected by Amazon’s customer-friendly policies and reliable delivery systems. This trust translates directly into higher conversion rates for sellers compared to standalone e-commerce websites.
📖Read this blog post on “Why Sell on Amazon” for tips on leveraging Amazon’s infrastructure.
As a seller, if you subscribe to fulfillment by Amazon (FBA), Amazon takes the hassle of storage, shipping, and customer service off your hands, leaving you in charge of marketing and selection of your product. This means you can focus on growing your business without getting bogged down by operational logistics. Amazon provides all the tools you need from managing inventory, optimizing listings, and growing your business.
🎧Check out this podcast on Fulfillment by Amazon (FBA)’s Selection Programme and how it can benefit your business.
The platform’s sophisticated algorithm and search features also make it easier for customers to find your products. With tools like Amazon’s A9 search algorithm, your products can gain visibility based on performance metrics rather than just advertising spend. This levels the playing field for new sellers who might not have large marketing budgets.
🎥Watch this tutorial on Finding The Best Amazon Keywords For Your Listings using BQool’s Keyword Research tool.
Also, Amazon’s mobile app presence means your products are accessible to customers 24/7, with over 150 million mobile users accessing the platform monthly. This mobile-first approach, combined with Amazon’s continuous investment in technology and customer experience, ensures that sellers can reach customers wherever they are, whenever they’re ready to buy.
How to Choose the Right Amazon Business Model from Online Arbitrage, Retail Arbitrage, Private Label, Wholesale, Drop-shipping, and Handmade.
Choosing the Right Amazon Business Model
When starting an e-commerce business, you must first pick out a business model that works for you. Below are a few factors to consider when choosing your ideal business model:
- Accessibility: How easy or difficult it is to start using this business model.
- Profitability: How quickly and easily this business model can generate profit.
- Viability: The chances of maintaining long-term success while handling risks.
- Competitiveness: The level of competition you’ll encounter in the market.
Below we introduce the most popular Amazon businesses, namely: Private label, wholesale, retail arbitrage, online arbitrage, drop shipping, and handmade.
The Six Types of Amazon Business Models
Let’s explore each business model in detail, examining not just what they are, but how they work and who they’re best suited for.
Amazon Private Label
Private label selling involves sourcing unbranded products from manufacturers and rebranding them under your own label. Essentially, you create your own brand identity and apply it to products that are often already being made by manufacturers. Think of it as creating your own restaurant rather than franchising an existing one—you have complete control over your menu (products), pricing, and brand identity.
A few benefits of owning a private label business on Amazon include:
- Brand ownership gives you control over pricing and product development
- Higher profit margins (typically 25-40%)
- Potential for brand recognition and customer loyalty
- Opportunity to expand beyond Amazon
📖 Read this blog on the 9 Causes for Private Label Seller Failure on Amazon
Amazon Wholesale
In wholesale, you purchase products in bulk from distributors or manufacturers at a discounted price, then resell them on Amazon at a markup. Unlike retail or online arbitrage, where you’re hunting for deals on individual products, wholesale selling focuses on buying from established suppliers with large catalogs and offering those products to a massive audience on Amazon. The key is to buy in large quantities, which helps secure better pricing and increases profit margins.
Key aspects of wholesale success:
- Established product demand reduces marketing needs
- Predictable inventory management
- Built-in brand recognition
- Opportunity for consistent reorders
🎥 Watch this video for tips and tricks on Amazon Wholesale & Private Label
Retail Arbitrage
Retail Arbitrage refers to reselling goods that you find at bargain prices from retail stores, then selling them at a higher price point on Amazon to make profits. Amazon sellers prefer this business model due to its ease of access, simplicity, and fast process. You don’t need any investments, and only purchase items that are readily available!
As a retail arbitrage seller you may find yourself going through the steps below:
- Morning: Check clearance sales at local stores
- Afternoon: Scan items using Amazon Seller App to check profitability
- Evening: List new finds and process shipments
🎥 Watch this video and find out How Alex made $380K a year with Retail Arbitrage in less than a year.
Online Arbitrage
Online arbitrage is similar to retail arbitrage but happens entirely online. You scour e-commerce websites like Walmart.com or Target.com for discounted items, purchase them, and resell on Amazon at a markup.
A few common tools that you would use to assist you as an Amazon online arbitrage seller include:
- Price comparison software
- Deal finding extensions
- Virtual assistants for sourcing
- Automated repricing tools
🎥Watch this video to discover John’s journey with Online Arbitrage as he shares the pros and cons and answers our questions about his experience.
Amazon Dropshipping
In this business model, sellers set up their storefronts, decide on pricing, branding, and marketing—all without ever touching the products. As a seller, you act as the middleman between the supplier and the customer. When someone places an order, you collect the payment, pay the supplier, and they handle the fulfillment.
Understanding the drop-ship workflow:
- A customer places order on your Amazon listing
- You forward order to supplier
- Supplier ships directly to customer
- You pocket the difference between your selling price and supplier cost
📖 Read this blog for a Basic Guide to Dropshipping on Amazon
🎥Watch this video on Tips for Retail Arbitrage, Online Arbitrage and Dropshipping on Amazon
Amazon Handmade
Amazon Handmade is a curated community for artisans, similar to Etsy but with Amazon’s massive customer base. This model is perfect for creators who want to scale their craft business.
What sets Handmade apart:
- Direct connection with customers
- Lower competition due to entry barriers
- Higher perceived value for unique items
- Strong brand storytelling opportunities
📖 Interested in Amazon handmade? Read this blog on Exploring the Handmade Amazon Program: Is it Worth Your Time (or your Money)
How do I choose the right Amazon business model?
Choosing the right Amazon business model is a critical decision that depends on your financial readiness, time availability, market conditions, and risk tolerance. The infographic below breaks down the process into three key steps: self-assessment to evaluate your resources and commitment, market analysis to understand competition and trends, and risk assessment to weigh potential challenges.
Questions to ask yourself when selecting an Amazon Business Model include: Self Assessment Questions, Market Analysis Questions, and Risk Assessment Questions.
Now that you understand the basics of Amazon’s business models and its policies, it’s time to explore the practical steps to get started. In this section, you’ll find step-by-step guides for each business model- Private Label, Wholesale, Retail Arbitrage, Online Arbitrage, Dropshipping, and Handmade. From finding suppliers to listing products that stand out, these practical tips will help you hit the ground running and set your Amazon journey up for success.
How to Sell Private Label on Amazon
Creating a private label business on Amazon involves sourcing unbranded products and rebranding them under your label. This model allows you to control your product design, branding, and pricing strategy, offering significant opportunities for growth. Below we define the steps on how to get started selling Private Label on Amazon.
4 Steps to Selling Private Label on Amazon include, defining your product strategy, developing go-to-market plans, listing products on amazon and finding a reliable supplier.
STEP 1: Define Your Product Strategy
Start by identifying a niche where you can offer something unique. Consider customer pain points, market trends, and gaps in existing offerings. Your product should address a specific need or provide added value to stand out.
STEP 2: Develop Your Go-to-Market Plan
Once you have your product, define your target audience, pricing, and marketing strategy. Remember that private label buyers often expect lower prices than national brands. Ensure your pricing aligns with consumer expectations while maintaining healthy margins.
STEP 3: Find a Reliable Supplier
Look for manufacturers on platforms like Alibaba or ThomasNet. Focus on suppliers who offer competitive pricing, consistent quality, and ethical production practices. Test samples to confirm the product meets your specifications.
STEP 4: List Your Product on Amazon
Create a professional, optimized Amazon listing with high-quality images, keyword-rich titles, and engaging descriptions. This ensures your product stands out in search results and appeals to potential buyers.
How to Sell Wholesale on Amazon
Wholesale involves purchasing products in bulk from distributors or manufacturers and reselling them at a markup. It’s a straightforward model that leverages established brands and products.
The four steps to selling Wholesale on Amazon include researching wholesale suppliers, conducting due diligence, purchasing products in bulk, and listing products on Amazon.
STEP 1: Research Wholesale Suppliers
Start by identifying reputable wholesalers. Use directories or contact brands directly to find authorized distributors. Focus on suppliers offering popular products with stable demand but avoid overly saturated categories.
STEP 2: Conduct Due Diligence
Vet potential suppliers thoroughly. Check for authorization to sell the products, review their pricing structures, and ensure they meet your shipping and quality standards.
STEP 3: Purchase Products in Bulk
Once you’ve selected a supplier, buy products in bulk to secure better pricing. Be mindful of minimum order requirements and focus on maintaining a balanced inventory to avoid overstocking.
STEP 4: List Products on Amazon
Use existing ASINs for products already listed on Amazon or create new listings for unique items. For optimal results, leverage FBA to manage storage, packing, and shipping, ensuring faster delivery and higher customer satisfaction.
How to Sell Retail Arbitrage on Amazon
Retail arbitrage is one of the simplest ways to start selling on Amazon. You buy discounted products from local stores and resell them at higher prices. Below are detailed steps on how to begin selling retail arbitrage.
The four steps to selling retail arbitrage on amazon include finding local stores and deals, using the Amazon Seller App, calculating your ROI, and listing your product on Amazon.
STEP 1: Find Local Stores and Deals
Visit department stores, supermarkets, or clearance outlets to scout for discounted items. Focus on well-known brands that customers already trust.
STEP 2: Use the Amazon Seller App
Scan product barcodes using the Amazon Seller App to check the current selling price and potential profit margins. Look for items with a Best Seller Rank (BSR) below 50,000 to ensure steady demand.
👉 Read our blog post on “5 Repricing Strategies”
STEP 3: Calculate Your ROI
Before buying, calculate your return on investment (ROI) using the app. Ensure the product’s profit margin justifies your time and effort.
STEP 4: List and Sell on Amazon
Add the items to your Amazon account under existing ASINs or create new listings. For faster sales, consider using a repricer to stay competitive.
How to Sell Online Arbitrage on Amazon
Online arbitrage mirrors retail arbitrage but involves sourcing discounted products from e-commerce websites instead of physical stores.
The four steps on selling online arbitrage on Amazon include identifying reliable websites, using product research tools, purchase and manage inventory, listing and optimize products.
STEP 1: Identify Reliable e-Commerce Websites
Search for deals on sites like Walmart, Target, or Overstock. Look for clearance sections or seasonal sales.
STEP 2: Use Product Research Tools
Leverage tools like SellerAmp or Keepa to track product pricing trends and ensure consistent profitability. Analyze sales data and competition before making purchases.
STEP 3: Purchase and Manage Inventory
Order the products and have them shipped to your home or directly to Amazon’s fulfillment centers if using FBA. Check shipping fees and delivery times to manage costs effectively.
STEP 4: List and Optimize Your Products
Create attractive listings on Amazon. Use compelling images and descriptions to drive conversions and regularly monitor performance to adjust pricing if needed.
How to Dropship on Amazon
Dropshipping allows you to sell products without holding inventory. You act as the middleman between customers and suppliers. The steps involved in dropshipping are listed below.
The 4 steps to dropshipping on Amazon include: identifying reliable websites, setting up your amazon store, handling orders and fulfillment and monitoring performance metrics.
STEP 1: Find Reliable Suppliers
Research suppliers on platforms like Oberlo or Spocket. Ensure they can deliver high-quality products promptly and offer competitive prices.
STEP 2: Set Up Your Amazon Store
Set up your store and list products from your chosen supplier. Use engaging product descriptions and high-quality images to attract buyers.
STEP 3: Handle Orders and Fulfillment
When a customer places an order, your supplier ships the product directly to them. Focus on managing customer expectations and addressing issues quickly.
STEP 4: Monitor Performance Metrics
Keep an eye on fulfillment times and customer reviews. Promptly address any issues to maintain strong seller metrics.
How To Sell Handmade on Amazon
Amazon Handmade is ideal for artisans and crafters looking to sell unique, handcrafted items.
The four steps to selling handmade on Amazon include: applying to Amazon handmade, designing and producing products, listing products on Amazon, and engaging with your audience.
STEP 1: Apply to Amazon Handmade
Register for the Handmade program and provide information about your craft. Approval may take time, so prepare your portfolio in advance.
STEP 2: Design and Produce Your Products
Focus on creating high-quality, unique items that cater to a specific niche. Highlight your craftsmanship and any custom options available.
STEP 3: List Your Products on Amazon
Showcase your items with professional photos and detailed descriptions. Include information about the materials, production process, and customization options.
STEP 4: Engage with Your Audience
Build a loyal customer base by offering exceptional service and engaging with buyers through feedback and reviews.
📖 Read this blog to find out whether Amazon Handmade program is worth your time!
The things you must know when getting started on Amazon include: How to set up your seller central account. knowing the difference between FBA and FBM, and understanding Amazon’s fee structures.
Getting Started
Which Amazon Seller Account Should I Sign Up For?
When signing up as an Amazon seller, you’ll need to make a crucial decision between two account types: the Professional seller account at $39.99 per month or the Individual seller account with a $0.99 per-item fee. Understanding the differences and benefits of each option is essential for making the right choice for your business.
Screenshot of comparison between Amazon Individual vs Professional Pricing Plans
What is a Professional Seller Account on Amazon?
The Professional Amazon seller account comes with several advantages that make it attractive for serious sellers. While it has a monthly subscription fee, Amazon has implemented a business-friendly feature: if you don’t have any active listings in a given month, you won’t be charged the $39.99 fee. The charge only applies when you make sales, making it a low-risk option for seasonal sellers or those testing new product lines.
What is an Individual Seller Account on Amazon?
For those starting small, the Individual seller account might be the better choice. This option is ideal if you sell less than 40 items per month, as you’ll only pay $0.99 per item sold instead of a monthly subscription. The break-even point is 40 items – if you sell more than this, the Professional account becomes more cost-effective.
| Features | Individual | Professional |
|---|---|---|
| Monthly Fee | None | $39.99 Per Month |
| Per-Item Fee | $0.99 Per Item Sold | None |
| Number of Listings | Up to 40 Items Per Month | Unlimited |
| Access to Buy Box | Limited | Full Access |
| Advertising Options | None | Full Access to Amazon PPC |
| Advanced Selling Tools | Not Available | Includes Inventory Tools, Bulk Listings, and Reports |
| Custom Shipping Options | Not Available | Available Buyers |
| Reports and Analytics | Basic | Detailed Sales & Performance Reports |
Remember that while the Individual account has lower upfront costs, it comes with some limitations. Professional sellers get access to additional features like bulk listing tools, inventory management systems, and advanced reporting capabilities that can be crucial for scaling your business.
Assuming you are an individual seller without a registered business yet, below are some documents needed to start the registration process:
- Government-issued ID or passport
- Tax information
- Recent bank account Bank account or credit card statement
- Chargeable credit card or debit card
- Mobile phone
One of the most flexible aspects of Amazon’s seller account system is that you can switch between account types at any time. This means you can start with an Individual account and upgrade to Professional as your business grows, or downgrade during slower periods to optimize your costs.
How to Set Up Your Amazon Seller Account
Setting up your Amazon Seller Account is the first major step in your journey.
Step 1: Create an Account. Visit Amazon Seller Central and click on “Sign Up.” Choose between an Individual or Professional account based on your business goals.
Amazon Seller Central Sign Up Page Screenshot
Step 2: Verify Your Identity. Prepare essential documents like your government ID, bank account details, and tax information. Follow the on-screen prompts to submit your documents securely.
Seller Information Needed When Getting Started on Amazon
Step 4: Set Up Payment Methods. Link your bank account to ensure you can receive payouts. Double-check to ensure accuracy in bank details.
Step 5: Familiarize Yourself with the Dashboard. Once registered, begin exploring explore Seller Central. To further your understanding of Seller Central and the basics of selling on Amazon, take advantage of Amazon’s Seller University resources.
Comparing FBA vs FBM for Amazon, which is right for you?
What is the difference between FBA vs. FBM?
Understanding the differences between Amazon’s two main fulfillment methods is crucial for your business success. Each option has distinct advantages and considerations that can significantly impact your operations and profitability.
🎥Watch our video to find out when to use Amazon FBA or FBM
What is FBA (Fulfillment by Amazon)?
Fulfillment by Amazon (FBA) offers a hands-off approach to order processing. When you choose FBA, you ship your inventory to Amazon’s warehouses, and they handle everything else. Amazon takes care of storage, packaging, shipping, and even customer service, including returns. Your products become eligible for Prime shipping, which can significantly boost your sales since Prime members often filter their searches to show only Prime-eligible items.
The main advantages of FBA include:
- Access to Amazon’s world-class logistics network
- Prime badge on your listings
- Higher chance of winning the Buy Box
- More time to focus on product sourcing and marketing
- Ability to scale quickly during peak seasons
- Build customer trust as you depend on Amazon’s reliable shipping and return policies
However, FBA also comes with considerations like storage fees, prep requirements, and the need to manage inventory levels carefully across multiple fulfillment centers.
Challenges of FBA include:
- Fees such as storage, fulfillment, and additional surcharges (e.g., aged inventory fees) can add up, especially for low-margin or slow-moving products.
- Lack of inventory control as you rely on Amazon’s processes, which may limit your ability to inspect and manage inventory directly.
What is Fulfillment by Merchant (FBM)?
Fulfillment by Merchant (FBM), on the other hand, puts you in control of the entire fulfillment process. You store your own inventory, pack orders as they come in, and handle shipping directly to customers. This method gives you complete control over your inventory and shipping processes but requires more hands-on management.
FBM might be the better choice if you:
- Sell large or heavy items where FBA fees would be prohibitive
- Have low sales volume or seasonal products
- Already have an efficient warehousing and shipping system
- Sell products that require special handling or customization
- Want to maintain closer control over your inventory
Some challenges of FBM include:
- Being more time-Intensive as you handle every aspect of fulfillment, which can be resource-heavy as your business grows.
- Higher shipping costs without Amazon’s discounted rates, your shipping expenses may be higher.
- Increased Buy Box Competition since FBM sellers are less likely to win the Buy Box compared to FBA sellers.
👉 Check out our podcast and gather valuable insights on whether you should choose FBA or FBM on Amazon.
How to Decide Between FBA and FBM
Evaluate Your Product Type
FBA is better for small, lightweight, high-demand products with healthy margins, as Amazon’s storage and fulfillment costs are lower.
FBM is ideal for oversized or heavy items that would incur significant FBA fees, or for custom or handmade products requiring personal attention.
Assess Your Budget
If you have the capital to invest in FBA fees and benefit from Prime visibility, FBA may be the way to go.
If you’re working with a tight budget and can handle logistics efficiently, FBM might be more cost-effective.
Analyze Your Order Volume
High-volume sellers benefit from FBA’s streamlined logistics, which can save time and improve customer satisfaction.
Low-volume sellers may find FBM more manageable, avoiding unnecessary FBA fees.
Pay attention to customer needs
For time-sensitive items, FBA’s fast and reliable shipping through Amazon Prime is a significant advantage.
For niche or handmade products, FBM allows for personalized touches that can enhance the customer experience.
Factor in Storage Needs
If your products require long-term storage or are slow movers, FBM may help you avoid Amazon’s aged inventory surcharges.
If you have limited space to store inventory, FBA’s fulfillment centers can take this burden off your hands.
The key to choosing between FBA and FBM is understanding your products, sales volume, and operational capabilities. Consider factors like product size and weight, sales velocity, and your ability to handle fulfillment efficiently when making your decision.
Some sellers opt for a hybrid approach, using both FBA and FBM depending on the product or season. For example, they might use FBA for their best-selling items and handle slower-moving products themselves, or switch to FBM during peak seasons when storage fees are higher.
📖 Learn how to succeed with the Amazon FBA and FBM as Chris shares expert tips on product sourcing, inventory management, and using repricing tools to scale your sales by up to 2,400%
The below table compares a few aspects of FBA vs FBM to help you decide between the two options.
| Aspect | Fulfillment by Amazon (FBA) | Fulfillment by Merchant (FBM) |
|---|---|---|
| Inventory Control | Limited control; Amazon manages inventory and processes | Full control over inventory and fulfillment |
| Storage | Amazon provides warehousing | Seller stores inventory |
| Packaging & Shipping | Amazon handles all packaging and shipping logistics | Seller is responsible for packaging and delivery |
| Customer Service | Amazon manages customer service and returns | Seller handles customer support and return processes |
| Prime Eligibility | Products are eligible for Amazon Prime | Products are not Prime-eligible |
| Fees | Includes storage, fulfillment, and possible surcharge fees | No FBA fees, but bears shipping and handling costs |
| Scalability | Easily scales with high order volumes and seasonal demand | Growth may require significant operational investment |
| Time Investment | Frees up seller time for growth-focused tasks | Requires hands-on daily management |
| Buy Box Advantage | Higher chance of winning the Buy Box | Lower Buy Box visibility |
| Customer Trust | Amazon’s brand builds buyer confidence | Offers personalized service that can foster loyalty |
Amazon Selling Fees Explained
Starting your journey as an Amazon seller requires understanding a complex ecosystem of fees, percentages, and calculations. This comprehensive guide will walk you through everything you need to know about Amazon’s fee structure, helping you make informed decisions and maximize your profits on the world’s largest e-commerce platform.
Amazon’s Core Fee Structure
Referral Fees
Amazon tends to update its Seller Fees every year. However, in the year 2025, Amazon is not introducing any new fee types or increasing their Referral fees. Referral fees are what Amazon charges customers, a percentage of your total sales price for each item that is sold on their platform. These fees typically range from 8% to 15% of your selling price, though some categories have special structures. To find out specific referral fees for certain categories of Amazon in the US, you can refer to Amazon’s specific fees.
For example, imagine you’re selling baby products:
- For a $8 baby bottle, you’ll pay 8% ($0.64)
- For a $25 baby carrier, you’ll pay 15% ($3.75)
In 2024, Amazon introduced more seller-friendly rates for apparel items:
- Items under $15: Reduced from 17% to 5%
- Items $15-$20: Reduced from 17% to 10%
- Special 3% referral fee for watches priced over $1,500
This below table shows the most popular and profitable categories for Amazon sellers in 2025, helping you make informed decisions about what to sell.
| Product Category | Referral Fee Percentage | Minimum Referral Fee |
|---|---|---|
| Clothing and Accessories | 17% | $0.30 |
| Electronics Accessories | 15% ≤ $100.00, 8% > $100.00 | $0.30 |
| Home and Kitchen | 15% | $0.30 |
| Beauty, Health and Personal Care | 8% ≤ $10.00, 15% > $10.00 | $0.30 |
| Grocery and Gourmet | 8% ≤ $15.00, 15% > $15.00 | — |
| Pet Products | 15%, 22% for vet diets | $0.30 |
| Sports and Outdoors | 15% | $0.30 |
| Computers | 8% | $0.30 |
| Consumer Electronics | 8% | $0.30 |
| Toys and Games | 15% | $0.30 |
Understanding Storage Fees: FBA vs. FBM
If you’re selling on Amazon, understanding storage fees is crucial to managing your costs. The following section will assist you in understanding the storage fees for both FBA and FBM sellers.
FBA (Fulfillment by Amazon) Storage Fee Structure
When you choose FBA, you’re essentially hiring Amazon as your warehouse manager, shipping department, and customer service team. This service can significantly reduce your operational burden. The FBA Storage Fee Structure consists of monthly inventory storage fees and long-term storage fees. These fees cover the cost of storing your inventory at Amazon’s fulfillment centers and depend on factors such as product size, volume, and how long you store your products at the warehouse.
Monthly Inventory Storage Fees
The monthly inventory storage fees are calculated by the amount of space that your products occupy in Amazon’s fulfillment centers. This is calculated by the average daily volume of your inventory in cubic feet. The factors that influence this fee include:
- Product type
- Product size-tier (small standard, large standard, oversized)
- Standard sized items storage fees range from $3.43 to $7.17 for apparel items with additional charges based on weight.
- Oversized items, are defined as products measuring over 130 inches in combined length and girth, incur higher storage fees and may lead to inventory surcharge fees.
- Time of year or seasonality
- For example, during off peak seasons like January to September, storage fees are reduced by $0.09 per cubic foot. Whereas, during October to December, which is peak season, the rates can be up to 2-3 times higher. (However, storage fees for oversized items remain unchanged regardless of which season it is).
- Storage Utilization Surcharge
To better manage your storage fees, you should bear in mind the possible costs and charges that may accumulate over time as your inventory changes.
How to calculate Amazon FBA Fee Per Product
For example, if you have subscribed to Amazon’s FBA Storage services, and you are selling 100 items on Amazon, and each item is 10 inches in length, 6 inches wide, and 4 inches in height, use the following breakdown:
1. Calculating the size of one item by multiplying the item’s dimensions:
-
- 10 × 6 × 4 = 240 cubic inches.
- Convert to cubic feet (since Amazon charges in cubic feet):
-
- 240 ÷ 1,728 = 0.1389 cubic feet per item.
2. Account for all items stored daily. Since you’re storing 100 items, the total space used per day is:
-
- 0.1389 cubic feet × 100 = 13.89 cubic feet.
3. Apply the storage rate by multiplying the total space by the rate:
-
- 13.89 cubic feet × $0.75 = $10.42 per day.
4. Get the monthly cost by multiplying the daily cost by 30 days:
-
- $10.42 × 30 = $312.50 per month.
FBA Fulfillment Fees
FBA Fulfilment Fees are the costs charged by Amazon for packing and shipping customer orders. This fee per unit is calculated according to the weight and dimensions of the product.
As of January 15, 2025, there are reduced rates for standard-sized and large bulky-sized products, with an average decrease of $0.58 per unit for minimal split shipments. Standard-sized items (one pound) cost approximately $3.22, which includes picking, packing, shipping, and customer service.
🎥 Watch our video for a detailed breakdown of FBA Fulfillment Fees
📖 Or if you prefer reading, check out the blog to learn more about FBA Fulfillment Fees in detail.
Refund Administration Fees
Amazon charges refund administration fees when they process returns for customers. This can either be 20% of the refunded charge or $5, whichever amount is lower will be charged to the seller.
Tools for Fee Management
You can utilize tools provided by Amazon, such as Amazon’s Fee Calculator, to help you estimate sales margins and compare different fulfillment methods.
Other useful tools from Amazon include the Amazon Fee Preview Report, which allows sellers to view their fees before the incoming billing cycle, and the Revenue Calculator Tool to calculate potential profits and modify your pricing strategies.
💡TIP: View your Fee Preview Report through your Seller Central account and navigate to the Reports section.
Being thorough in your calculations can help you estimate your costs better and manage your budget efficiently.
What is Storage Utilization Surcharge on Amazon?
If your inventory exceeds a certain utilization ratio, there may be a storage utilization surcharge. The storage utilization ratio is calculated as the average daily inventory stored divided by the average daily shipped over the past 13 weeks. This is monitored through the FBA dashboard and calculated independently for each size tier.
Factors for Calculating Storage Utilization Surcharge
- Product Size Tier
- Month
- Product Dimensions and Volume
- Average Monthly Units Stored
- Storage Utilization Ratio (The average amount of inventory stored daily compared to the average daily shipped amount over the past 13 weeks)
- Dangerous Goods Classification.
This surcharge applies to sellers who:
- Have a Professional account
- Have their first shipment 365 days ago
- Average daily inventory volume > 25 cubic feet
- Storage utilization ratio above 22 weeks (as of April 1, 2024)
Aged Inventory Surcharge (Previously known as Long-term Storage Fees)
Amazon’s aged inventory surcharge, also known as Long-term storage fees (LTSF), are incurred when your items are stored in Amazon’s storage centers for more than 180 days. The aged inventory surcharge is evaluated on the 15th of each month, with charges applied between the 18th and 22nd. If not properly accounted for, these fees can add up quickly. So it’s important to conduct regular inventory health checks to see how long your products occupy Amazon’s fulfillment centers.
Amazon charges LTSF twice a year, on February 15th and August 15th. It’s important to note that Amazon charges these fees separately to the standard storage fees.
Aged Inventory Surcharge Fee Structure:
- 181-270 days: Standard rate
- 271-365 days: Increased rate (as of February 15, 2024)
- 365+ days: Premium rate
Amazon provides Aged Inventory and Utilization reports to help sellers track inventory age distribution, items approaching fee thresholds, and products requiring action.
Sellers have access to the Inventory Performance Dashboard that provides key insights into your inventory health. Through monitoring metrics such as the Inventory Performance Index (IPI), excess inventory levels, sell-through rates, and storage utilization metrics to assist you in assessing your inventory health.
To avoid long-term storage fees on Amazon and move products faster, sellers could offer promotions and discounts or lower prices. Use pricing tools to adjust prices based on competitor pricing and sales velocity, and watch out for overstocking and incurring unnecessary fees from Amazon.
🎥 Watch this video to understand “Amazon’s Long-Term Storage Fee and How to Avoid It”
👉 Check out our blog on BQool’s new Inventory Conditions update
Fulfillment by Merchant (FBM)
If the fees from Amazon for FBA seem like a lot, you can opt to fulfill your products by yourself. This option is called Fulfillment by Merchant (FBM) on Amazon and gives you more control but requires more hands-on management. Here’s what you need to consider:
Shipping and Packaging
A typical one-pound package might cost:
- Shipping: $6
- Packaging materials: $1
- Total: $7 per unit
📖 Read our blog post on “Amazon FBM Sellers & Prep Centers”
Time Investment
Consider the value of your time: order processing might take 10 minutes at $40 per hour, equating to $6.67 per order. You also need to take care of customer service, returns handling, and inventory management.
Profit Calculation
Let’s walk through an example to understand how you would calculate profits on Amazon.
Consider the following costs of a home organization product:
- Product Cost: $8.00
- Referral Fee (15%): $4.50
- FBA Fulfillment: $3.22
- Storage (per month): $0.15
- Advertising (10% ACoS): $3.00
- Net Profit: $11.12 (37% margin)
Now, let’s sum up all the costs: Total Costs: $8.00 + $4.50 + $3.22 + $0.15 + $3.00 = $18.87
To determine the selling price that results in a net profit of $11.12 (37% margin), we add the net profit to the total costs:
Selling Price: $18.87 (Total Costs) + $11.12 (Net Profit) = $29.99
Therefore, the selling price is $29.99.
🎥 Check out our video on How To Use Our Profit Calculator Tool
🔥 Sign up for a free 14-day Trial here: Start Trial
Success on Amazon requires thorough understanding of fees, strategic planning, and continuous optimization. By mastering these elements and staying informed about fee updates, you’re well-positioned to build a profitable and sustainable Amazon business.
Remember: The most successful Amazon sellers treat their fees not as obstacles but as investments in a powerful distribution channel. Regular monitoring, strategic planning, and proactive management are key to maintaining and growing your profitability.
How to Select the Right Product to Sell on Amazon
Choosing the right products to sell on Amazon can be daunting, especially with the wide variety of products available, it can be difficult to decide what you would like to focus on. By leveraging product research tools, understanding key metrics like Best Seller Rank (BSR), and navigating Amazon’s requirements, you can set yourself up for long-term success.
🎥Watch now to find out How to find profitable products to sell in under 5 mins
Product Research Tips for Beginners
Product research is the foundation of finding profitable products. Tools like Keepa and SellerAmp simplify this process by tracking pricing trends, sales history, and competition.
👉 Read our blog on How to Identify Profitable Amazon Products on Amazon
Understand Best Seller Rank (BSR)
BSR is a key metric that indicates how well a product is selling within its category. A lower BSR signifies higher sales velocity. For example:
- A product with a BSR of 1,000 in the Home & Kitchen category is selling significantly better than one with a BSR of 50,000.
- Target products with a BSR under 50,000 to ensure consistent demand, while a BSR under 10,000 may indicate a highly competitive market.
Use BSR alongside other factors like pricing trends and competition to identify products with both demand and profitability potential.
Prioritize Small, Lightweight Items
Smaller, lightweight products are cost-effective to ship and store, making them ideal for FBA sellers. For example, compact phone accessories are easier to manage than bulky furniture, keeping fees low and profits high.
Set a Sustainable Price Point
Aim for a profit margin of 15%–20% as a beginner and work toward 30% as you grow. Following the “⅓ rule” can help ensure profitability: if you sell an item for $30, aim to source it for $10.
Start Small and Test Demand
Order small quantities of products initially to gauge customer interest and market performance. For instance, test 10–20 units of a niche product to minimize risk before committing to bulk purchases.
💡Pro Tip: Use tools like Keepa to analyze historical sales data and spot products with stable demand and manageable competition.
Understanding PPC ROI (Pay-Per-Click Return on Investment)
Selecting the right products to sell isn’t just about identifying demand and profit margins; it’s also about ensuring they are cost-effective to advertise. Products with high PPC ROI potential – those that are easier and cheaper to promote – can give you an edge in Amazon’s competitive marketplace. By evaluating metrics like Advertising Cost of Sales (ACoS) and understanding category-specific benchmarks, you can make smarter product decisions that maximize both visibility and profitability.
🎥 Watch this video and find out how Craig tripled his sales and halved his ACoS in just 6 months
What Is PPC ROI?
Amazon’s PPC advertising helps boost product visibility by targeting relevant keywords. Tracking metrics like Advertising Cost of Sales (ACoS) helps ensure campaigns are cost-efficient.
How to Use ACoS in Product Selection
When choosing products, consider their potential PPC performance:
- Products with a lower category average ACoS are generally more cost-effective to advertise.
- Higher-margin products are better suited to absorb advertising costs, ensuring profitability even with moderate ACoS.
For example, a product in the Tools & Home Improvement category with an average ACoS of 24.8% and a CPC of $0.60 may offer better returns than a product in Beauty & Personal Care, which has an average ACoS of 44.1% and a CPC of $0.92.
🎥 Learn how to use BQool’s chrome extension to find profitable products and keywords
Leverage Category Benchmarks
Use Amazon’s Category Benchmark Reports to compare average ACoS and Cost-Per-Click (CPC) across categories. For example:
- Beauty & Personal Care: 44.1% average ACoS, $0.92 CPC
- Tools & Home Improvement: 24.8% average ACoS, $0.60 CPC
By understanding these benchmarks, you can select products that align with your advertising goals and budget.
Understanding Gated Products and Restrictions
Certain categories, such as Beauty, Jewelry, and Automotive, are gated, requiring sellers to gain approval. Although this involves extra steps, it often leads to reduced competition and better profit margins.
What Are Gated Products?
Gated products require documentation like invoices from authorized distributors or brand authorization letters to ensure marketplace integrity.
How to Identify Restricted Products
Tools like SellerAmp highlight gated items during product research, saving you time and effort. Work with reliable suppliers to secure necessary documentation and streamline the approval process.
😎 Get exclusive offers from BQool & Selleramp Integration
Benefits of Selling Gated Products
Gated categories often feature less competition and higher margins. For instance, while selling in the Jewelry category may require an upfront investment in compliance, the reduced competition can result in significant profitability.
Common Gated Categories
- Jewelry
- Automotive & Powersports
- Fine Art
- Major Appliances
- Collectible Coins
💡 Read now for more detailed information on restricted products on Amazon
🎥 Watch this short to find out which products you should avoid selling on Amazon
How to Prepare for Peak Season on Amazon
Success on Amazon is about more than great products and optimized listings, it’s about mastering timing and preparation. These moments, including Prime Day, Black Friday/Cyber Monday, and also the Holiday Season, hold immense potential for growth. We’ll guide you through detailed timelines and strategies to adequately prepare you for Prime Day and Black Friday/Cyber Monday.
Prime Day Preparation Timeline for Amazon Sellers
Prime Day
Prime Day, Amazon’s annual two-day shopping extravaganza exclusively for Prime members, offers sellers an incredible opportunity to boost sales. Here’s how to prepare effectively:
Three Months Before (April)
Begin by analyzing data from the previous year’s Prime Day to uncover valuable insights and trends. Use this information to guide your inventory planning and initiate negotiations with suppliers to ensure stock availability. At this stage, it’s also crucial to allocate a marketing budget and start optimizing your product listings to attract more buyers.
One Month Before (June)
Ensure that your inventory has arrived at FBA centers, ready to meet the anticipated demand. Finalize your promotional strategy and prepare pay-per-click (PPC) campaigns to drive traffic. Additionally, test the optimized product listings to confirm they’re effective and appealing to potential buyers.
During Prime Day
Stay vigilant by monitoring your inventory levels hourly to avoid running out of stock. Be ready to adjust your PPC bids as needed to maintain visibility. Keep an eye on competitor pricing to stay competitive and prioritize customer service responsiveness to enhance buyer satisfaction during this critical period.
Black Friday and Cyber Monday
Black Friday, occurring on the fourth Friday of November, and Cyber Monday, the following Monday, represent the pinnacle of retail sales. To capitalize on this high-demand period, strategic planning and meticulous execution are essential. Here’s a streamlined guide to help you optimize your profits:
Black Friday Prep Timeline for Amazon Sellers
Pre-Season Planning (August-September)
During August-September, analyze your previous year’s performance to identify successful strategies and areas for improvement. Order inventory, considering Chinese holidays that may affect production, and develop a promotional calendar. Create engaging marketing assets, including advertisements and social media content, to ensure a cohesive campaign.
Implementation (October-November)
In October-November, ensure your inventory arrives by early October to avoid delays. Set up Amazon Lightning Deals if eligible, and prepare social media campaigns for peak engagement. Conduct thorough testing of your systems and processes, including your website and customer service protocols, to ensure smooth operations during high-traffic periods.
Holiday Season (September-December)
Throughout September-December, stagger inventory shipments to maintain a steady supply chain and reduce storage costs. Monitor daily sales velocity to adjust inventory levels and promotional strategies in real-time. Stay flexible with pricing strategies to remain competitive and maximize sales. Maintain high customer service levels to enhance satisfaction and encourage repeat business.
Post-Holiday Period (January-February)
In January-February, focus on inventory management by gradually reducing stock levels through clearance sales or promotions. Consider post-holiday promotions to clear remaining inventory and avoid storage fees. Plan for storage fee optimization and review aged inventory for liquidation, donation, or further promotions. Analyze the previous year’s data to identify trends and areas for improvement. Research new product opportunities, update your business plan, and optimize product listings to enhance visibility and conversion rates.
By following this strategic approach, you can effectively navigate the busy holiday season and maximize your profits during Black Friday and Cyber Monday.
🎥 Watch this video to find out how to reprice on Amazon during low seasons on Amazon.
How to Optimize Your Amazon Listings
Creating an effective Amazon listing might seem overwhelming at first, but breaking it down into manageable components makes the process much simpler. Let’s walk through each element step by step to help you create listings that both Amazon’s algorithm and your customers will love.
How to Write Product Titles and Descriptions on Amazon
Think of your product title as your first impression on potential customers. You have 200 characters to work with, so make them count! Include these elements in a logical order:
- Start with your brand name and basic product type (e.g., “BrandName Stainless Steel Water Bottle”)
- Add key features that set your product apart (e.g., “Vacuum Insulated, Leak-Proof”)
- Include practical details like size and quantity (e.g., “32 oz, Pack of 2”)
- Mention the primary use or target user (e.g., “for Sports & Outdoor Activities”)
For your product description, imagine you’re explaining your product to someone who can’t see or touch it. Use simple, clear language and break up text into short paragraphs. Focus on answering the questions: “What problems does this solve?” and “Why should someone choose this product?”
🎥Watch this video to learn How to Write an Amazon Product Description that Sells
Optimizing Images and Bullet Points
Your product images are like your virtual showroom. Here’s how to make them work harder for you:
- Your main image needs a pure white background with the product taking up 85% of the frame
- Make sure images are at least 1000px × 500px to enable zoom features
- Include photos showing your product from different angles
- Add lifestyle images demonstrating the product in use
- Consider comparison shots to help customers understand size
For bullet points, think of them as your elevator pitch. Start each point with the most compelling information:
- First bullet: Highlight your product’s main feature or benefit
- Second bullet: Address a common problem it solves
- Third bullet: Mention quality indicators or certifications
- Fourth bullet: Include practical information like dimensions or compatibility
- Fifth bullet: Add any special features, warranty, or support information
Using Keywords Effectively
Keywords are like signposts that help customers find your product. Here’s a beginner-friendly approach:
- Start by brainstorming terms your customers might use to search for your product
- Use Amazon’s search bar suggestions for inspiration – type in related terms and see what Amazon suggests
- Include these keywords naturally in your title, bullets, and description
- Save additional relevant terms for your backend keywords
- Remember: Write for humans first, then optimize for search
🎥 Watch our video for a step-by-step tutorial on how to conduct Amazon Keyword Research
🔎Want to find the most profitable keywords? Try our Product Research Tool free for 14 days
Managing Customer Reviews
Customer reviews are crucial for building a strong Amazon reputation. They increase visibility since Amazon’s algorithm favors products with positive feedback, and they enhance credibility by demonstrating that real users trust your product. Reviews also act as social proof, as satisfied customers can influence potential buyers and drive sales.
For new sellers, gathering positive reviews in a competitive marketplace can be challenging. Without good reviews, or if negative ones aren’t managed properly, your rankings may drop, leading to missed sales and a harmed reputation. Sellers could also sometimes receive fake or malicious reviews that can mislead customers and hurt your business.
To address this, sellers should encourage reviews through:
- Offering great products: Make sure you’re selling items that meet customer needs and are of sound quality to avoid complaints.
- Set clear expectations: Describe your products accurately so customers get exactly what they expect—no surprises!
- Highlight reviews: Regularly share positive reviews on your listings to attract more buyers and build confidence.
- Listen and learn from negative feedback: Although bad reviews may be discouraging for new sellers, they offer valuable perspective and feedback which you can immediately address for future sale- it shows you’re willing to make things right.
- Watch for fake reviews: If you spot fake reviews, you can report them to Amazon to protect your reputation.
🎥 Learn how to track and remove fake or negative reviews through BQool’s BigCentral tool.
🎥Watch this video to learn how to leverage BQool’s Integration with InventoryLab for easy inventory management.
Understanding Amazon’s Key Performance Metrics
Success on Amazon goes beyond listing products – it’s about tracking and optimizing critical performance metrics. The table below outlines essential metrics, why they matter, and how to use them to improve your sales, visibility, and profitability. Use this table below to stay competitive and grow your business strategically.
Essential Metrics to Monitor for Amazon Sellers
| Metric Category | Metric | Why It Matters | Actions to Take |
| Traffic and Engagement | Sessions | Shows the number of unique visitors to your product page, revealing listing visibility and customer interest. |
|
| Click-Through Rate (CTR) |
Measures the effectiveness of listings or ads in capturing attention. |
|
|
| Conversion Rate (Unit Session %) | Indicates how well your listing converts visitors into buyers. Aim for 5-10%. |
|
|
| Buy Box Percentage | Tracks how often your offer appears as the default purchase option, crucial for sales. |
|
|
| Advertising Effectiveness | Return on Ad Spend (RoAS) | Measures profitability of ad spend, showing revenue earned per dollar spent. |
|
| Total Advertising Cost of Sales (TACoS) | Combines organic and ad-attributed sales for a holistic view of revenue. |
|
|
| Cost-per-Click (CPC) | Tracks the cost of each ad click, reflecting ad competitiveness. |
|
|
| Profitability and Margins | Gross Margin | Reveals profitability at the product level by excluding direct costs. |
|
| Net Profit Margin | Measures overall profitability after all expenses. |
|
|
| Cost of Goods Sold (CoGS) | Tracks direct costs of producing goods. |
|
|
| Inventory Management | Inventory Turnover Rate | Tracks how often inventory is sold and replaced, revealing sales velocity. |
|
| Excess Inventory % | Reflects overstocked items that tie up capital and increase costs. |
|
|
| Stockout Rate | Measures the percentage of time products are out of stock, impacting sales. |
|
|
| Customer Experience | Customer Ratings | Builds trust and impacts conversions through customer satisfaction. |
|
| Refund Rate | Indicates product or expectation issues. |
|
|
| Market Intelligence | Best Sellers Rank (BSR) | Shows product performance within its category based on sales velocity. |
|
Best Practice for Metric Analysis
1. Regular Monitoring
To establish an effective monitoring routine, dedicate consistent times each week to review your performance comprehensively. Rather than reacting to daily fluctuations, focus your attention on identifying meaningful trends that indicate true business patterns. Keep your analysis organized by maintaining detailed spreadsheets that track performance over time, allowing you to spot long-term patterns and seasonal changes.
2. Action-Oriented Analysis
When analyzing your data, transform these insights into concrete actions. Start by using your inventory data to optimize stock levels and prevent costly stockouts. Your performance metrics will highlight specific areas where listings need improvement, while campaign data should guide adjustments to your advertising strategy. Use your historical performance patterns to design promotional activities that align with your customers’ buying behavior.
3. Holistic Performance Review
Take a comprehensive approach to reviewing your overall performance by examining how different metrics interact and influence each other. By documenting your progress over time, you can identify meaningful long-term trends that shape your business trajectory. Compare performance across your entire product catalog to identify successful strategies that can be replicated. Set realistic performance goals by using category standards as benchmarks, allowing you to measure your success against industry averages while identifying areas for improvement.
💡Remember: Regular analysis and strategic adjustments based on these metrics will help ensure sustainable growth for your Amazon business.
Mastering Amazon PPC Advertising
What is Amazon PPC?
Amazon PPC is an advertising service designed to help sellers and brands boost their product sales. Sellers can run ad campaigns for their products, and a small fee is charged by Amazon each time a customer clicks on an ad.
The Three Types of Amazon PPC Campaigns
When it comes to advertising on Amazon, understanding the different campaign types is key to reaching the right shoppers at the right time. Amazon offers three main types of PPC (Pay-Per-Click) campaigns, each with a unique role in your marketing strategy.
1. Sponsored Products
These ads blend seamlessly into search results and product pages, putting your products in front of shoppers who are actively searching. Sponsored Products are your go-to for visibility, quick sales, and testing new items.
2. Sponsored Brands
These ads showcase your brand, logo, and a curated set of products in top-tier positions. If you’re looking to build recognition and guide customers to explore your full catalog or brand store, this is your tool.
3. Sponsored Display
Sponsored Display ads help you reconnect with shoppers who viewed your products or similar items. They also appear outside of Amazon, keeping your brand top-of-mind across the web.
Each campaign type works best when used with a specific goal in mind, whether that’s boosting sales, building brand awareness, or re-targeting curious shoppers.
What is the difference between Sponsored Product, Sponsored Brand, and Sponsored Display?
When running PPC (Pay-Per-Click) ads on Amazon, you’ll come across three main types of ad campaigns: Sponsored Products, Sponsored Brands, and Sponsored Display. Here’s a simple breakdown of each and where your ads will show up:
🛒 Sponsored Products
- What it is: Ads that promote individual product listings.
- Where it appears: In search results (top, middle, or bottom of the page). On competitor product pages (under “Sponsored Products related to this item”).
- Great for: Boosting visibility of specific products.
- UI location: In Seller Central, go to Advertising > Campaign Manager, click Create Campaign, and select Sponsored Products.
🏷️ Sponsored Brands
- What it is: Ads that showcase your brand logo, a custom headline, and up to three of your products.
- Where it appears:
- At the very top of search results, above Sponsored Products.
- Sometimes within search results or at the bottom of the page.
- Great for: Increasing brand awareness and driving traffic to your Storefront or a custom landing page.
- UI location: In Campaign Manager, click Create Campaign and select Sponsored Brands.
📣 Sponsored Display
- What it is: Ads that target shoppers based on their interests, shopping behavior, or even if they’ve viewed your products before.
- Where it appears:
- On Amazon (product detail pages, search results, or homepage).
- Off Amazon (third-party websites and apps).
- Great for: Retargeting and reaching new audiences.
- UI location: In Campaign Manager, choose Create Campaign and select Sponsored Display.
Understanding Essential PPC Metrics
Just as a doctor monitors vital signs to assess health, these key metrics help you evaluate and optimize your campaign’s performance.
What is Advertising Cost of Sales (ACoS)?
Think of ACoS as your campaign’s temperature reading:
Definition: The percentage of attributed sales spent on advertising
- Formula: (Ad Spend ÷ Sales) × 100
- Real-world example: If you spend $10 on ads and generate $100 in sales, your ACoS is 10%
- Target: Lower ACoS generally indicates better efficiency, but optimal rates vary by product and profit margins
Pro Tip: Consider your profit margins when setting ACoS targets. A 25% ACoS might be excellent for high-margin products but unsustainable for low-margin items.
What is Return on Ad Spend (RoAS)?
Consider RoAS as your campaign’s pulse rate:
Definition: Revenue generated per advertising dollar
- Formula: Sales ÷ Ad Spend
- Real-world example: $500 in sales from $100 in ad spend equals a 5x RoAS
- Target: Higher RoAS indicates stronger campaign performance
💡Pro Tip: Track RoAS trends over time rather than focusing on daily fluctuations.
The Two Amazon PPC Campaign Types
Understanding the difference between automatic and manual targeting is crucial for your advertising strategy. Think of it as choosing between an automatic and manual car- each has its advantages depending on your skill level and goals.
Automatic Targeting
Perfect for beginners and market research, automatic targeting is like having an experienced co-pilot:
- Amazon’s algorithm does the heavy lifting
- Minimal setup required—ideal for those just starting
- Excellent for market research and keyword discovery
- Four intelligent match types:
-
- Close match: Your most relevant searches
-
- Loose match: Broader but related terms
-
- Substitutes: Similar product alternatives
-
- Complements: Products often bought together
Best for:
- New sellers getting started
- Product research
- Keyword discovery
- Testing new markets
Manual Targeting
Once you’re comfortable with PPC basics, manual targeting gives you full control:
- You choose specific keywords to target
- Three precise match types:
- Exact match: Perfect for high-performing keywords
- Phrase match: Captures relevant variations
- Broad match: Casts a wider net
- Better control over spending
- Higher potential ROI once optimized
How to Set Up Your First Amazon PPC Campaign
Starting your first PPC campaign can feel overwhelming but breaking it down into manageable steps makes the process much clearer. Think of it as building a house—you need a solid foundation before adding the finishing touches.
1. Initial Setup: Getting Started Right
Just as you’d carefully choose a location for a physical store, your campaign setup requires thoughtful consideration:
- Navigate to Seller Central > Advertising > Campaign Manager
- Select Sponsored Products as your starting point
- Begin with automatic targeting—it’s like having a skilled mentor guiding your first steps
- Remember: A well-planned start sets you up for long-term success
2. Configuring Campaign Settings
These settings are like the blueprint for your advertising strategy:
- Campaign Name: Choose descriptive titles that help you track purpose and performance
- Budget: Think of your daily budget as your store’s daily operating costs
- Start with at least $50/day to gather meaningful data
- Remember: Underfunding can limit your learning opportunities
- Duration: Leave the end date open to maintain continuous presence
- Bidding: “Dynamic bids – up and down” gives Amazon permission to adjust your bids for optimal performance
3. Creating an Ad Group
Think of ad groups as departments in your store:
- Keep it simple: One product per ad group for clear performance tracking
- Use consistent naming conventions for easy management
- Ensure Buy Box eligibility—without it, your ads won’t run
- Pro tip: Create separate ad groups for variations of the same product
4. Setting up your Bidding Strategy
Your bidding strategy is like setting prices in your store:
- Start with default bids between $1.50-$2.00 to ensure visibility
- Monitor performance daily in the first week
- Adjust based on data, not hunches
- Remember: Higher initial bids can help gather data faster
Pro Tips for PPC Success
These insights come from years of seller experience and can help you avoid common pitfalls:
1. Have Patience
- Give campaigns at least two weeks before major changes
- Don’t panic over short-term fluctuations
- Focus on trends rather than daily numbers
2. Strategic Product Selection
- Products in the $21-$30 range often perform best
- Higher margins allow more bidding flexibility
- Consider seasonal trends in your strategy
3. Smart Keyword Management
- Use automatic campaigns as research tools
- Graduate proven keywords to manual campaigns
- Regularly update negative keywords
- Monitor competitor pricing for bid adjustments
Your success in Amazon PPC comes from understanding these fundamentals and applying them consistently. Start small, learn from your data, and scale what works. With patience and attention to detail, PPC can transform from a marketing expense into a powerful revenue generator for your Amazon business.
Shipping and Logistics: Avoiding Common Mistakes
Efficient shipping and logistics are essential for running a successful Amazon business. Whether you rely on Fulfillment by Amazon (FBA) or handle orders independently with Fulfillment by Merchant (FBM), understanding Amazon’s guidelines and avoiding common mistakes can save you time, money, and stress.
Amazon’s Shipping Requirements
FBA Shipping Requirements
Amazon has specific rules for packaging, box dimensions, weight, and labeling to ensure inventory is delivered safely:
Box Size and Weight
Standard boxes must not exceed 25 inches on any side or weigh more than 50 lbs. Oversized items can exceed these limits but may incur additional fees.
Packaging Materials
Use strong, six-sided boxes with protective materials like bubble wrap, kraft paper, or air pillows. Avoid restricted materials such as Styrofoam or packing peanuts.
Labeling
Each box must have an FBA Box ID label, ship-to and ship-from addresses, and special handling labels (e.g., “Team Lift” for boxes over 50 lbs). Place labels on a flat surface, not over seams, to ensure scannability.
FBM Shipping Guidelines
FBM sellers must prioritize:
- Timely Deliveries. Choose reliable carriers to meet promised delivery times.
- Insurance. For high-value shipments, use carriers that provide insurance to protect against loss or damage.
- Labeling and Prepping Inventory. Proper labeling is critical for seamless FBA operations.
FNSKU Labels
Ensure each product has a scannable FNSKU (Fulfillment Network Stock Keeping Unit) label, a barcode that Amazon uses to identify and track products in their warehouses. And ensure that this label that matches your shipping plan. For example, a misaligned barcode can delay processing.
Packaging for Protection
Use poly bags, bubble wrap, or custom boxes to secure fragile items. For instance, individually wrapping glassware prevents breakage during transit.
Avoid Labeling Errors
Duplicate or photocopied labels can confuse fulfillment centers. Always use unique, freshly printed labels for each shipment.
💡 Pro Tip: Use visuals to guide team members or suppliers on proper labeling practices to prevent mistakes.
Creating a Shipping Plan
An FBA shipping plan ensures your inventory is sent to the correct fulfillment centers. Key elements of a shipping plan include:
- Product Details. List all products and quantities being shipped.
- Fulfillment Centers. Amazon assigns centers to optimize storage and delivery.
- Labeling Responsibilities. Specify whether Amazon or you will handle labeling.
- Finalize your shipping plan early. preferably before manufacturing—to avoid delays. Missing Amazon’s recommended “Ship By” date can result in cancellation fees and delayed processing.
Handling Lost or Damaged Inventory
FBA Sellers
If inventory is lost or damaged at an FBA center, Amazon typically reimburses sellers. Monitor shipment statuses in Seller Central and file claims promptly for reimbursement.
FBM Sellers
Use carriers with tracking services and insurance to mitigate risks. For high-value items, ensure extra packaging to protect against shipping damage.
Example: If an FBA item is marked as “unsellable” due to damage, you can request reimbursement or create a removal order to inspect the item yourself.
Common Shipping Mistakes to Avoid
Ignoring Amazon’s Packaging Rules
Using prohibited materials like Styrofoam can lead to rejected shipments.
Overlooking Label Placement
Placing labels over seams or edges can make them unreadable during scanning.
Choosing Unreliable Freight Forwarders
Work with experienced companies familiar with FBA procedures to avoid delays and damaged shipments.
Underestimating Lead Times
Always build a buffer into your shipping schedule to account for unexpected delays.
Timing Your Shipments
Shipping during peak seasons, such as the holidays, can cause delays and increased costs. Plan ahead for major shopping events like Black Friday, Prime Day, and Cyber Monday. Avoid shipping too close to these dates to ensure your inventory arrives on time.
Returns and refunds are inevitable when selling on Amazon, with return rates averaging 5% to 15% across categories (MyFBAPrep, 2024). Managing them well can turn challenges into opportunities to build trust and loyalty with your customers. By understanding Amazon’s return policies and proactively addressing issues, you can maintain strong seller metrics and create a seamless customer experience.
What Are Amazon’s Return Policies for FBA and FBM Sellers?
FBA Return Policies
With Fulfillment by Amazon (FBA), Amazon manages the return process, following its own policies to determine eligibility. Sellers have limited control, even when the buyer is at fault for misuse or damage.
Standard Window
Customers can return items within 30 days, though exceptions apply, such as extended holiday return periods or 90-day windows for unopened Baby category items.
Return Evaluations
Returned items are assessed for resale. Items in new condition are added back to your inventory, while damaged ones are marked “unsellable.” Damaged or unsellable items are categorized as “Defective” or “Customer Damaged.”
Reimbursement
If Amazon damages an item, you’re reimbursed. For customer-caused damage, reimbursement is unavailable unless covered by Amazon’s Safe-T Claim program.
Inventory Evaluation Settings (2024 Update)
Sellers can choose to inspect returns themselves, ensuring quality control for items like electronics or products with moving parts. This is particularly useful for sellers of electronics or items with moving parts, as it gives them the opportunity to personally assess whether a product is truly unsellable. You can manage these settings in Seller Central under FBA Inventory Evaluation Settings.
FBM Return Policies
For FBM sellers, managing returns is entirely your responsibility.
Timely Action
Provide return labels and process refunds within two business days to maintain good metrics.
Inspection
Assess returns for resale potential, such as reclassifying a slightly damaged item as “Used – Like New.”
Custom Policies
Sellers can set conditions, but they must comply with Amazon’s guidelines.
What Happens if the Customer Doesn’t Return the Product?
If a customer doesn’t return an item within 45 days, Amazon recharges them and reimburses the seller automatically. In rare cases, sellers may need to file a support ticket for reimbursement.
How Can I Reduce Return Rates on Amazon?
Optimize Listings
Use accurate descriptions, high-quality images, and clear sizing details to align customer expectations.
Enhance Quality Control
Inspect inventory regularly and address recurring issues with suppliers. Packaging improvements can also reduce shipping-related damage.
Customer Communication
Answer buyer questions promptly, and include usage or care instructions to prevent unnecessary returns.
FBA Returns Fees
Amazon has introduced additional fees for returns exceeding category thresholds.
Threshold-Based Fees
Higher return rates than category norms incur extra charges. For example, exceeding a 10% category return rate triggers additional fees. For example, if your category’s standard return rate is 10% but your product reaches 15%, you may incur extra fees.
Exemptions for Low-Volume Products
Products shipping fewer than 25 units monthly are exempt.
Apparel and Shoes
Return fees are charged for every returned item, regardless of return volume.
Fee Calculations
Return fees depend on size tier, shipping weight, category, and return rate. For instance, a large standard item in the electronics category exceeding its return threshold will incur combined fees. For more details on how Amazon calculates return fees, check out this website. Additionally, see the table below for return rate thresholds per category.
Amazon Return Rate Threshold Per Category
| Category | Return Rate Threshold (Since June 2024) |
|---|---|
| Backpacks, Handbags, and Luggage 👜 | 12.8% |
| Compact Appliances 🏠 | 12.6% |
| Eyewear 👓 | 12.1% |
| Full-Size Appliances 🏠 | 11.9% |
| Watches ⌚ | 12.0% |
| Amazon Device Accessories 📱 | 11.3% |
| Computers 💻 | 11.4% |
| Consumer Electronics 🎧 | 11.2% |
| Jewelry 💍 | 10.8% |
| Video Game Consoles 🎮 | 10.7% |
| Pet Products 🐾 | 10.2% |
| Lawn Mowers and Snow Throwers 🌱 | 9.5% |
| Mattresses 🛏 | 9.3% |
| Baby Products 👶 | 9.3% |
| Automotive and Powersports 🚗 | 9.1% |
| Musical Instruments and AV Production 🎸 | 9.2% |
| Furniture 🛋 | 9.6% |
| Lawn and Garden 🌿 | 7.7% |
| Base Equipment Power Tools 🛠 | 7.1% |
| Electronics Accessories 📡 | 8.8% |
| Sports and Outdoors ⚽ | 8.7% |
| Tires 🚗 | 8.7% |
| Tools and Home Improvement 🛠 | 8.7% |
| Home and Kitchen 🍽 | 8.1% |
| Media – Books, DVD, Music, Software, Video 📚 | 5.1% |
| Fine Art 🎨 | 5.6% |
| Beauty, Health and Personal Care 💅 | 5.5% |
| Business, Industrial, and Scientific Supplies 🏗 | 6.0% |
| Video Games and Gaming Accessories 🎮 | 6.5% |
| Everything Else 🌐 | 4.8% |
| Gift Cards 🎁 | 4.8% |
| Amazon Explore 🌍 | 4.8% |
| Toys and Games 🧸 | 4.7% |
| Office Products 🖊 | 4.4% |
| Grocery and Gourmet 🥘 | 2.9% |